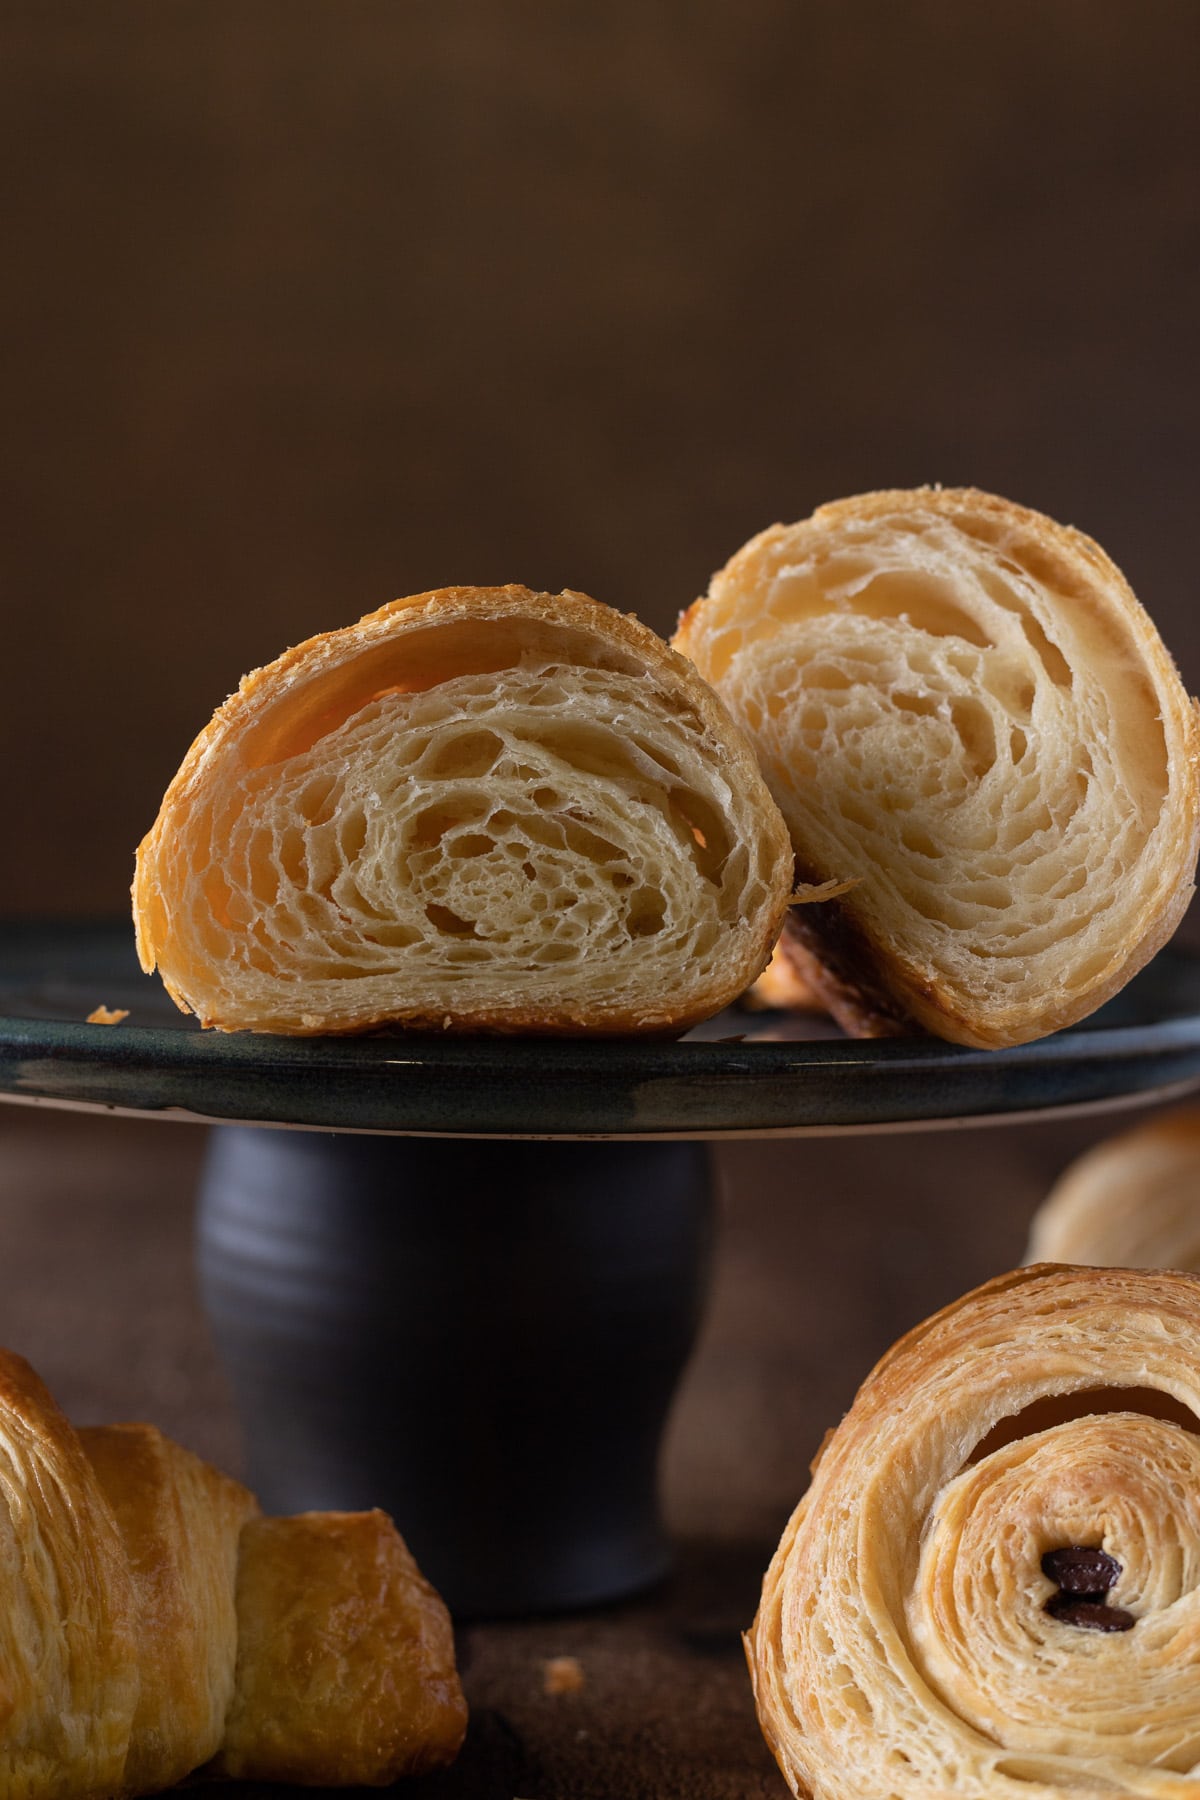
Learn how to make the most authentic French croissant recipe and chocolate croissants from scratch with over 40 step-by-step photos!
Most croissants served in the U.S. are an absolute abomination. In other words, they suck.
Most often shortcuts are taken and not enough butter is used in croissant dough.
The HOLY French croissant has been turned into a lifeless, sad excuse for a pastry. But we’re about to change that…
Making homemade croissants can be one of the most difficult baked goods to master.
An authentic French croissant recipe, the base of which can be formed into luscious chocolate croissants and an array of the most mouth-watering pastries you’ve ever eaten in your whole entire life, is a bit labor-intensive and can seem like too much work to be worth the effort.
Let me dispel this myth right here, right now.
With over 40 step-by-step photos you will learn how to make croissants that could be served in any of the finest pâtisseries in France!
I have received countless happy emails and testimonials from readers who’ve made these croissants, many who have never tried making them before.
Testimonials:
“I decided to make your recipe yesterday….It made my day when my teen’s eyes lit up when they bit into them saying they tasted just as good as the ones in France!… I never would have imagined I would be able to make authentic french croissants.”
“Great recipe! Very long process, but they will be the best you will have outside of France.”
Learn how to make croissants from a professionally-trained baker
I don’t say this to gloat, but merely to explain how I learned to make the holy grail of French pastries. I had the great pleasure of attending The French Pastry School’s artisan bread and pastry program in Chicago a few years back and be taught by award-winning bakers from France. I had eaten croissants before going to school here, but never could have imagined the life-changing experience of trying an authentic artisan croissant.
The difference in making croissants at home
Professional bakeries use dough sheeters which actually role the dough out for you in a matter of seconds. This allows for less time for the gluten to be manipulated, and less time time for the dough to get too warm in between “folds”.
The result is the flakiest, most perfect pastry dough imaginable.
After making croissants at home 20 -30 times, I knew I needed to make adjustments to the recipe to accommodate for several issues I was constantly running into. The extra time it takes to roll out the dough by hand can result in the dough tearing because the gluten gets overworked or the dough is too warm and butter oozes out of the dough, which can keep it from becoming flaky.
On top of the adjustments to the croissants recipe, I also wanted you to visually see what the dough should and shouldn’t look like each step of the way.
This post might seem a bit overwhelming, so I set out to create my own video course to show you that making croissants is TOTALLY possible no matter your baking experience. From novice bakers to professional chefs, my video course on Skillshare will walk you through the process and make you feel like I’m right with you in the kitchen!
Photos can only show so much. What you need is someone showing you exactly how the dough moves in your hands.
Click the purple button below to enroll in my Skillshare class for how to make authentic French Croissants!
The secret to achieving a flaky crust
When you bite into a croissant, it should be so flaky that you get crumbs all over you and should also have that intense CRUNCH when you bite into it. This experience is nirvana! The trick to getting the flakiest texture comes from two main components:
- The temperature of the dough and the temperature of the butter folded inside the dough should be cold, but not so cold that the butter breaks into pieces when you roll it out.
- The gluten in the flour should not be over-worked. The more you fight against rolling out the dough, the longer it will take (which causes the dough to become too warm), and the tougher the croissant will be.
As you will see in the photos below, getting to that sweet spot in between too warm and too cold will make the dough easy to roll out, in turn making the process of making croissants MUCH easier.
What kind of flour, butter, yeast, and salt should I use for croissants?
If you are a professional baker making the most authentic croissants, chances are you are using a flour that has a protein content around 11-12%. The percentage of protein in flour is important because it tells you the strength of the gluten structure.
Too much protein (around 13%) yields a really chewy texture which is better for bagels. Too little protein yields a structure that is too weak for croissants, but is great for certain cakes where a lighter-than-air texture is desired. When baking croissants at home, I always use 100% Organic Bread Flour from King Arthur Flour.
Per a reader comment, I updated the recipe to half bread flour and half all purpose flour. Non-organic flour works, but with the over-usage of toxic pesticides in wheat crops today, it’s much better for the planet (and for the wheat crops) to buy only organic flours if possible.
Butter
As for butter, the higher the fat content, the better.
In France, cows are grass-fed. They are eating the food nature intended, and when this happens they make the most incredible butter.
Butter from grass-fed cows has a higher fat content, but also contains CLA which is a powerful antioxidant. Like organic flours, if you are going to buy butter, I recommend it be from grass-fed cows.
Even if a butter says “organic” on the label, that doesn’t mean the cows are grass-fed. Kerrygold butter is one of the best butters available. I know it’s more expensive, but buy less, and enjoy higher quality if possible.
Salt & Yeast
I like to use sea salt exclusively for baking because of its clean flavor, especially celtic sea salt, but any sea salt will do.
Yeast can be more confusing, as there are several different kinds to choose from. For at-home baking, active dry yeast is generally best because it’s most readily available at grocery stores.
However, this type of yeast needs to be activated with warm water for a few minutes before adding to your dough. Professionals mostly use instant dry yeast (or instant yeast) because it doesn’t need to be activated with warm water. You just add it in with the rest of your ingredients, and the water will activate it.
The measurements for both are the same, so there are no adjustments to the recipe.
Grocery stores in the U.S. now carry Rapid Rise Yeast, which is the same thing as instant yeast. Just check the label to ensure you don’t have to activate it with warm water.
No need to worry if you are confused. Just remember, active dry yeast needs to be activated with warm water, while instant dry yeast is activated instantly with any temperature of water. In the recipe, I give you options for both.
You can add a sourdough culture to the dough!
You can actually make this recipe with a sourdough culture too. You will have to make sure that you still use dry baker’s yeast too, because otherwise your croissant will be like a brick. The extra butter in the recipe will make it hard for the dough to rise enough with a sourdough culture alone.
The recipe will be exactly the same, just simply add 60 grams of sourdough culture (about 1/4 cup) to the dough when mixing.
Additional tools for this recipe
I have included U.S. measurements (cups, teaspoons, etc) and measurements by weight.
Weighing your ingredients instead of measuring with cups and teaspoons is actually MUCH easier and way more accurate. When I bake croissants and artisan bread at home, I ALWAYS use a digital scale. It can measure in grams, ounces, and pounds.
Just remember to “tare” or zero out your scale after weighing each measurement so you get the right amount. I have been using this digital scale for a few years now and I love it!
Ok now let’s get to baking those croissants, shall we?!
Making the best authentic French croissants requires a one and a half to three day process.
This is because you are letting time and long fermentation add the most amazing natural sweet flavor.
Long fermentation not only yields unmatched flavor, but it also helps to create enzymes in the dough that actually help your body to digest it. I could go on and on about this topic, but I won’t bore you today.
The first day, you are only mixing the dough and making the butter book or “beurrage”, and time does the rest of the work. The second day is where you fold in the butter into the dough with 30 minutes in between to rest in the fridge. I like to start this recipe late in the evening, then finish it the next morning.
A “fold” or “turn” is the term used for rolling out the dough and folding it like a book to create layers and layers of buttery dough. Three single folds (which is what we use for croissants) lends 163 layers of butter and dough!
This recipe is the maximum quantity you should use in a 5 qt. Kitchenaid Stand Mixer. However, a Kitchenaid won’t do a good job creating a soft gluten structure. It can overwork the dough and make it tough.
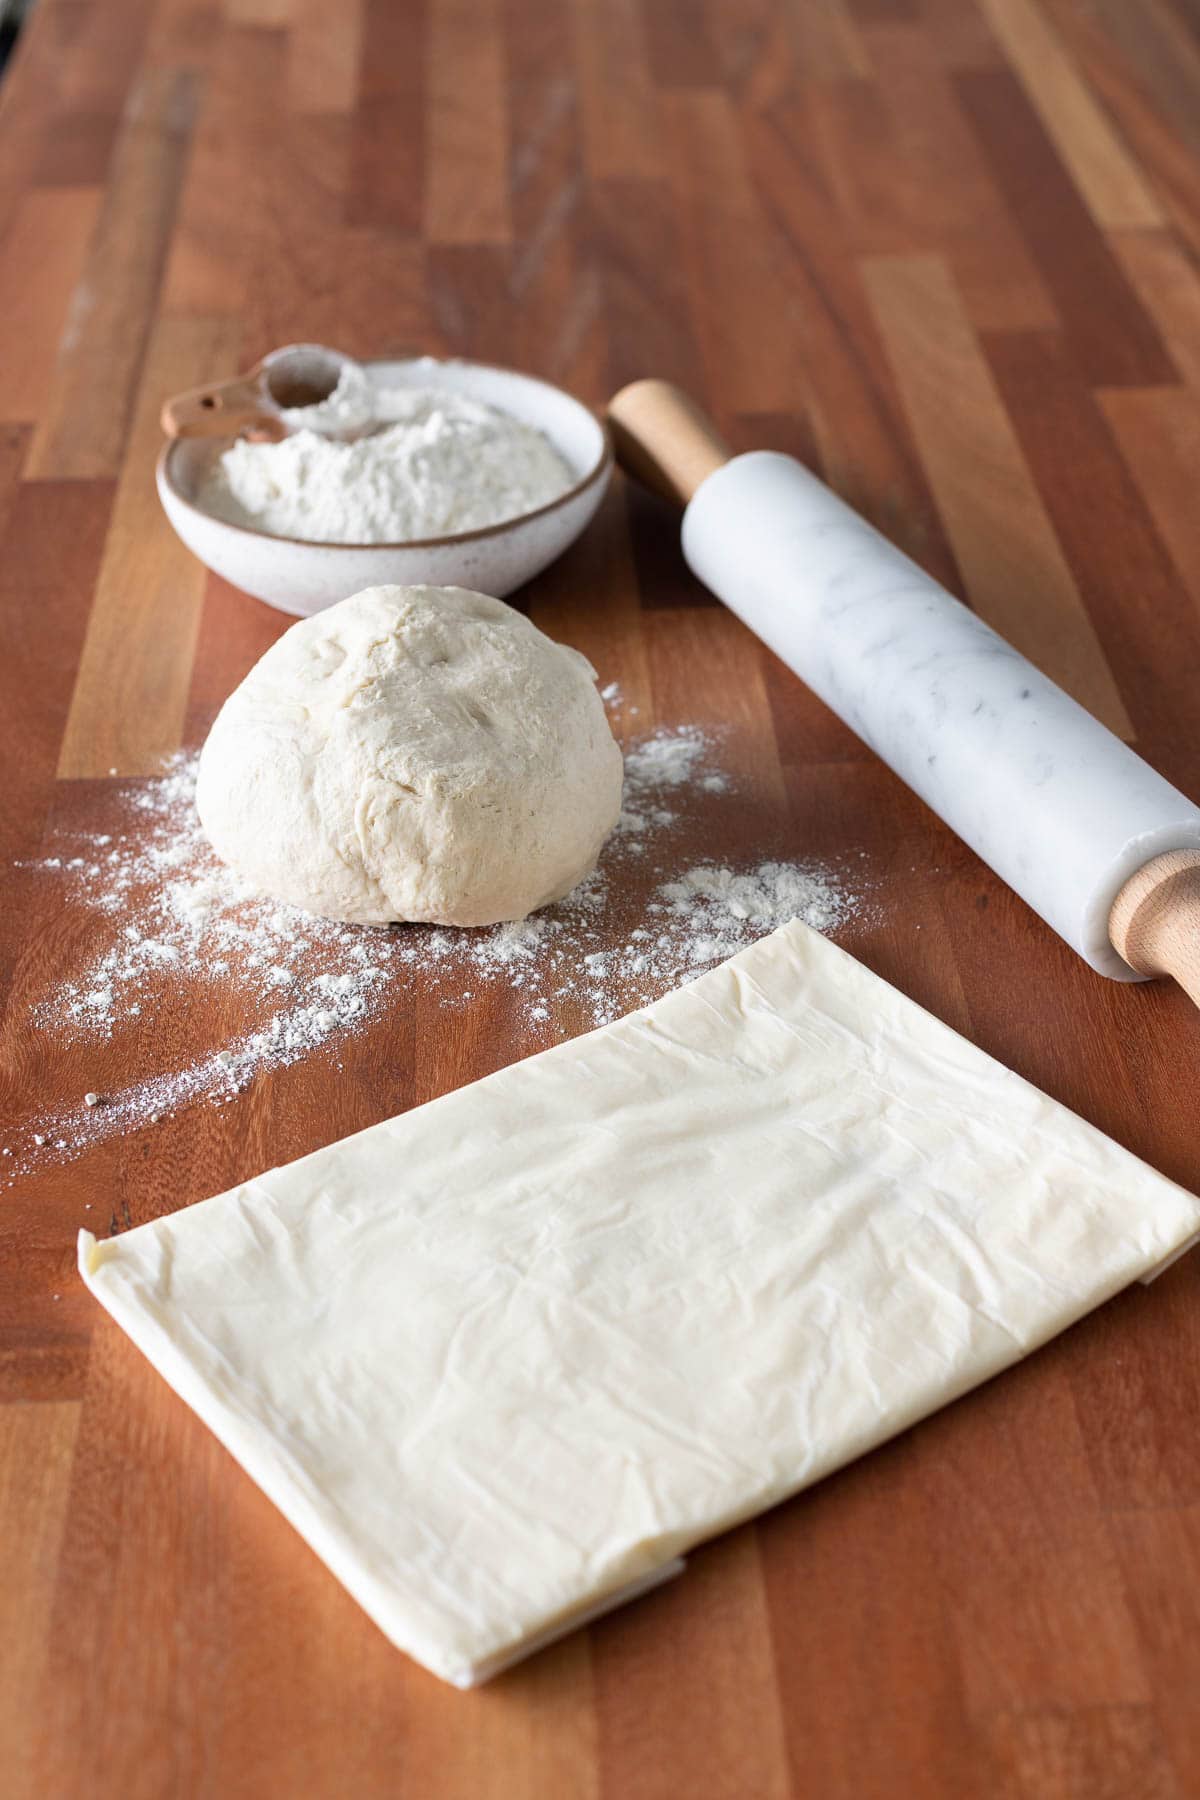
I have found that it’s best to start the dough in the mixer and mix only until the dough comes together. Next, take the dough out onto a floured surface and knead by hand until the dough is soft and the butter is incorporated. We only add a small amount of butter to the dough while mixing, and the rest will be folded in the next morning.
Add the dough back to the mixing bowl and cover with plastic wrap, let ferment at room temperature for 30 minutes. This will activate the fermentation process.
It then ferments overnight in the fridge. The long fermentation time will create a lighter croissant texture.
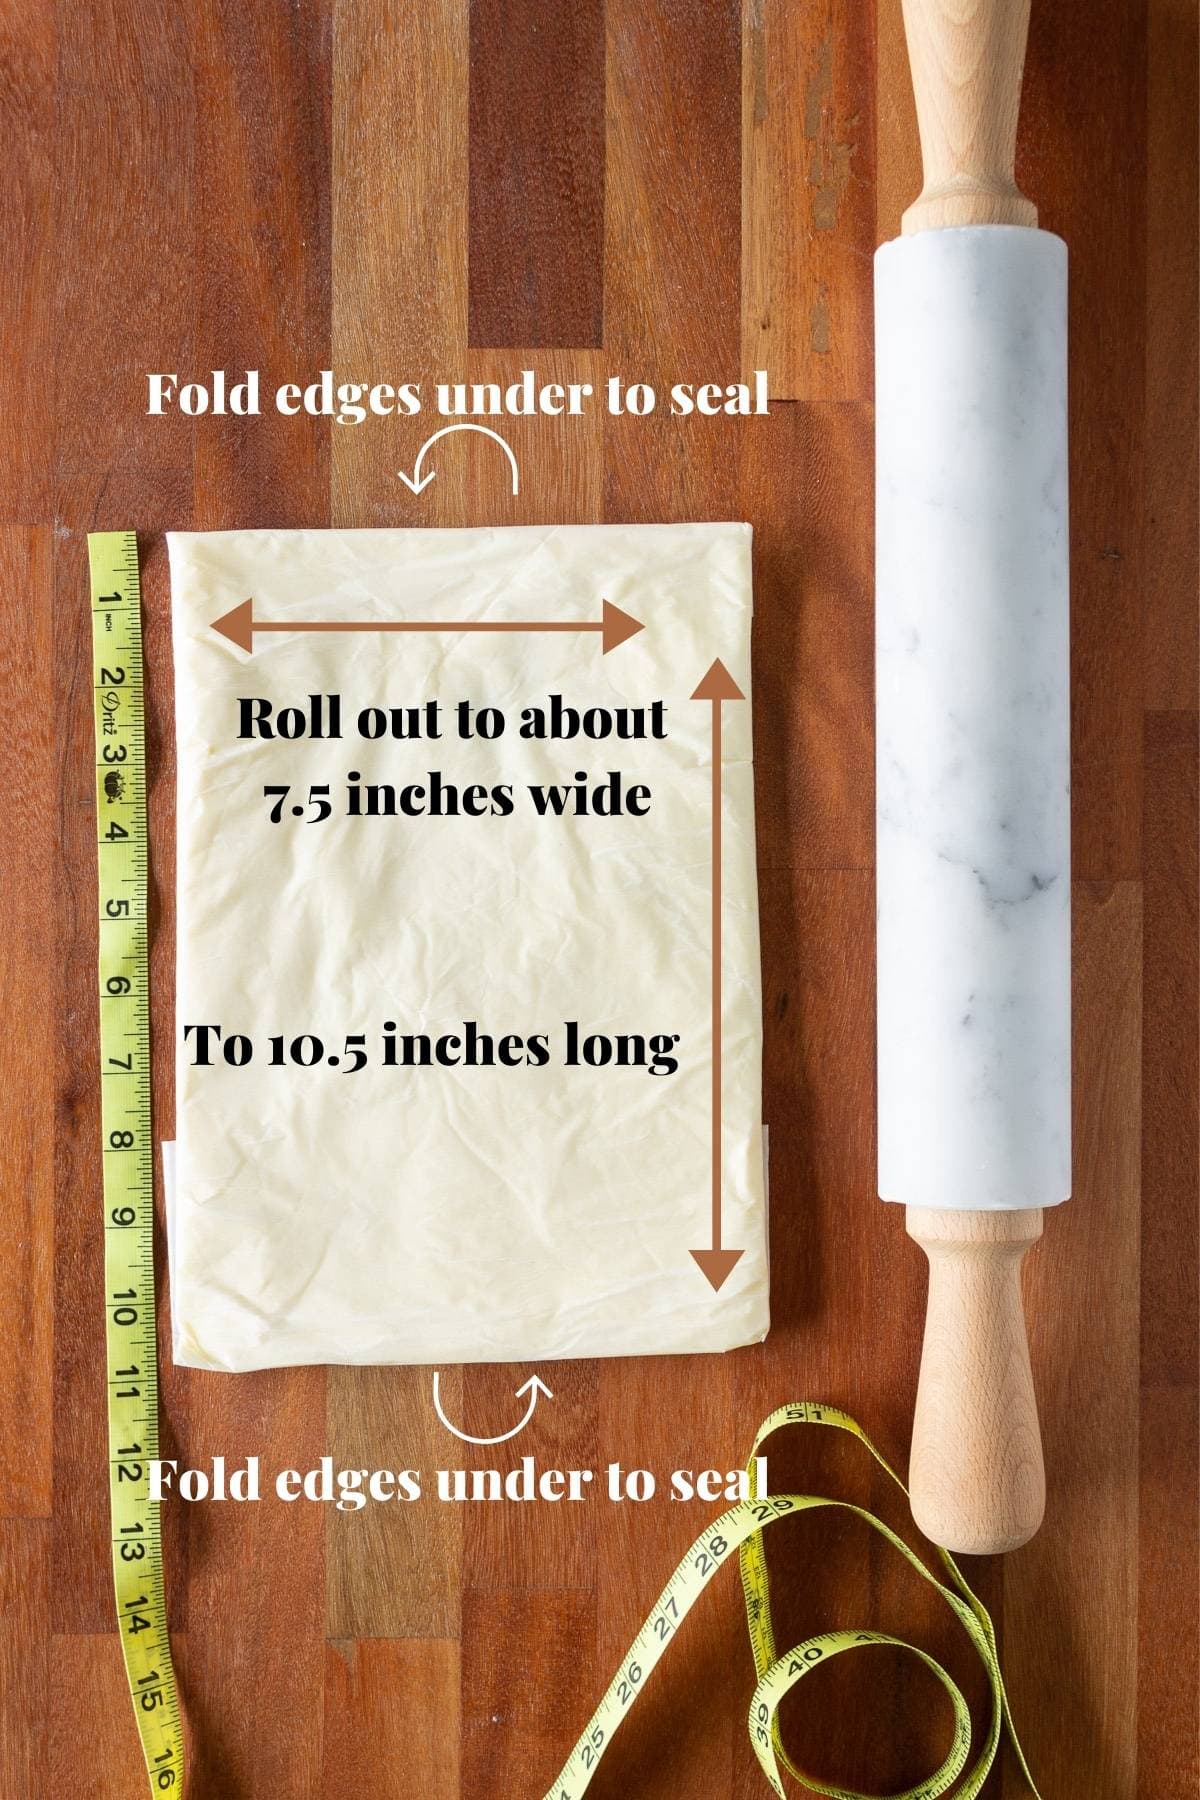
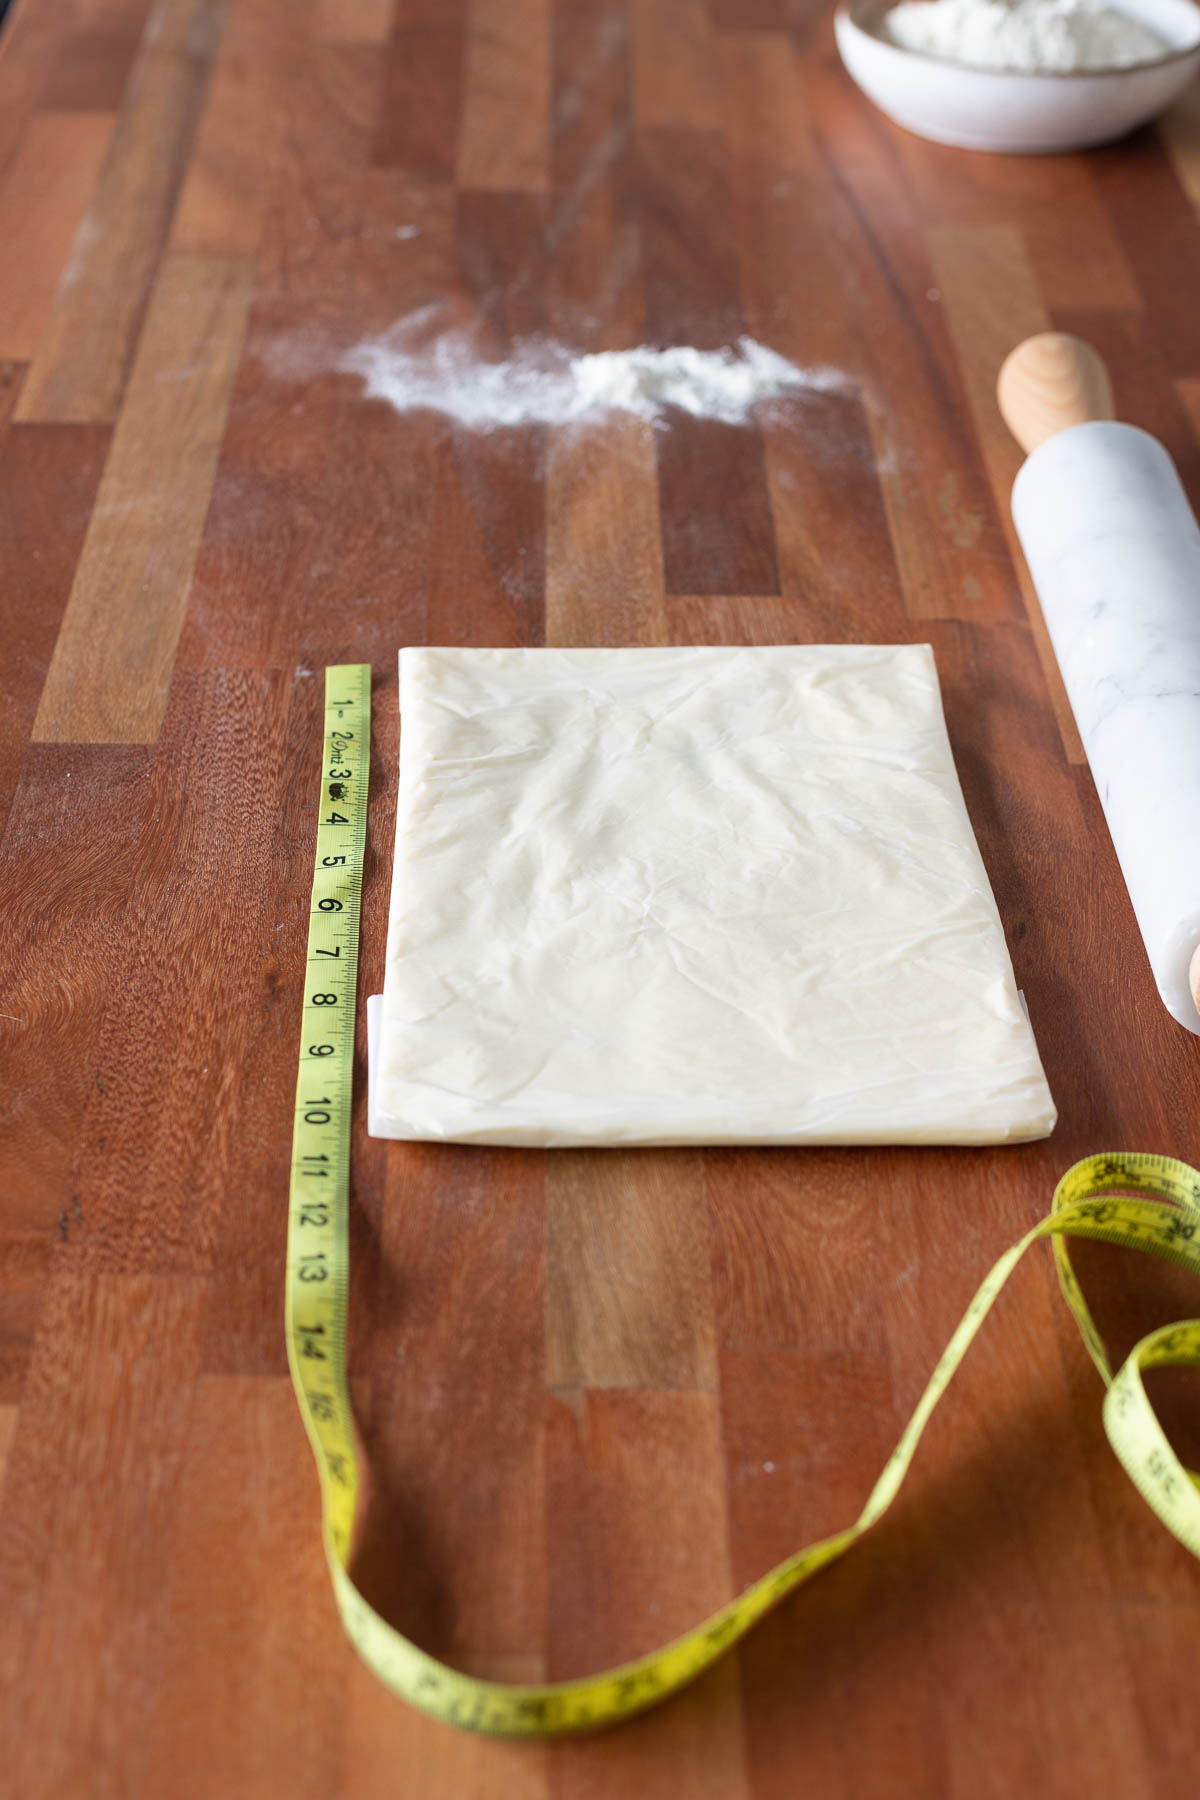
While the dough is resting at room temp., make the butter book or “beurrage”. Parchment paper works great for this. You can fold the parchment paper to an exact size and form the butter inside the rectangle. You just need to overlap the parchment paper and fold in the edges to seal it so the butter doesn’t ooze out while you are rolling it.
Give the butter some time to soften at room temperature so it becomes easier to roll out. This way you won’t need to add a lot of pressure and the parchment won’t break.
If the parchment paper breaks, just cover it well with plastic wrap before you put it back in the fridge.
As you can see below, I turned the butter book over after sealing the edges, then gently rolled the butter so it was level and smoothed the butter all the way to the corners. Place the butter book in the fridge overnight along with the dough.
Day Two
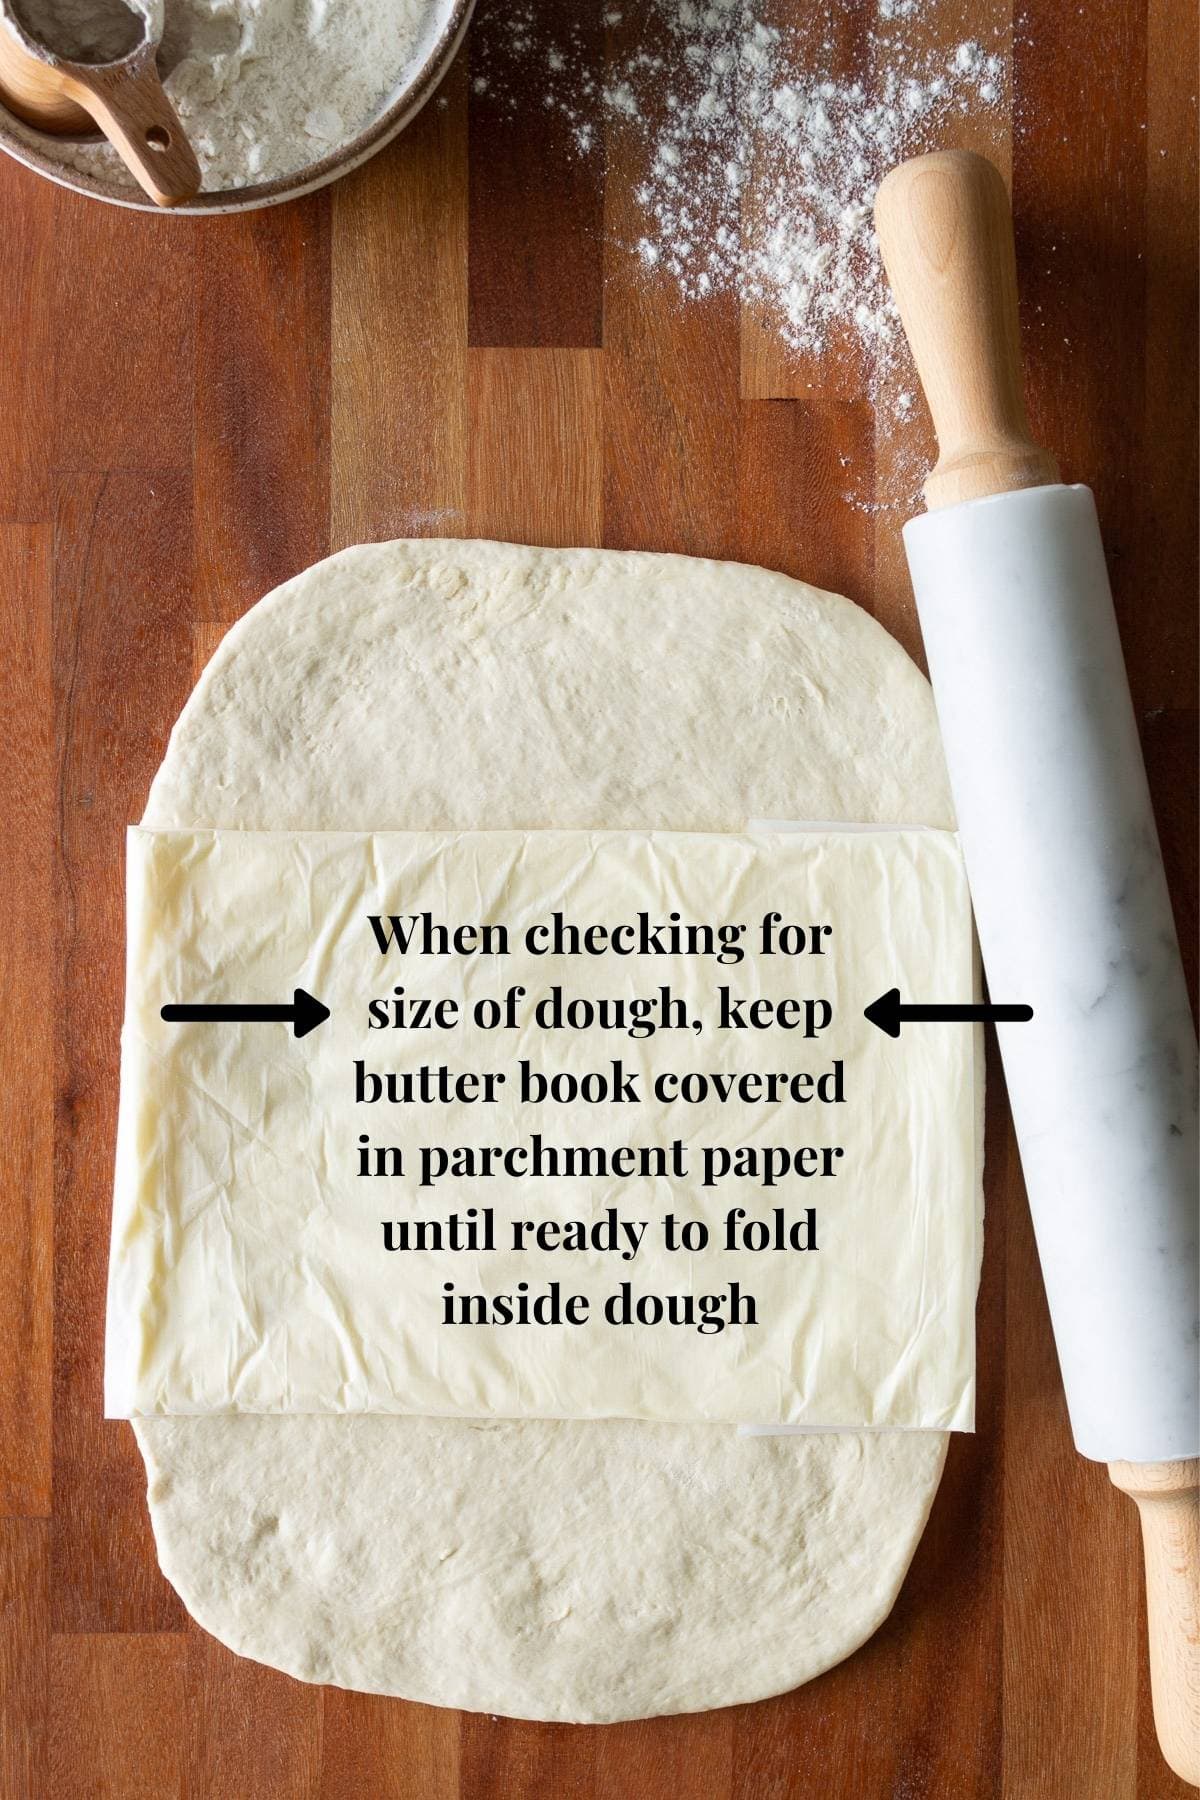
Take the dough and the butter book out of the fridge. Flour a work surface. You can use a dining room table because it’s nice and long. You will need to eventually roll out the dough to about 25-27 inches long, so you need a long space to be able to lean forward into the dough.
Try to work quickly, as the dough will start to warm up the longer it’s at room temperature. Turn the dough bottom side up and flatten it out with your hands and a rolling pin to a rectangle.
Try to add as little flour as possible. Just flour the rolling pin itself if needed.
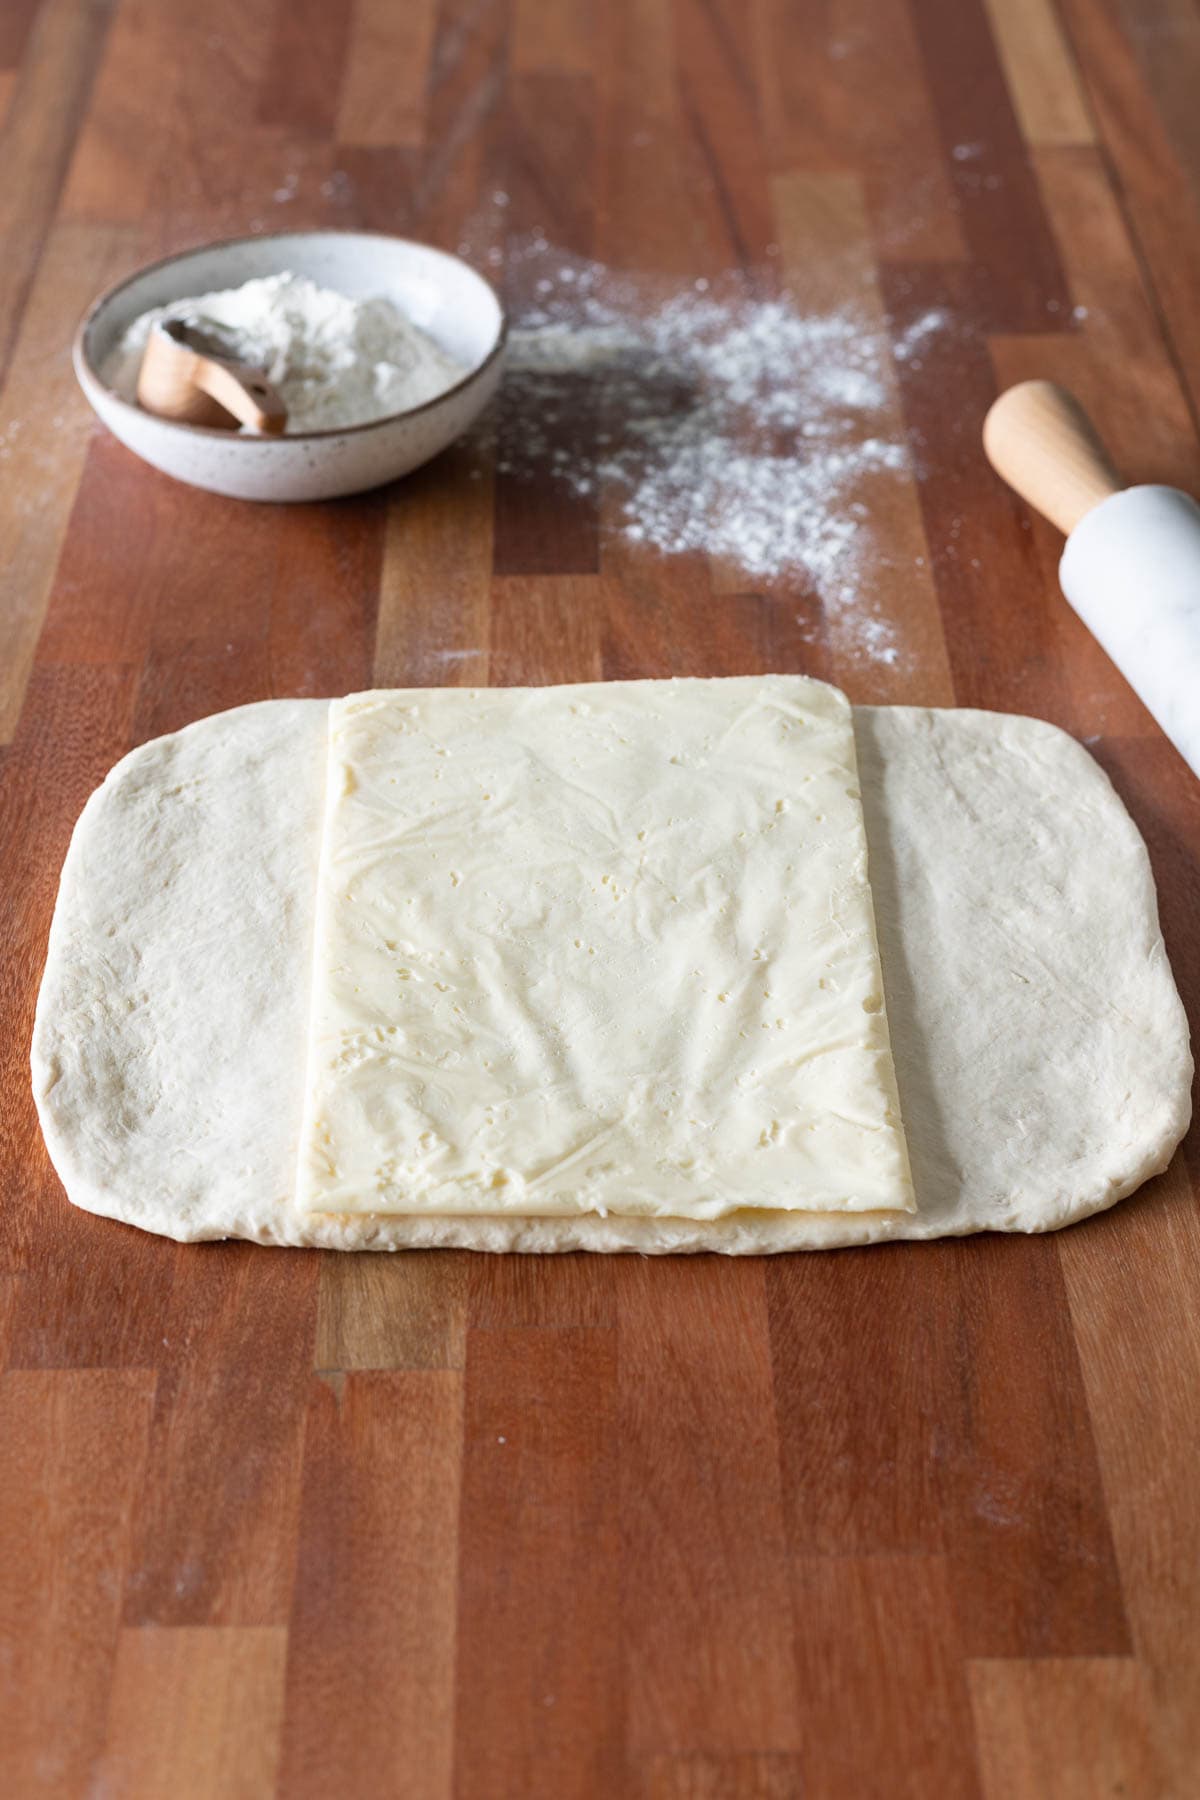
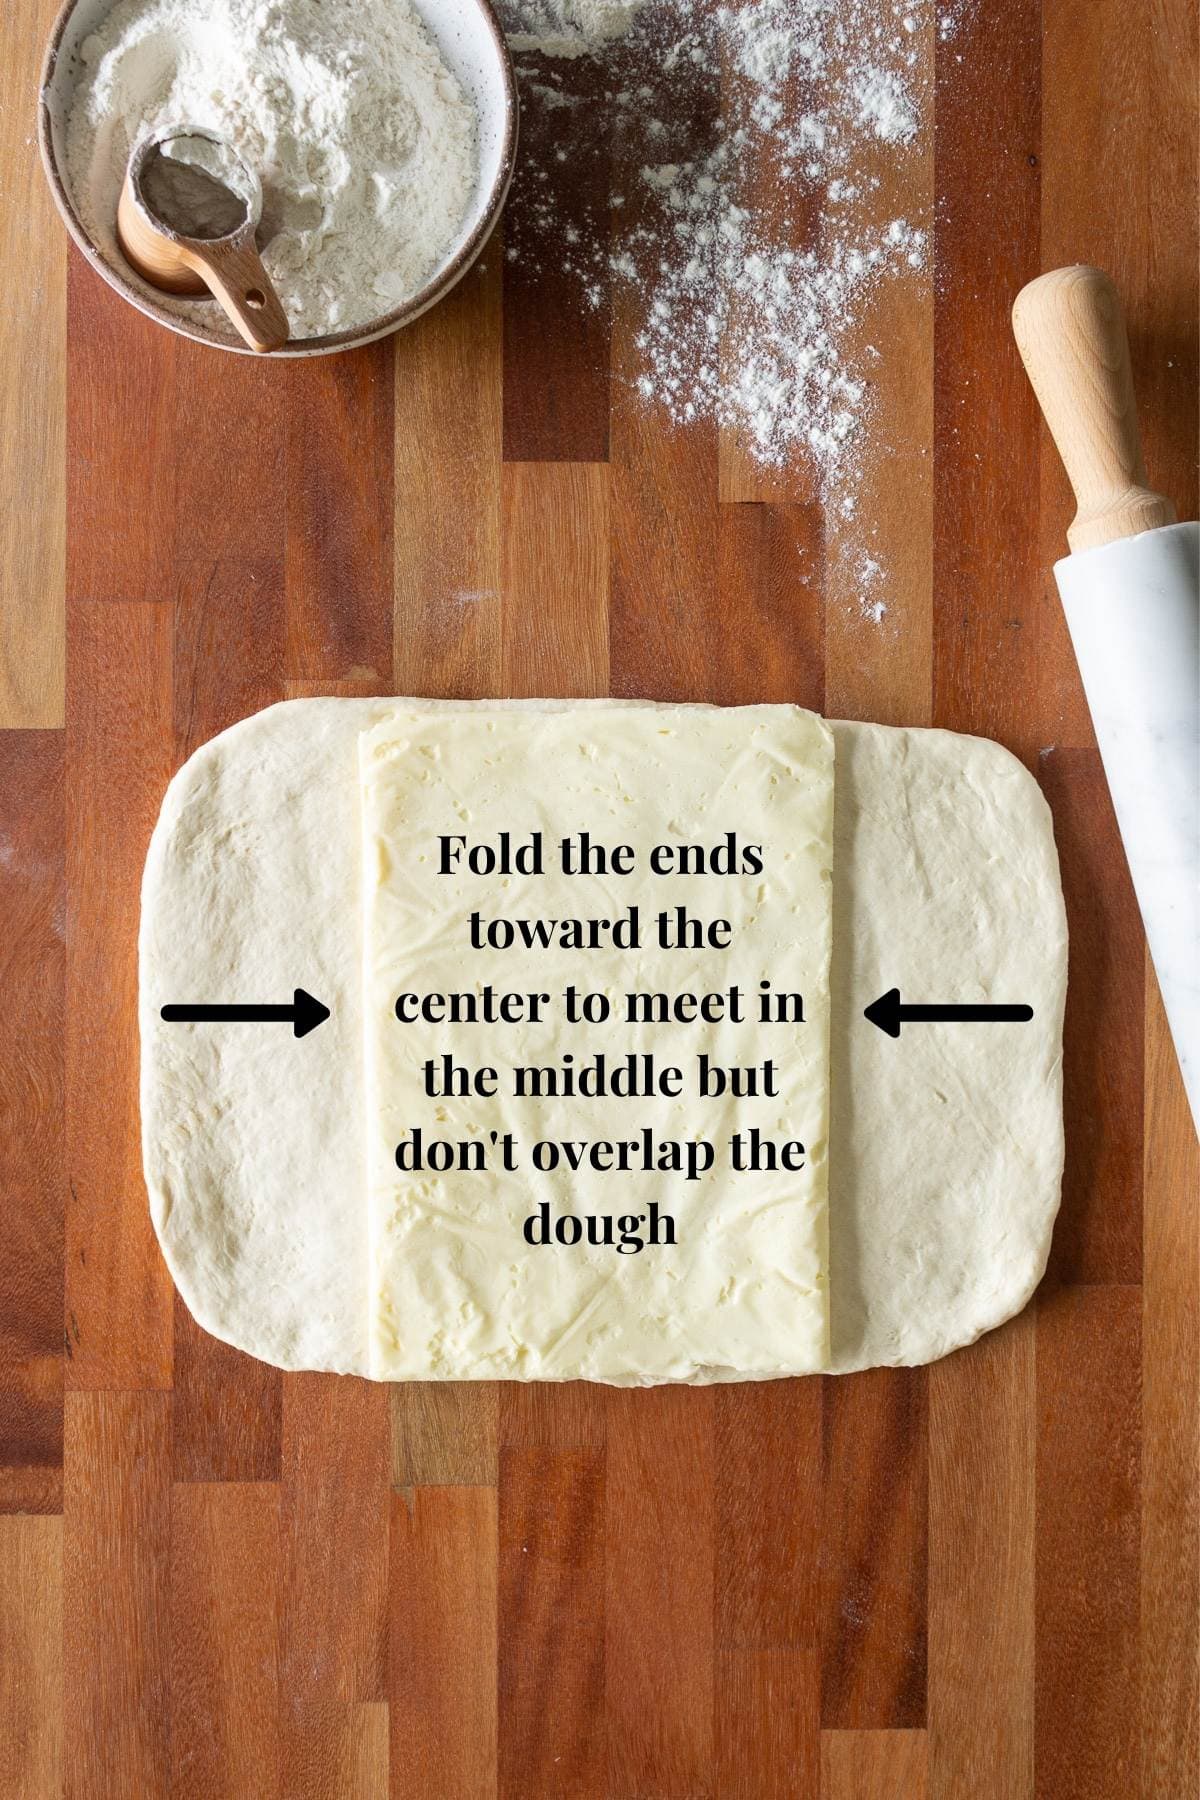
Before you fold the butter into the dough, place it on top of the rectangle width-wise. You want the dough to fold perfectly over the butter without any overlap. See the two photos below for illustration.
If the dough doesn’t cover the butter completely, roll out a bit more. Keep putting the butter book on top and folding over the dough into the center until it’s a perfect fit.
You can use your hands to pull the dough in an inch or so to seal it. Unwrap the butter on one side and press it into the dough to help it form with the dough. Remove the parchment paper.
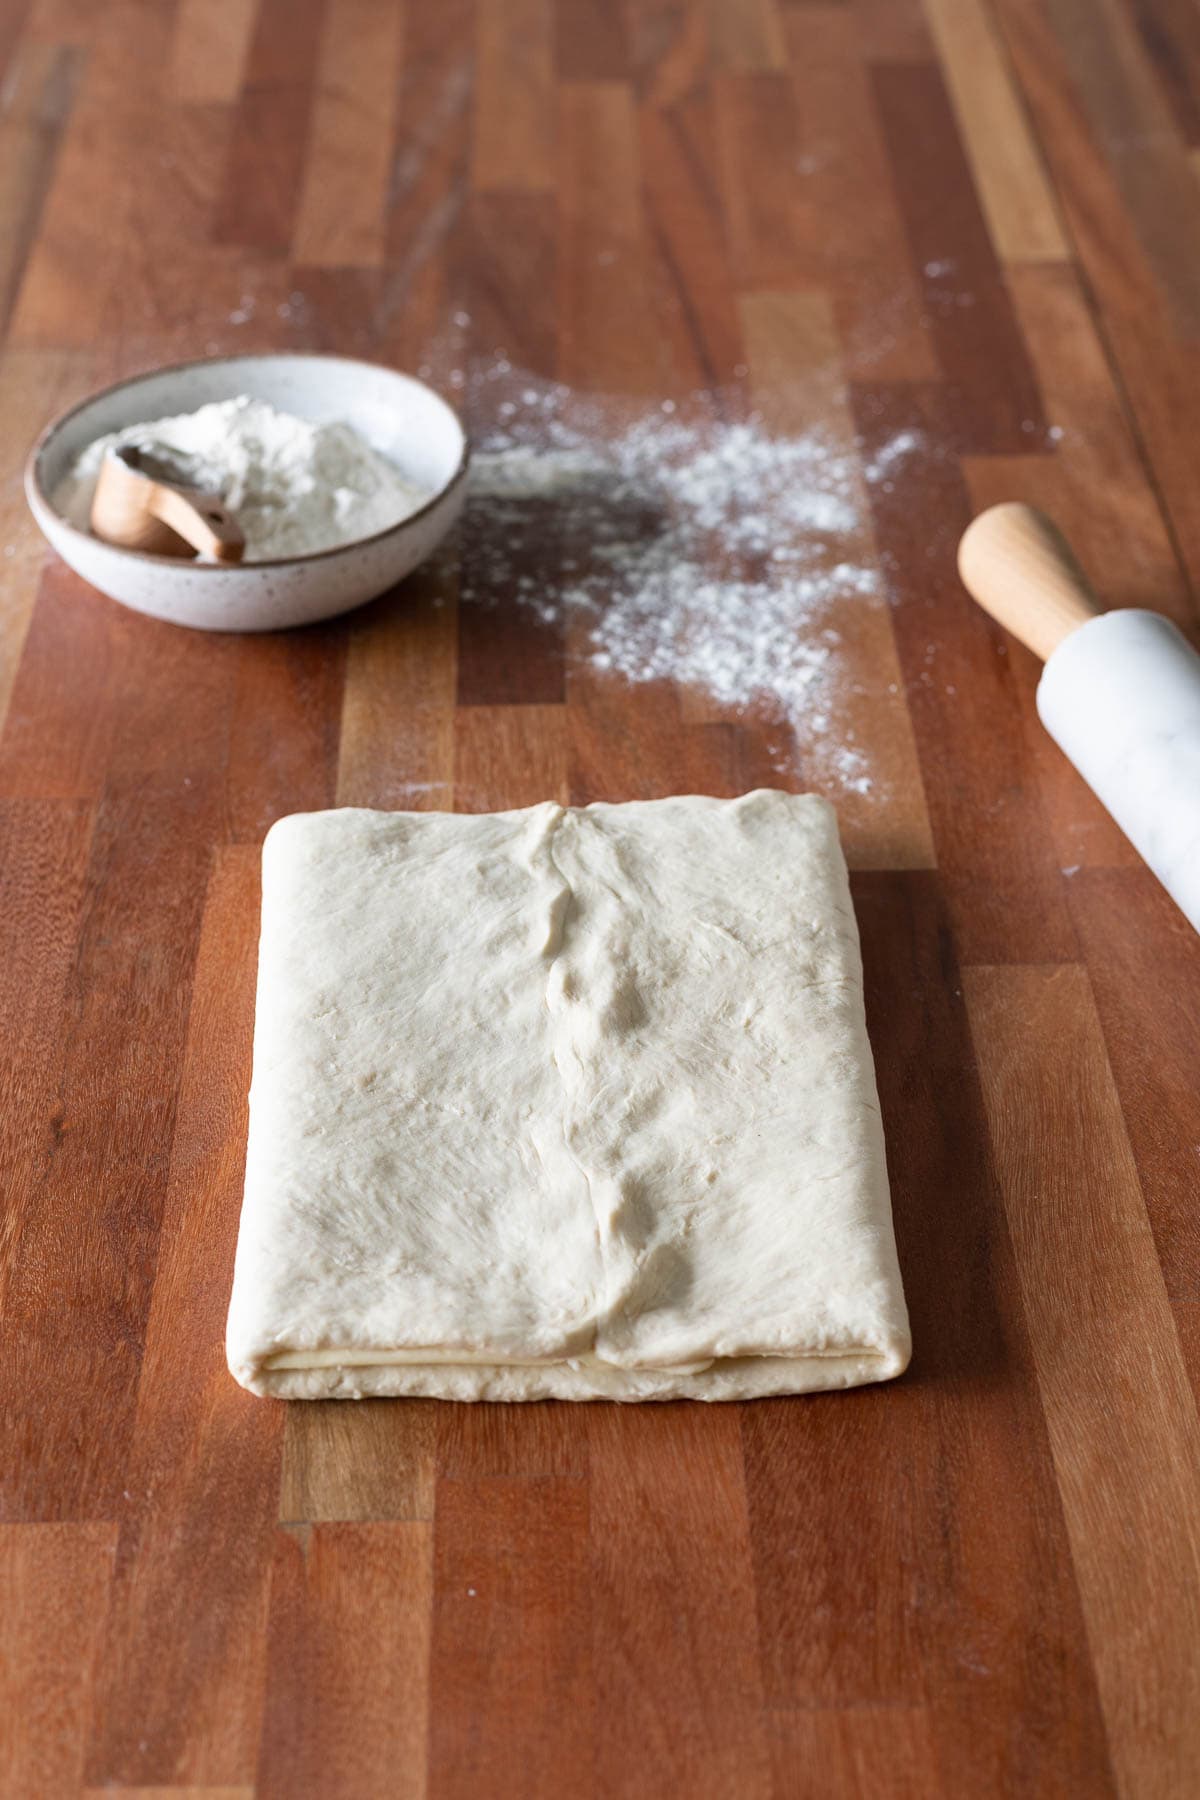
Fold the dough toward the center without overlapping the dough and seal the edges together with your fingers. You want the perfect dough/butter layers, so overlapping the dough will mess that up.
Turn the dough a quarter turn so that the seal is pointing long ways. As you can see below, the dough acts like a book over the butter, without overlapping.
As shown below, seal the ends with your fingers so that the butter won’t ooze out while rolling.
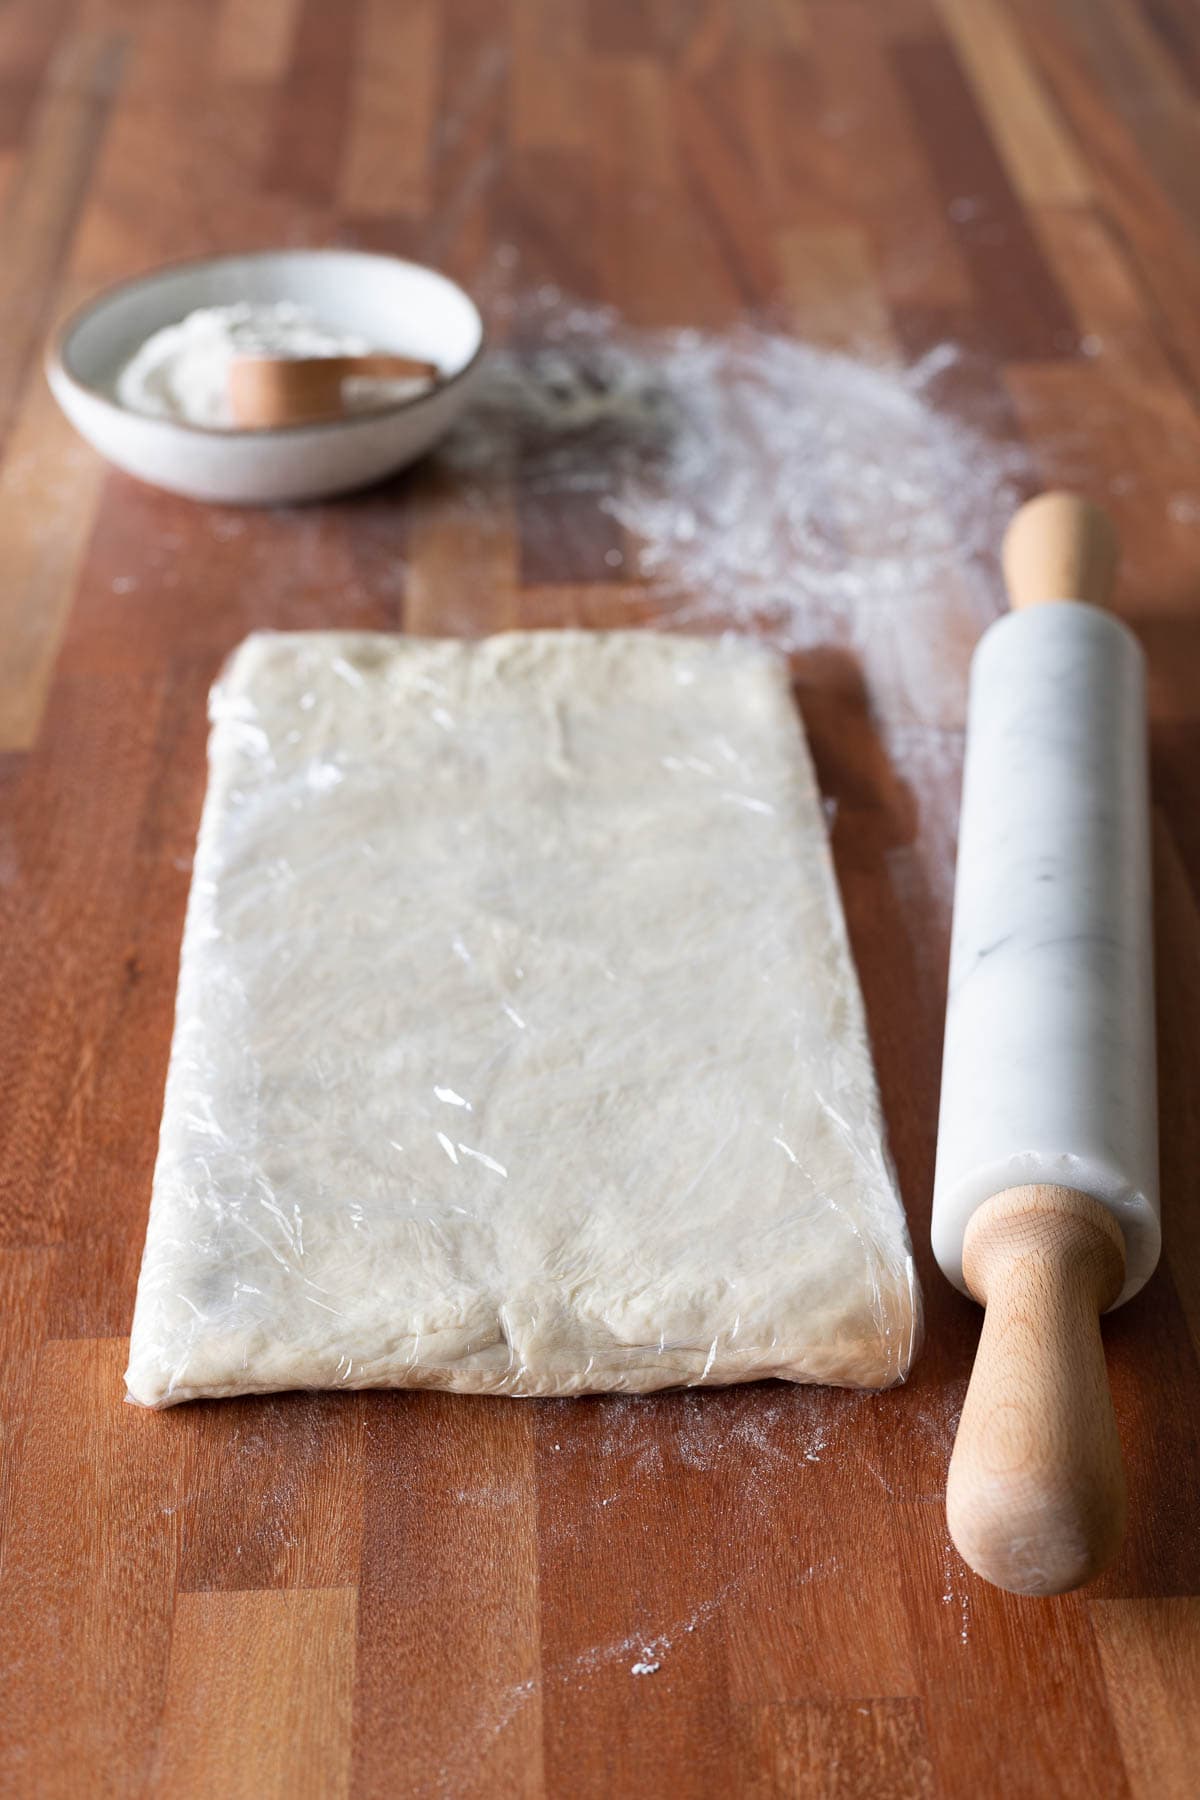
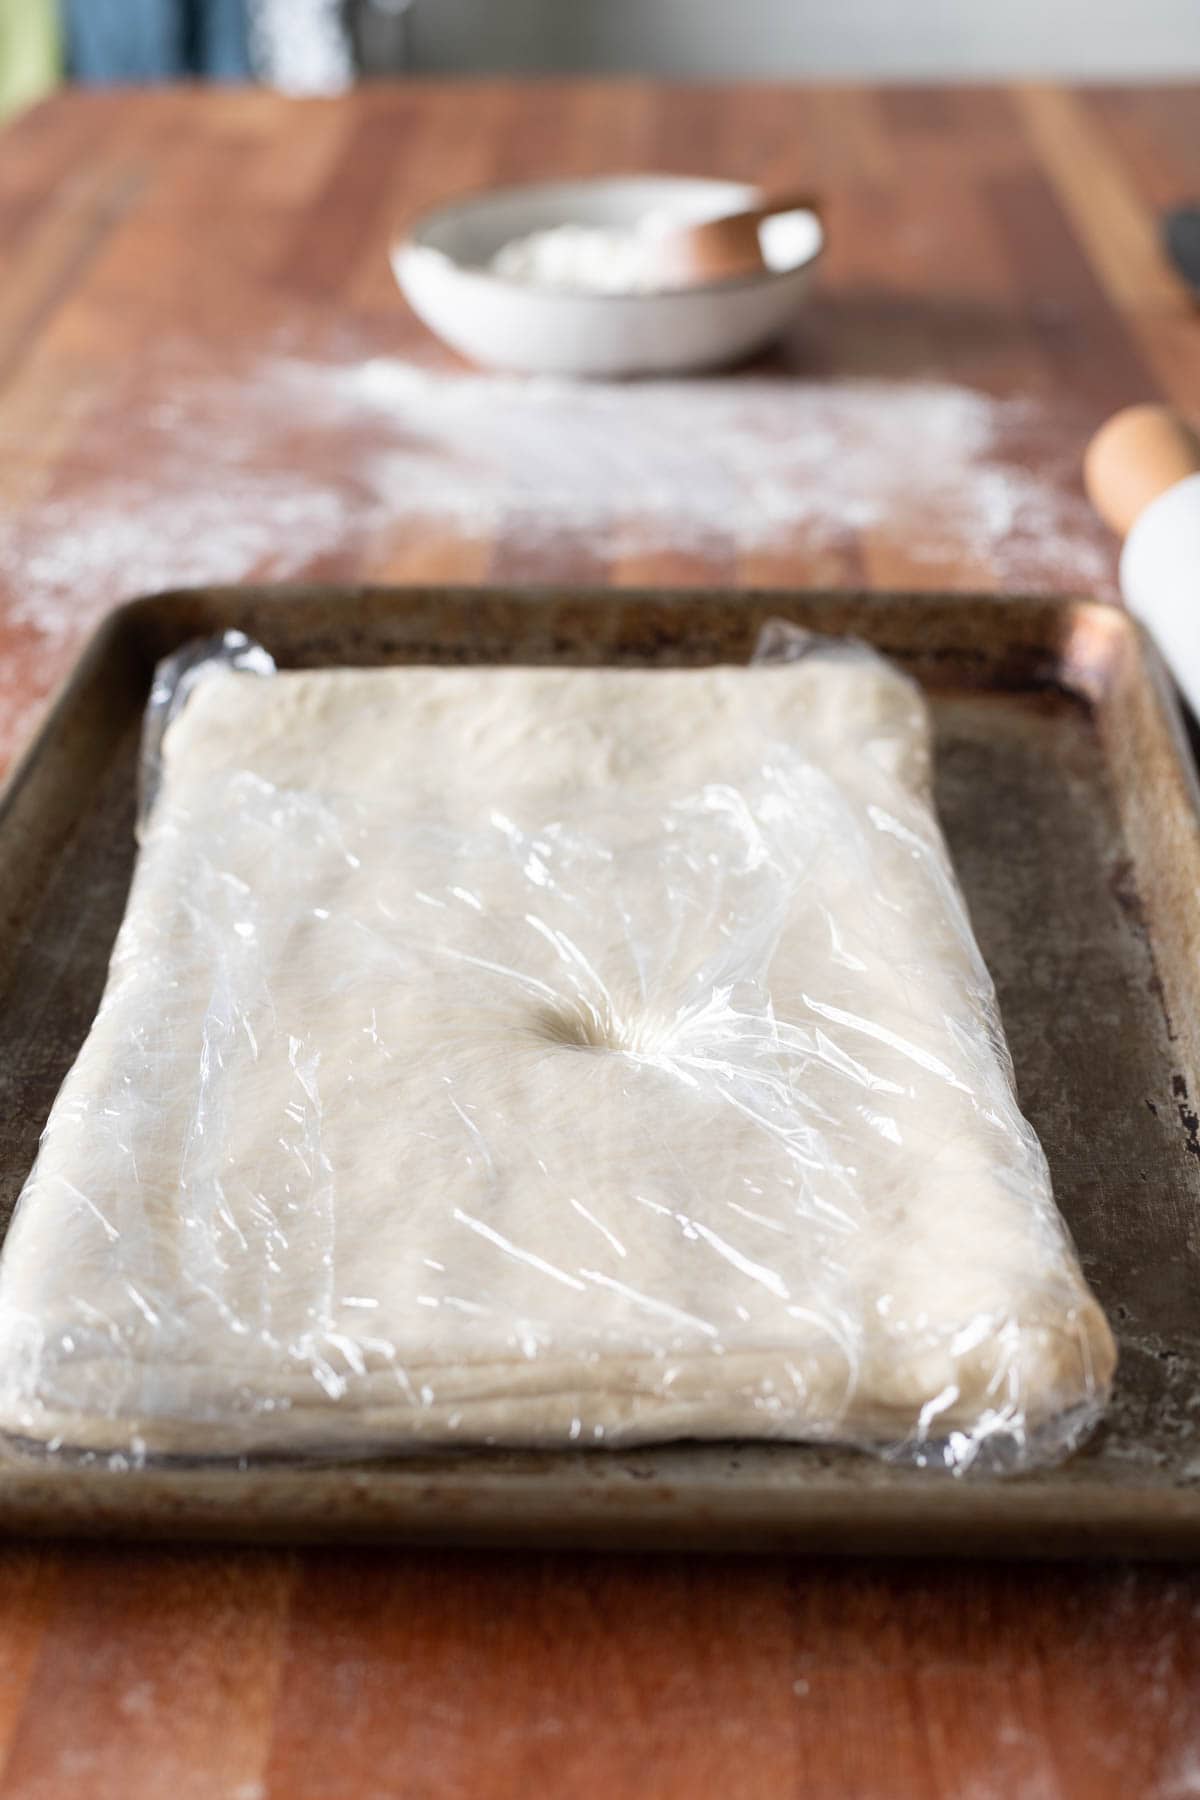
Now wrap it really well with plastic wrap, making sure there are no openings. Otherwise, it will dry out the dough. Place in the fridge for 15-30 minutes, until nice and cold.
Why does the dough need to rest in between folds?
I know it may be tempting to try to speed up this process, but you will only tear the dough or warm it up so that the butter oozes out and messes up the layers of flaky dough.
You need to let the dough rest in the fridge for about 30 minutes in between the initial folding of the butter into the dough, and in between each of the three folds because the temperature of the dough and the butter needs to be cold.
If the butter is too cold though, the butter will break into pieces inside the dough. You can easily see this happen, so you will know if you need to stop rolling and let it warm up for a few minutes. If you set a timer for 30 minutes to rest it in the fridge, chances are your dough won’t get too cold.
You might also think it’s a good idea to rush the chilling process by popping it in the freezer, but the gluten in the dough also needs to relax. If it’s in the freezer for 30 minutes, it will be rigid when it comes out.
If you only freeze it for 10-15 minutes, the gluten won’t have enough time to relax. When the gluten is relaxed it will roll out with ease and you won’t overwork the dough. So just be patient with this process, IT’S TOTALLY WORTH IT!!!!
Alright, now we are officially going to start creating those flaky 163 layers of dough!
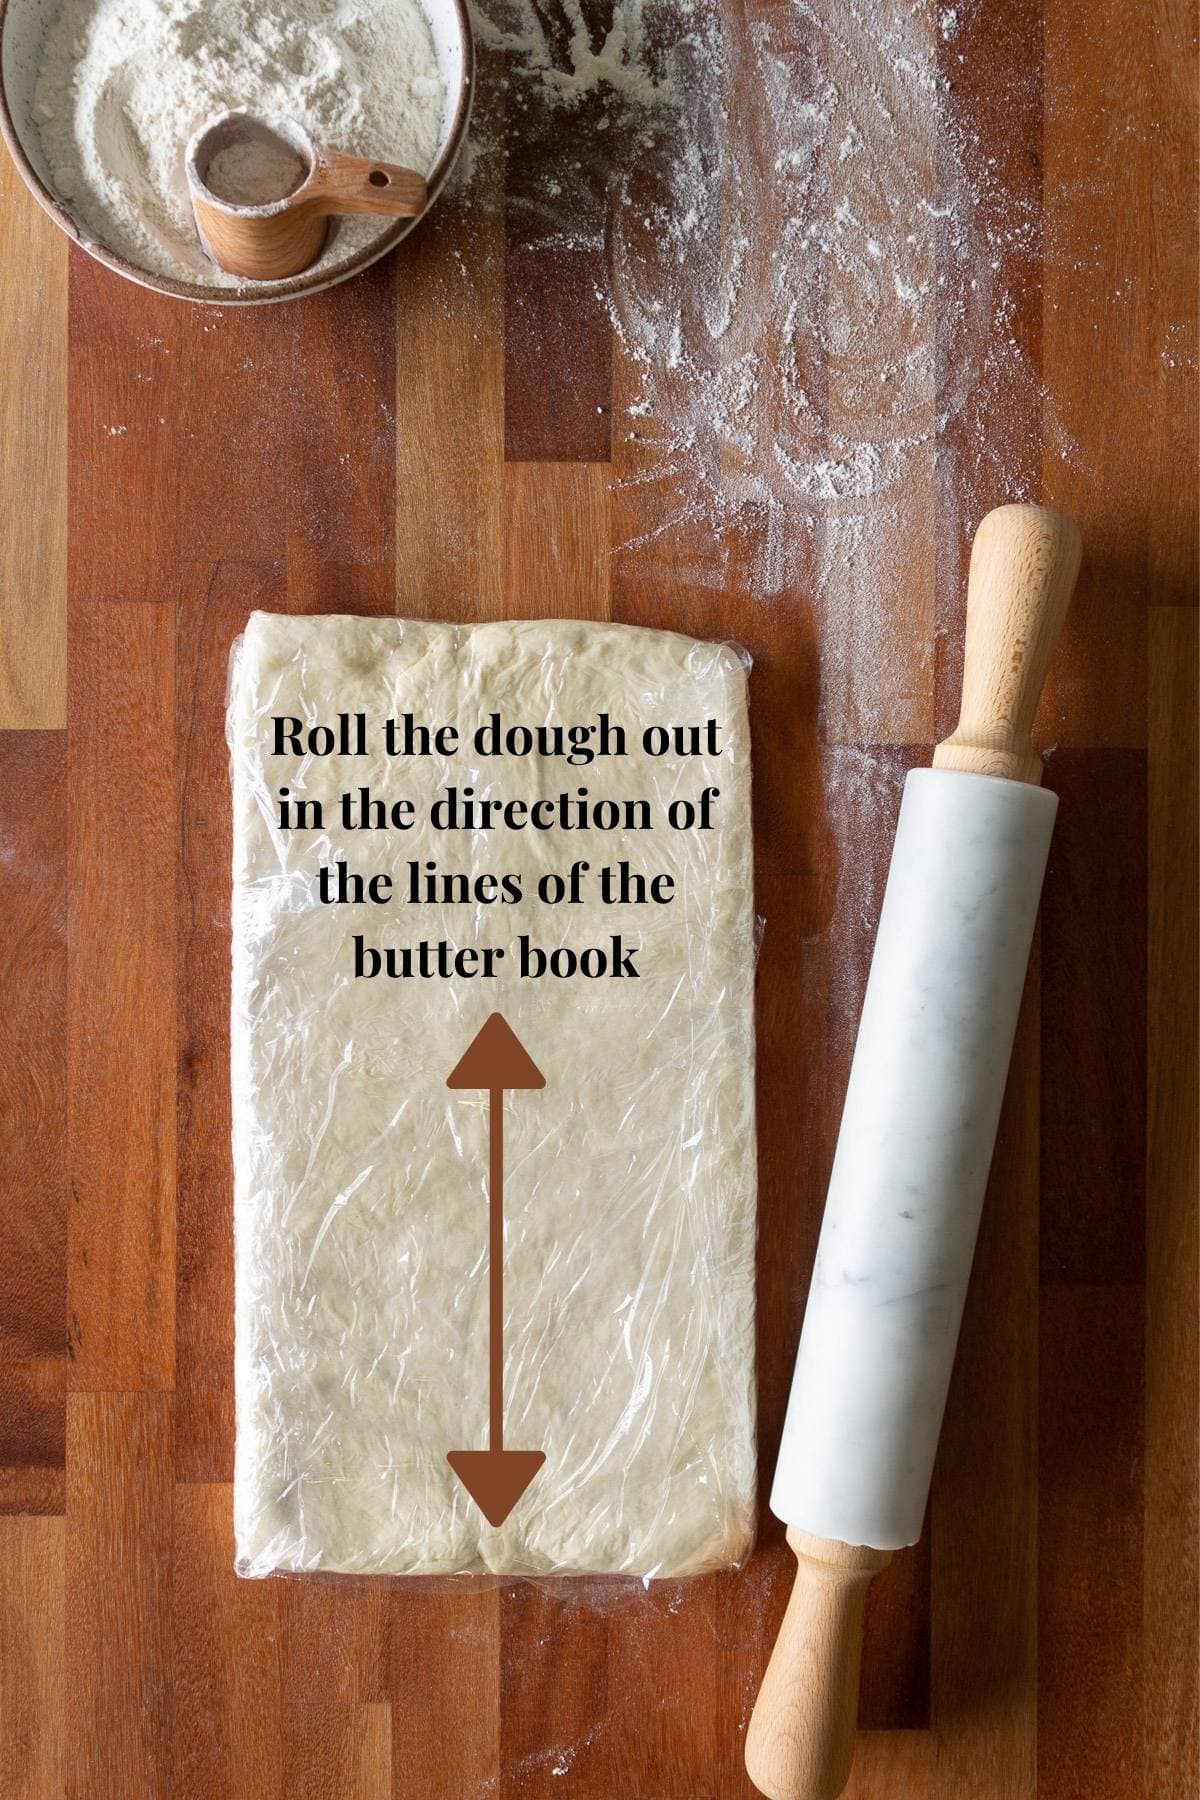
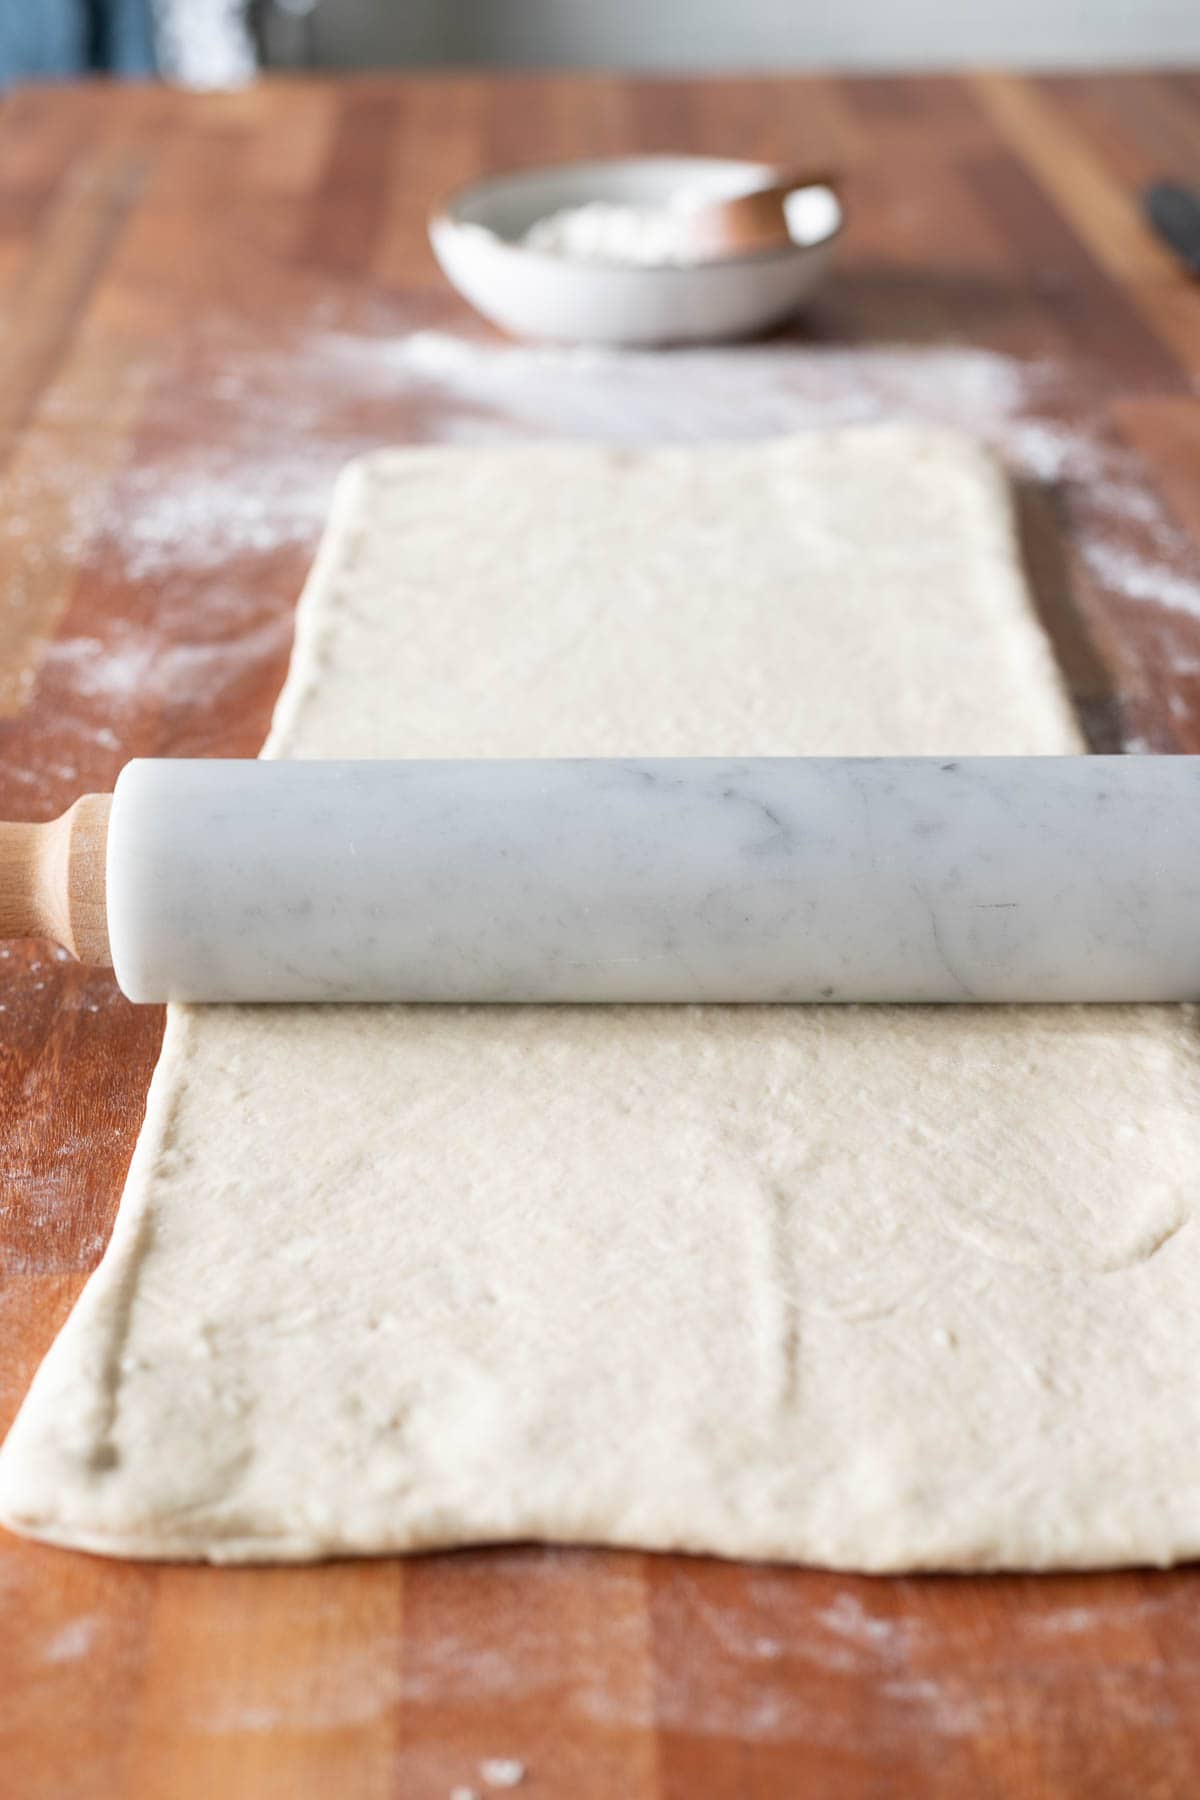
We are going to roll it out in the direction of the lines in the center of the book as shown above. Remove the dough from the fridge and take the plastic wrap off.
Save the plastic wrap as you will need to recover it after each fold. Flour your work surface and flour the top with a bit of flour, not too much though. Roll it out to about 20-24 inches long, working quickly, but not tearing the dough. Occasionally glide your hands under the dough to keep it from sticking.
Add a little flour at a time underneath as needed. Also roll it out a bit width-wise as well, but not too much.
Again, the dough and butter should roll out uniformly without the butter breaking or oozing out. If the butter starts to break, stop for a couple of minutes and let it warm a bit. If the dough oozes out or the dough tears, you need to cover it with plastic wrap and place it back in the fridge.
It’s ok if you need to fold the dough in order to fit it in the fridge, just unfold it when you finish rolling it out.
The photo below shows a smooth dough with a small tear. These are likely to happen when you are rolling it out by hand, so THAT’S OK. We just don’t want those tears to get much bigger.
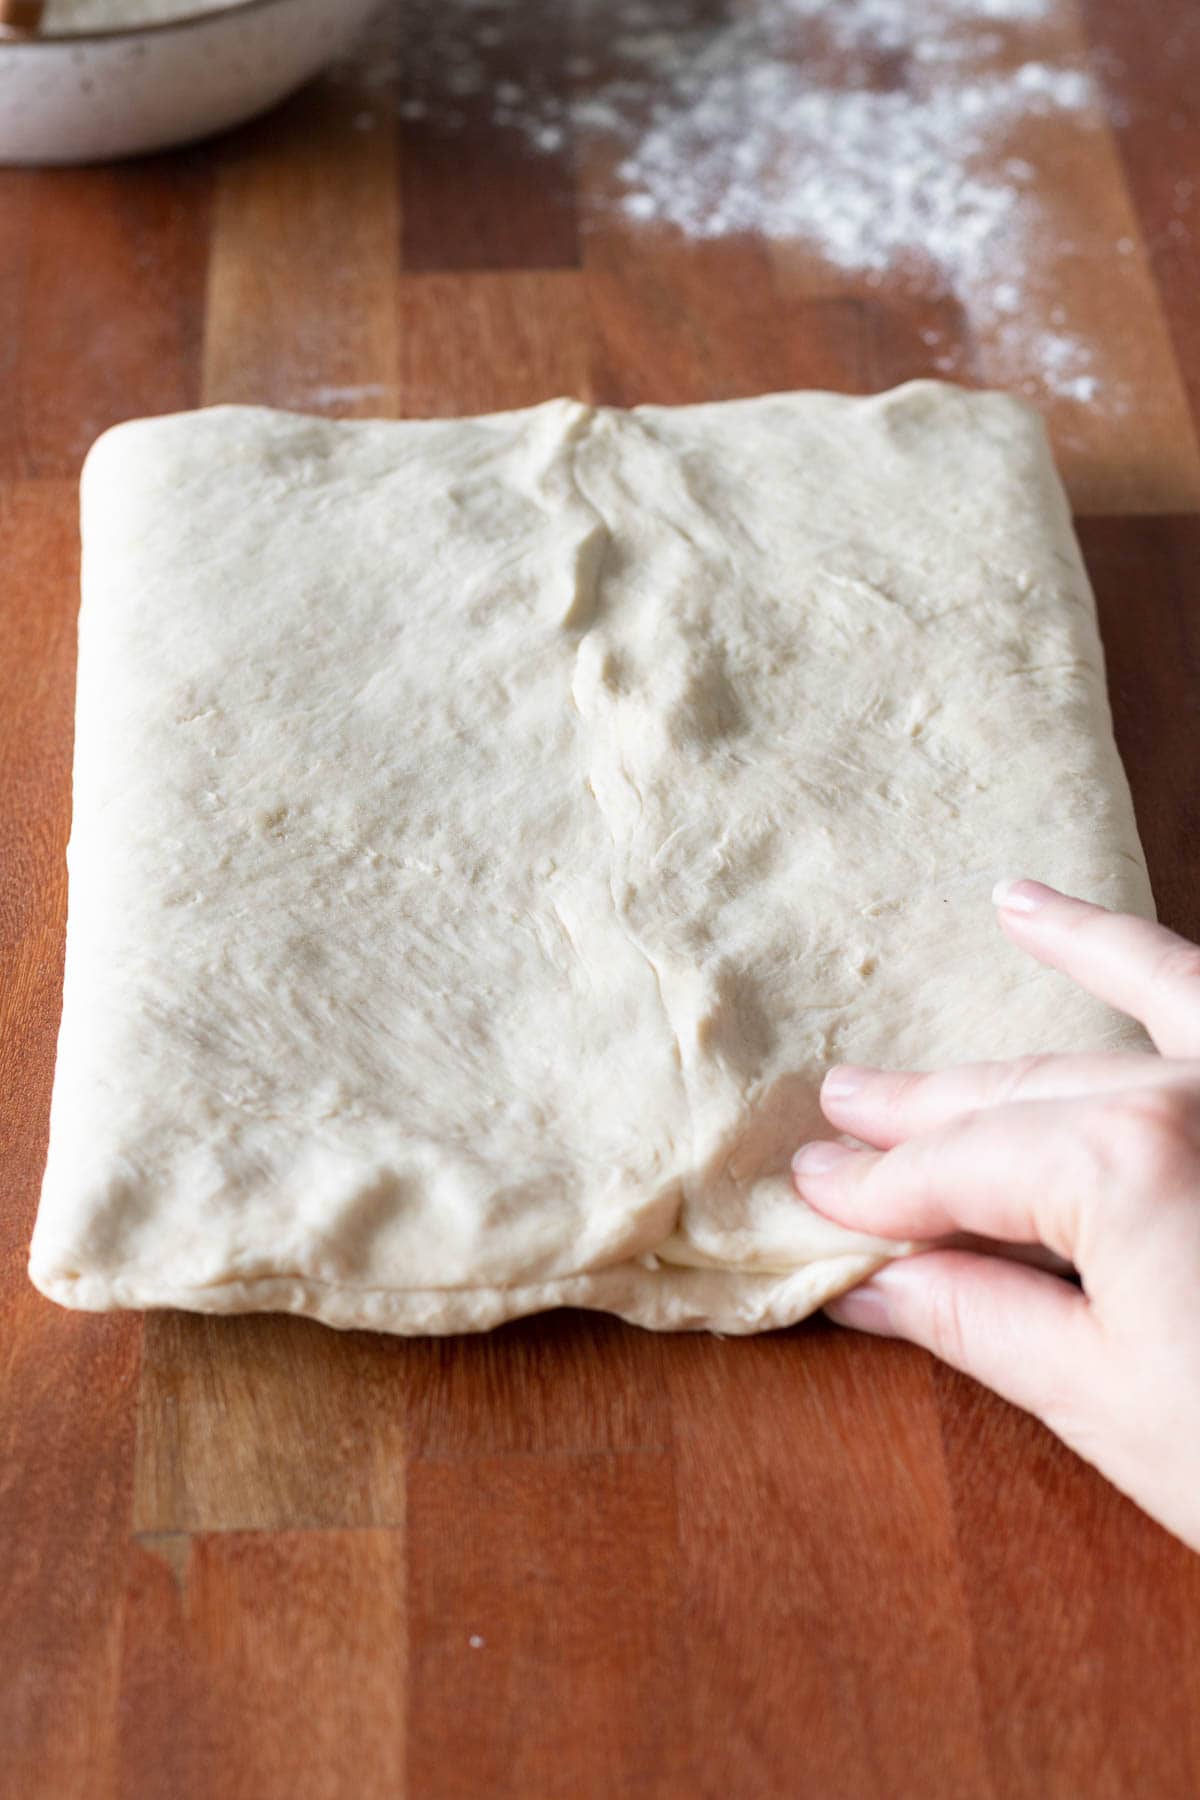
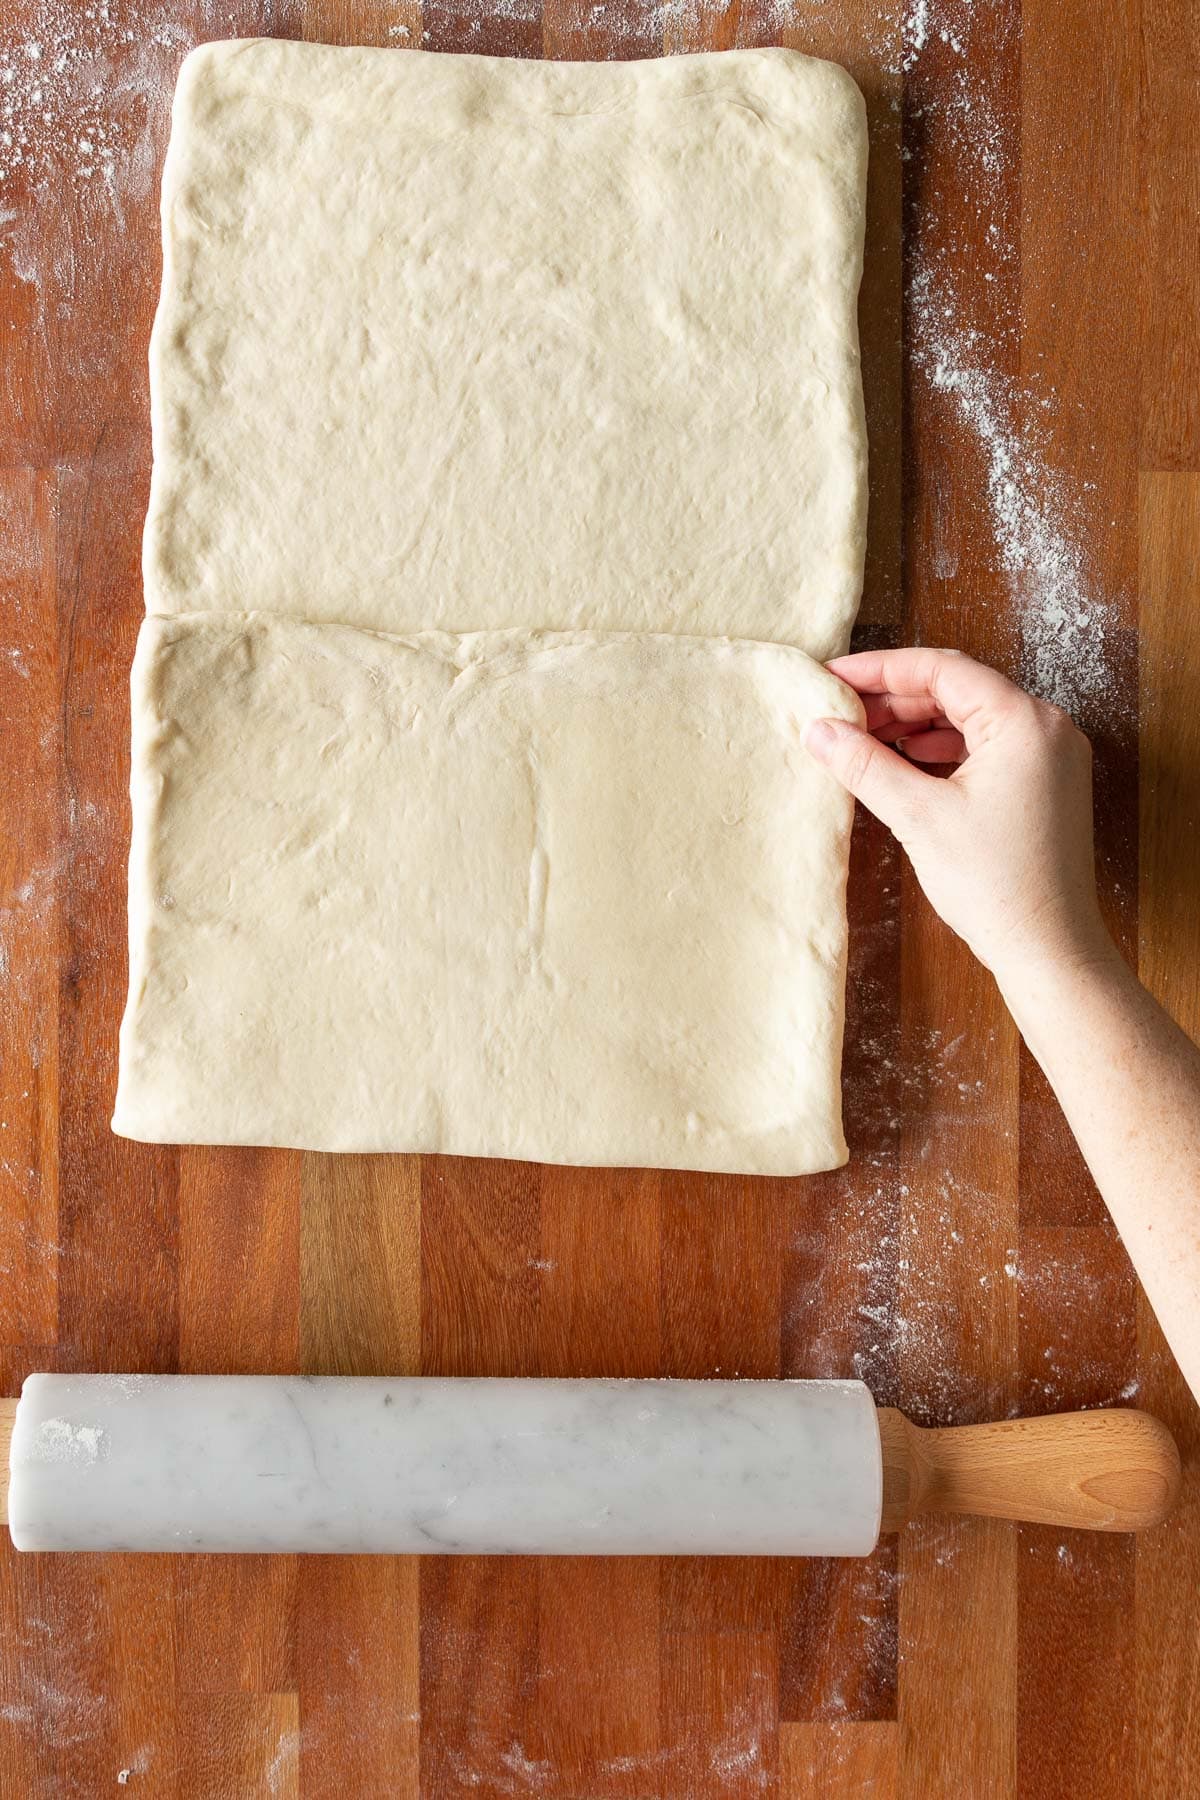
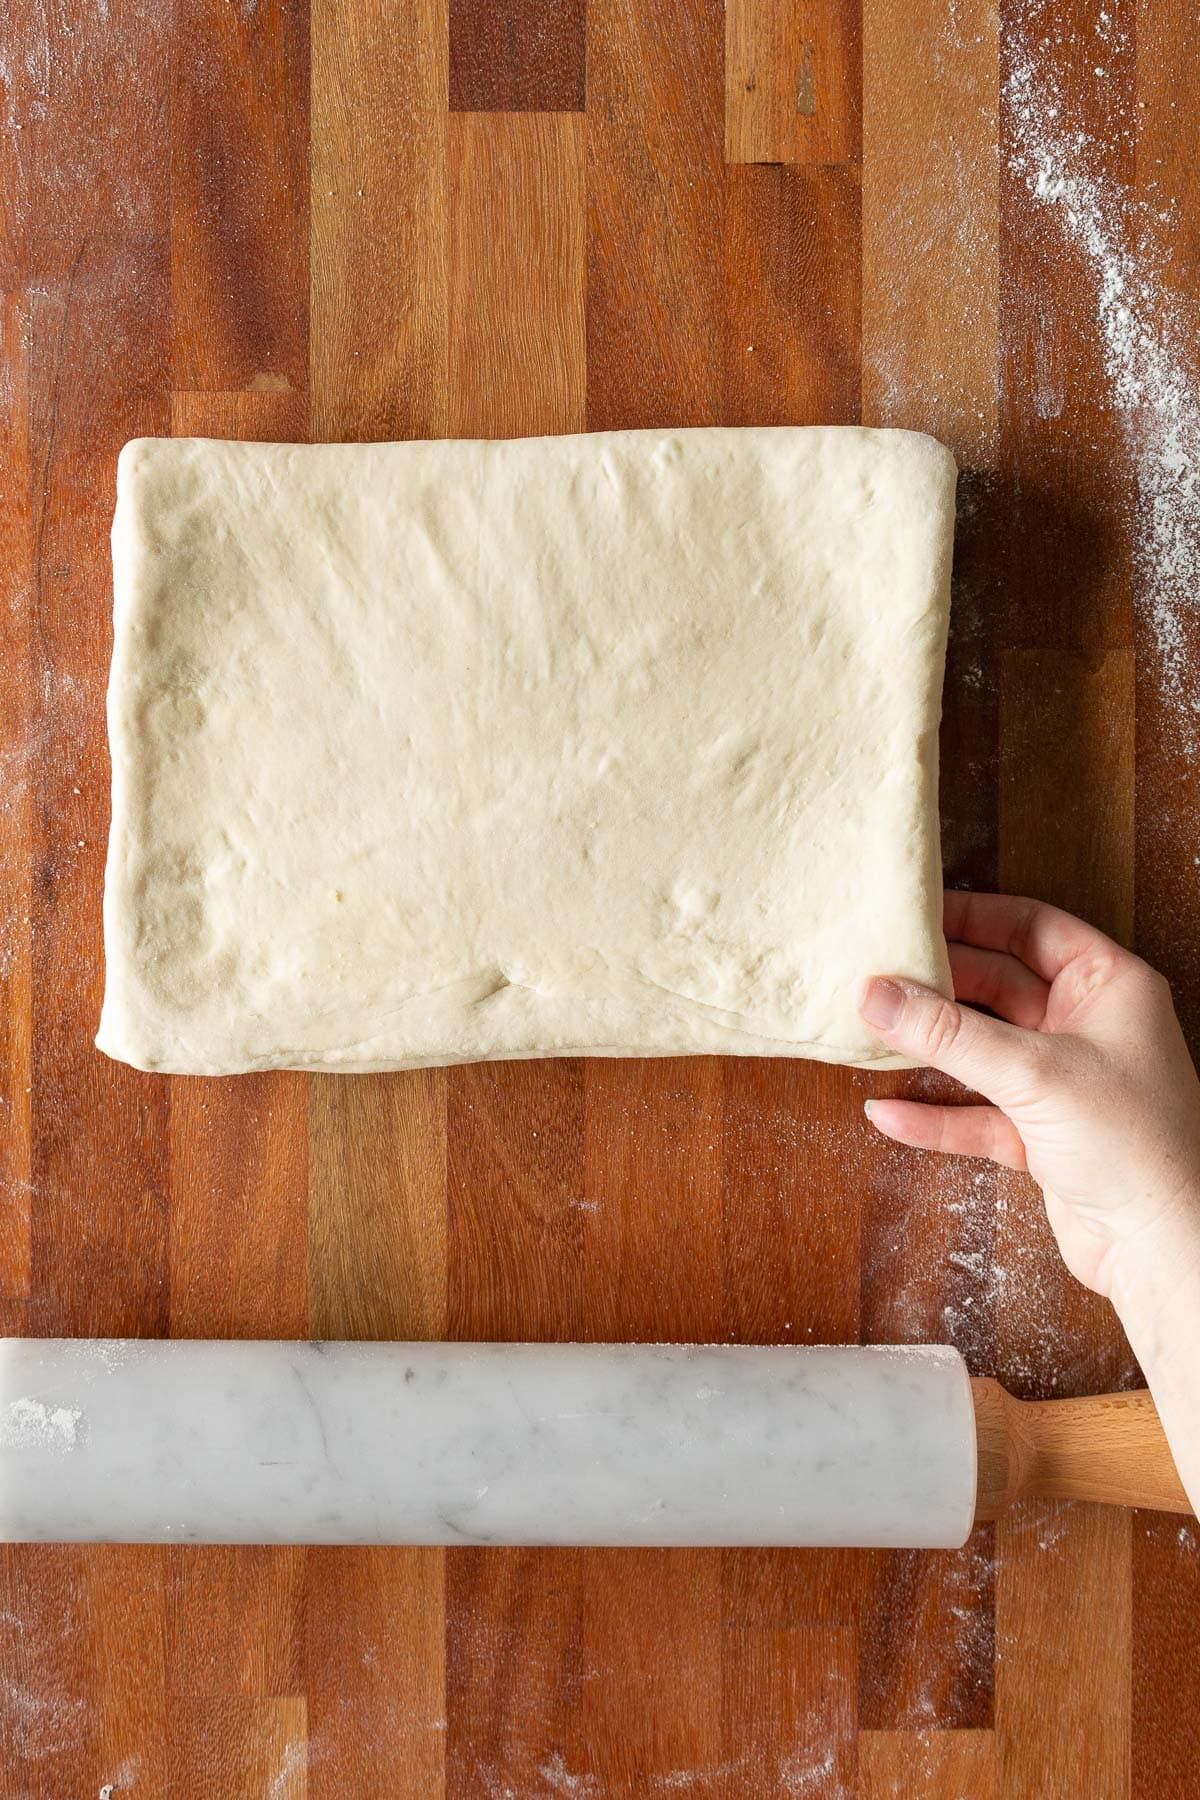
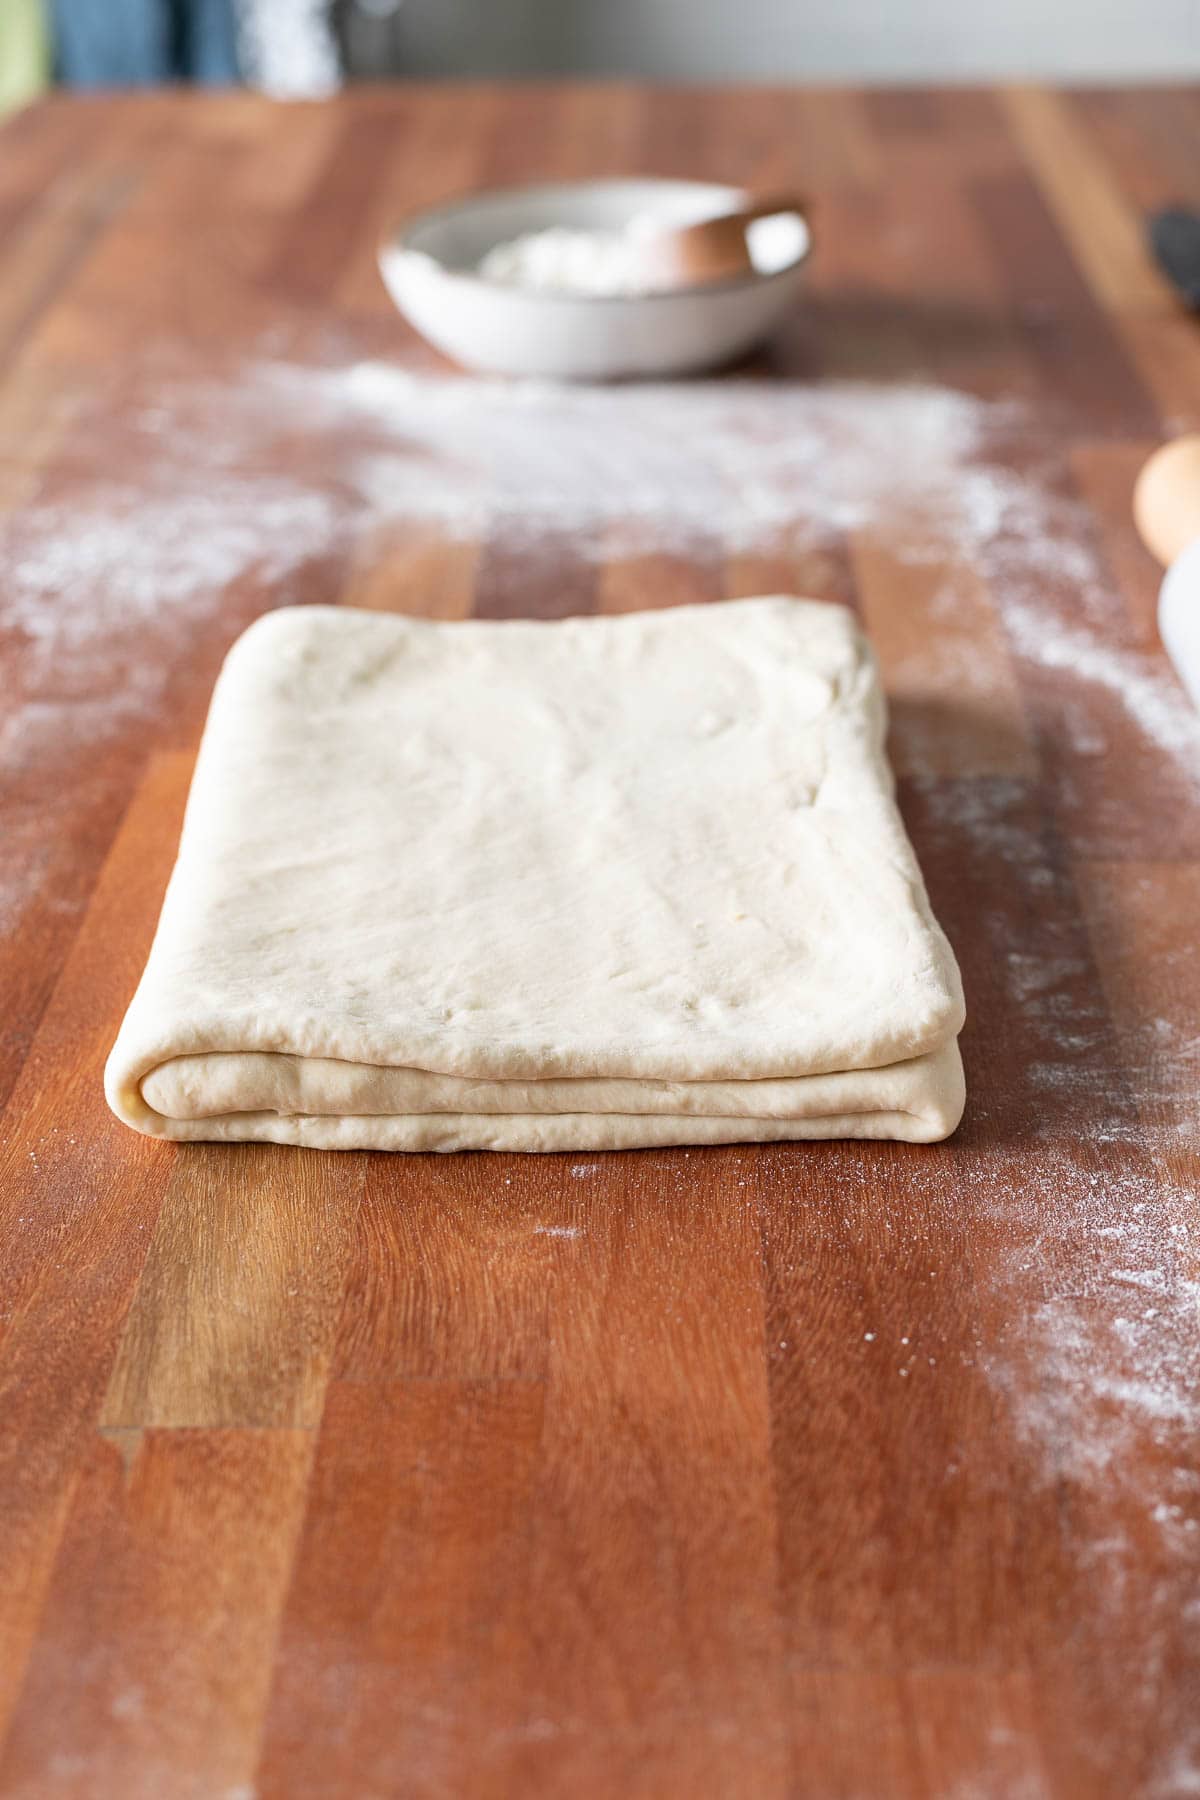
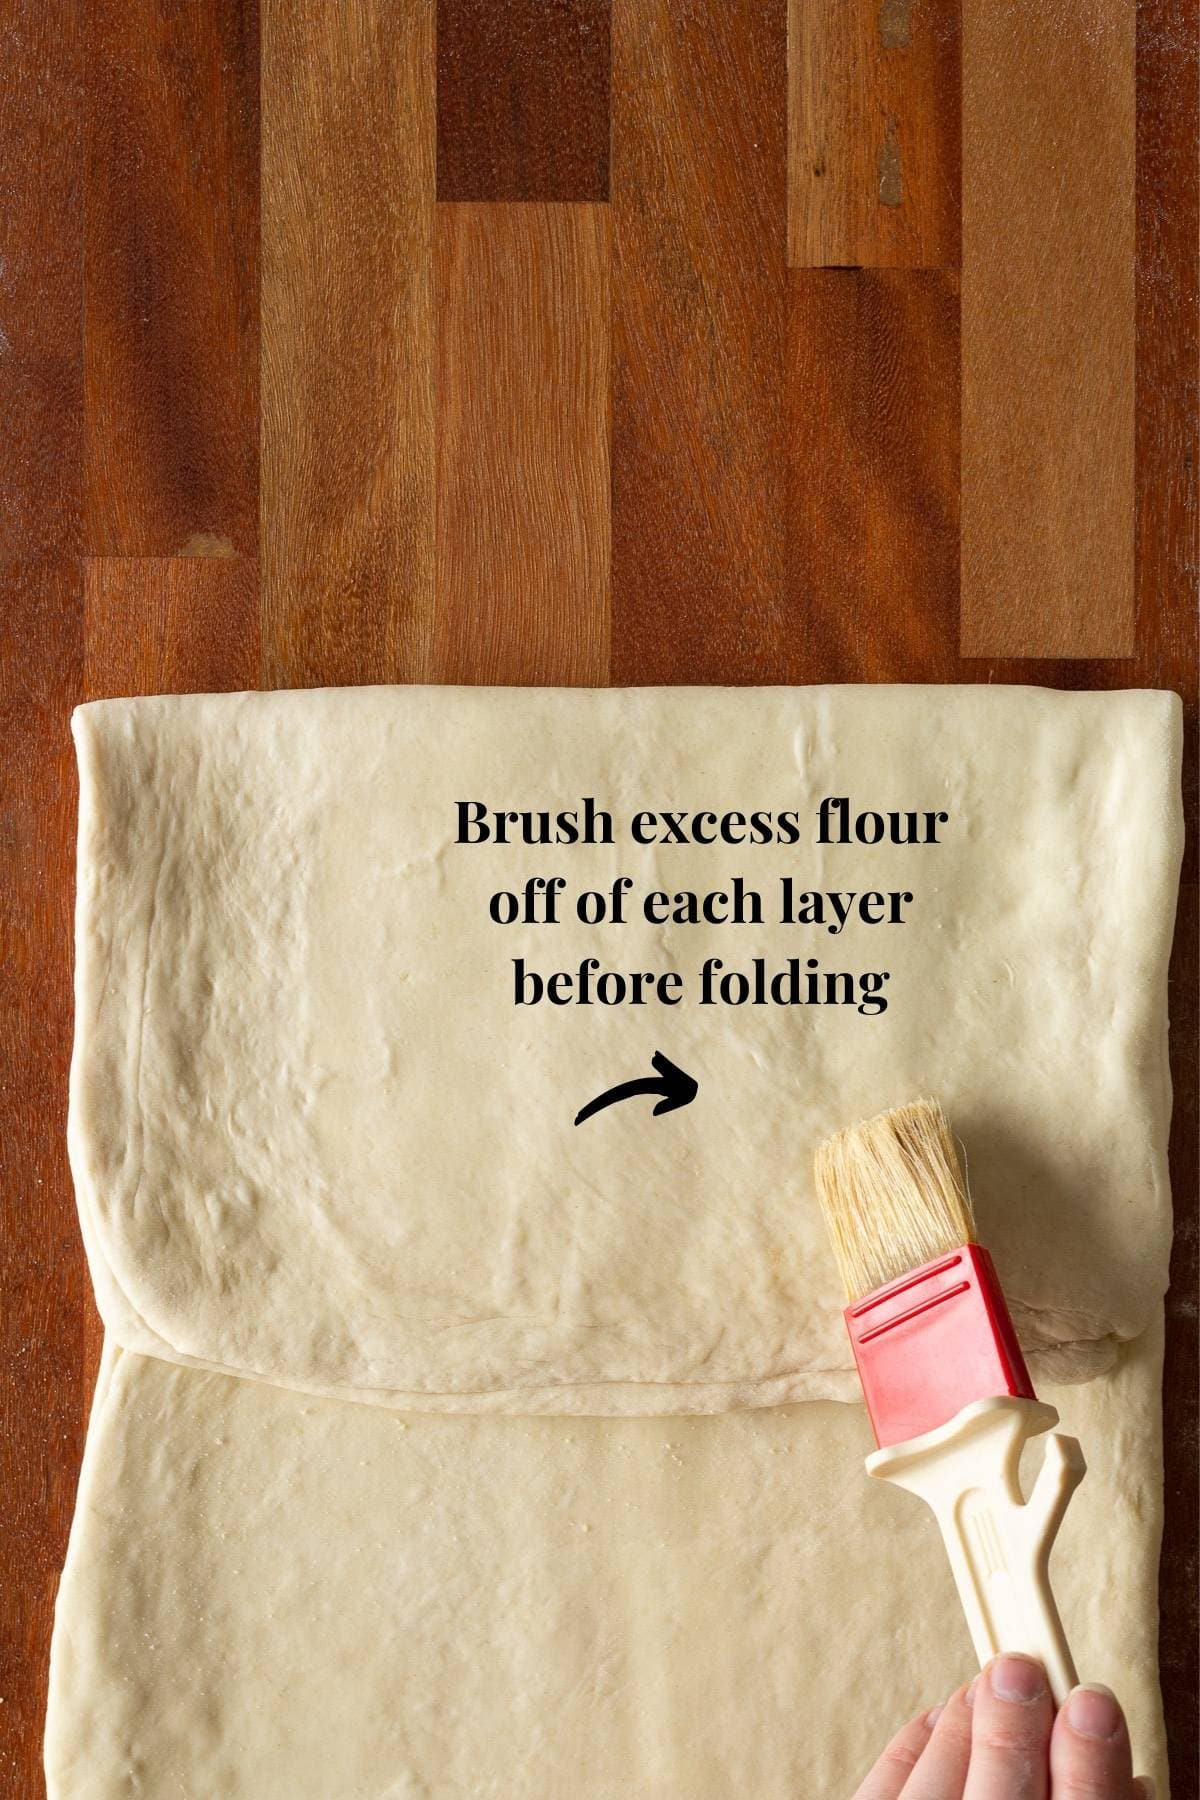
When it’s rolled out to 20-24 inches, fold one end of the dough right into the center. Fold the other end of the dough over the top of that. It should look like a book. Brush off any excess flour when folding the dough.
Notice in the two photos below, how all the layers are lined up perfectly. We don’t want any overlapping here either.
Turn the dough a quarter turn so that the lines of the top of the “book” are going long-ways. All the layers on all sides line up perfectly.
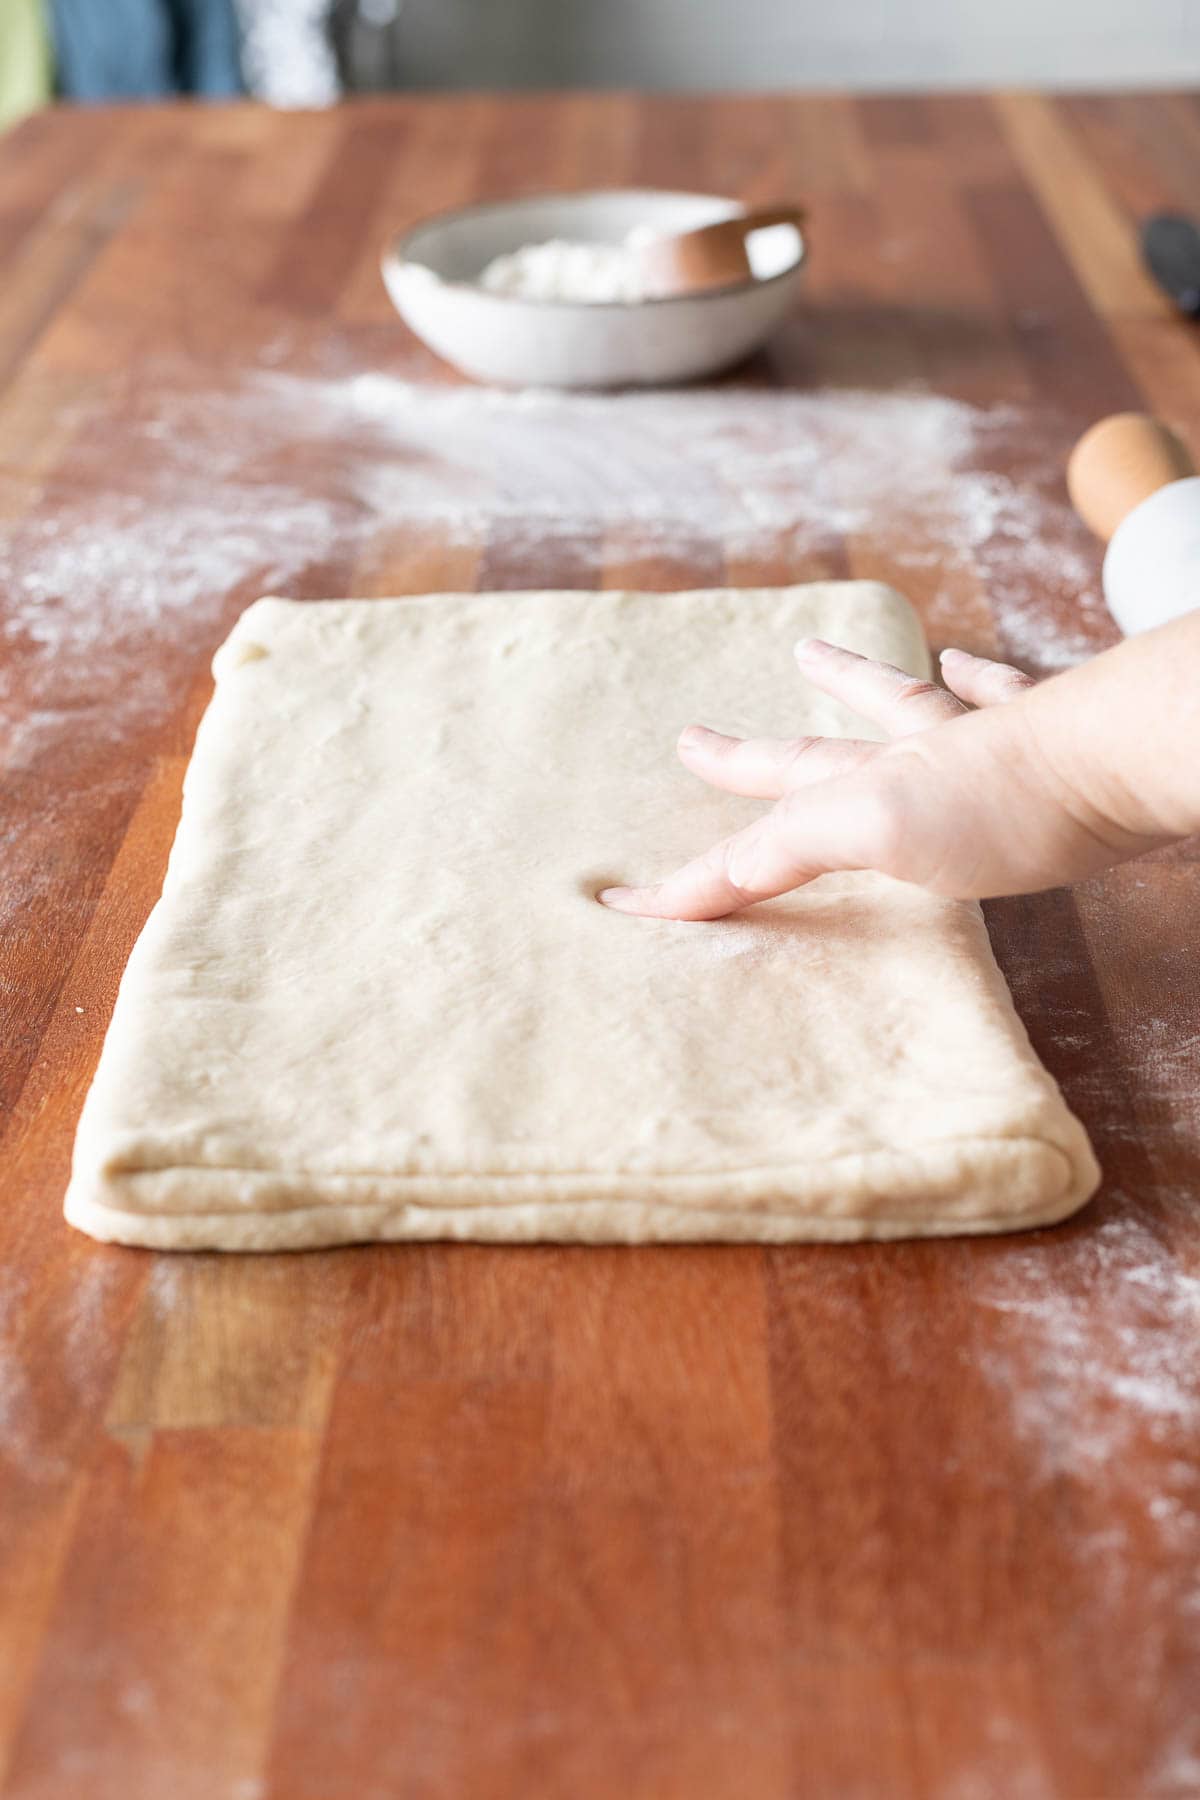
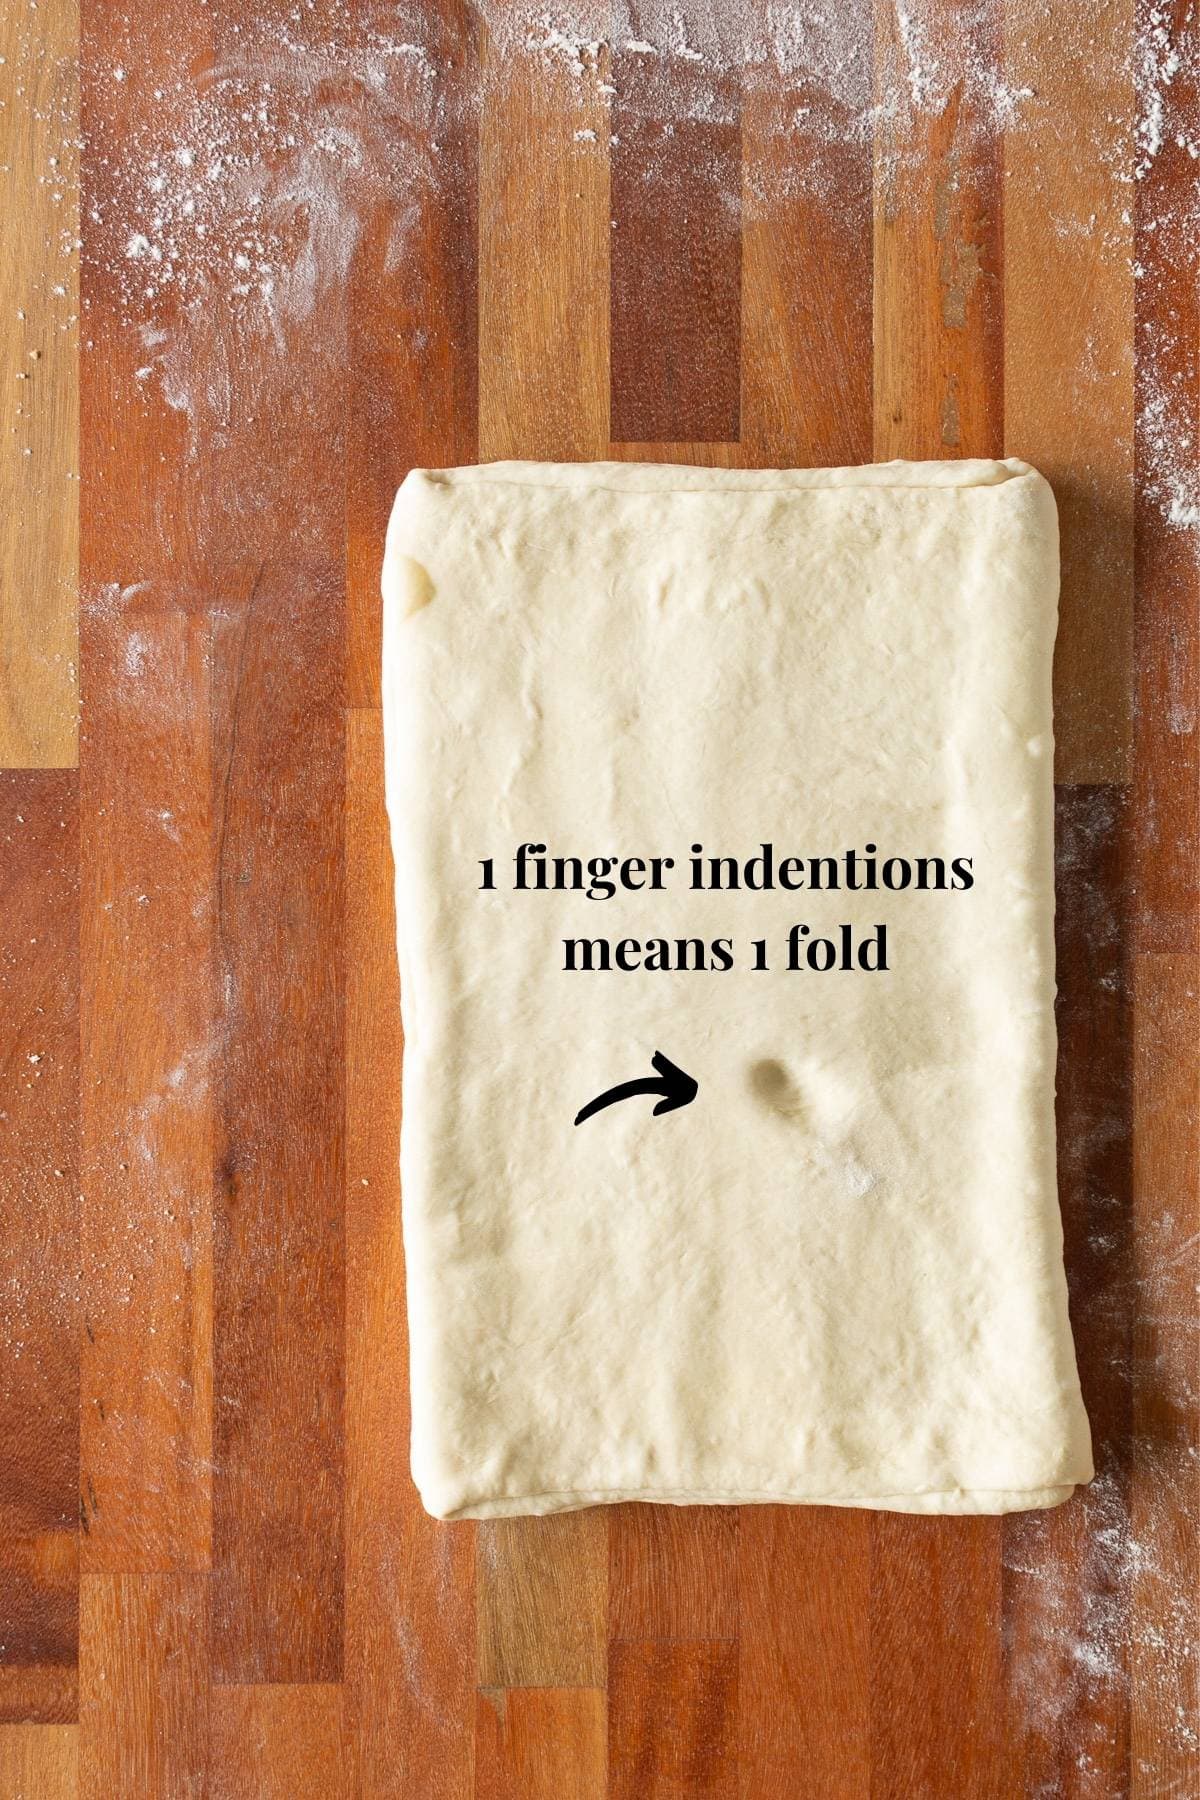
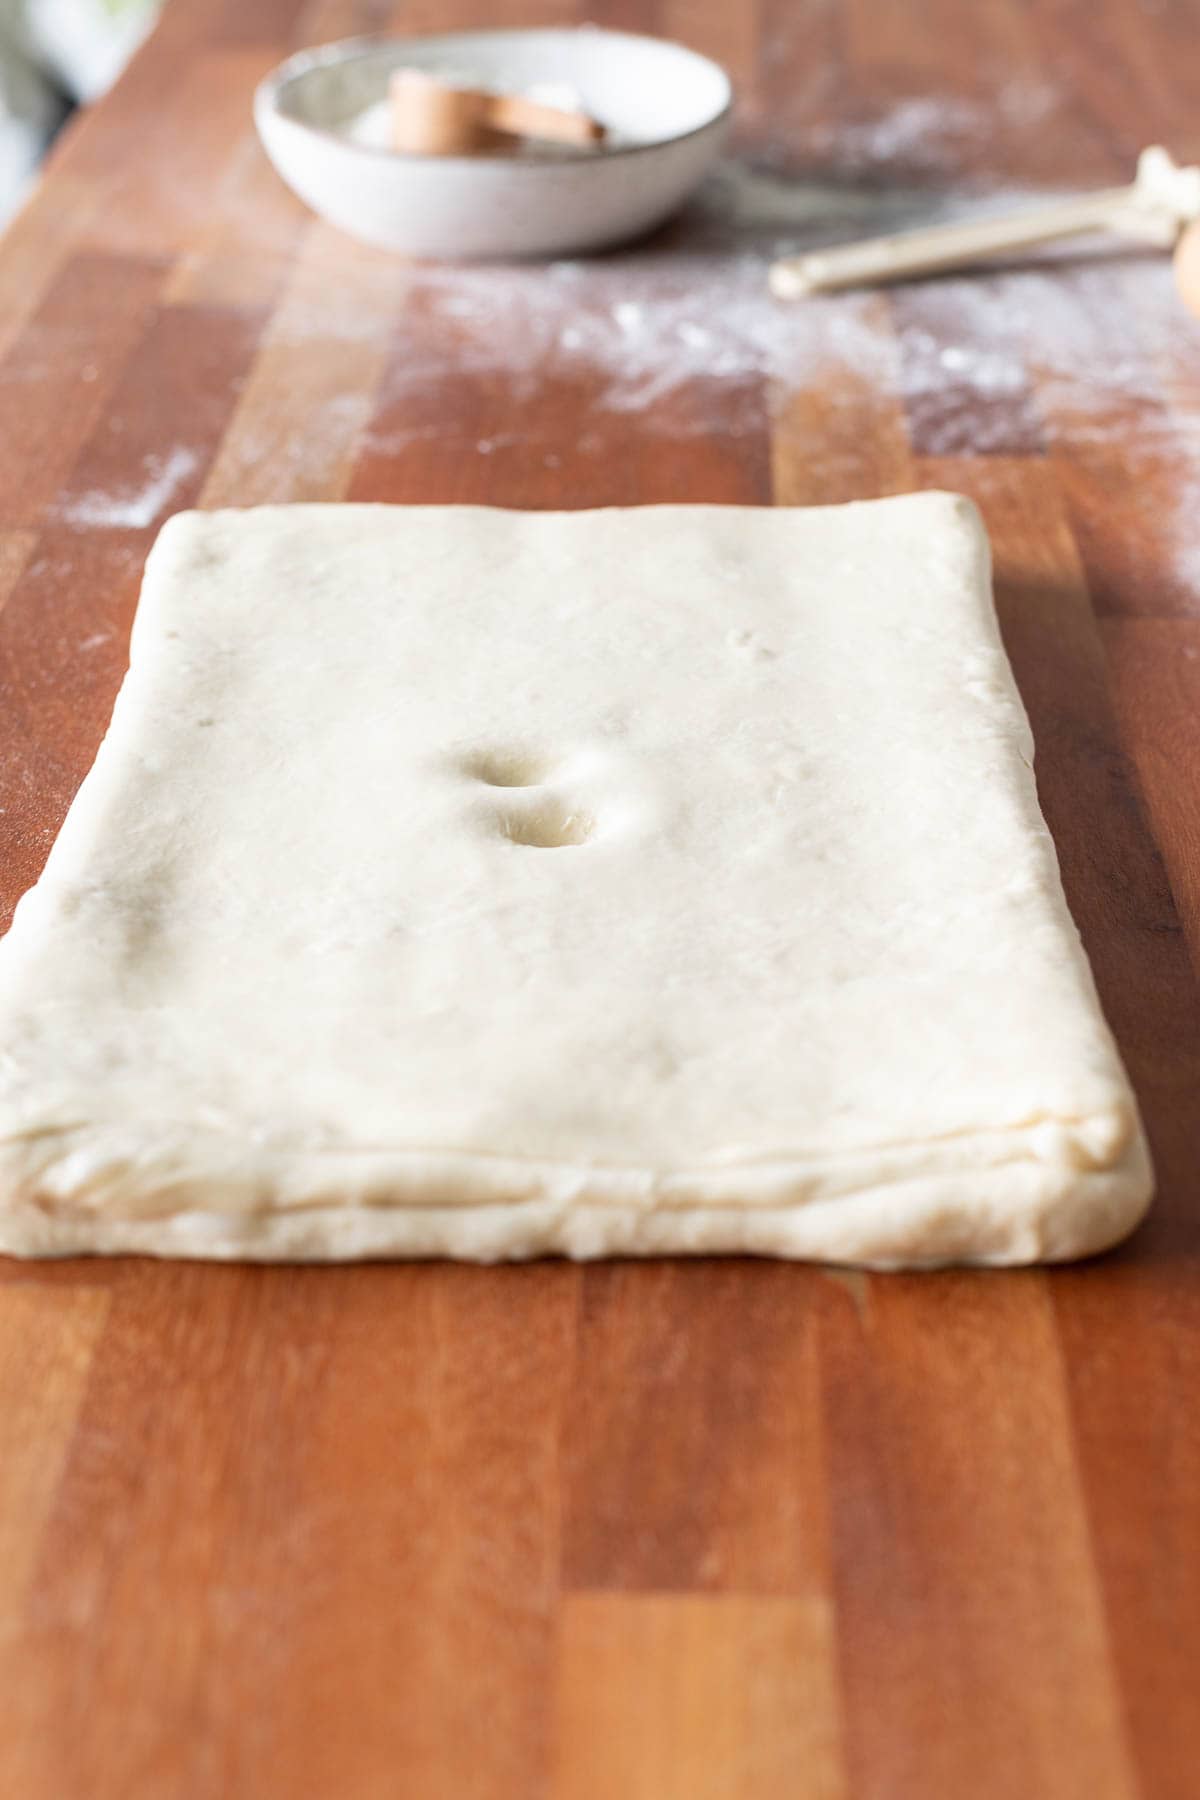
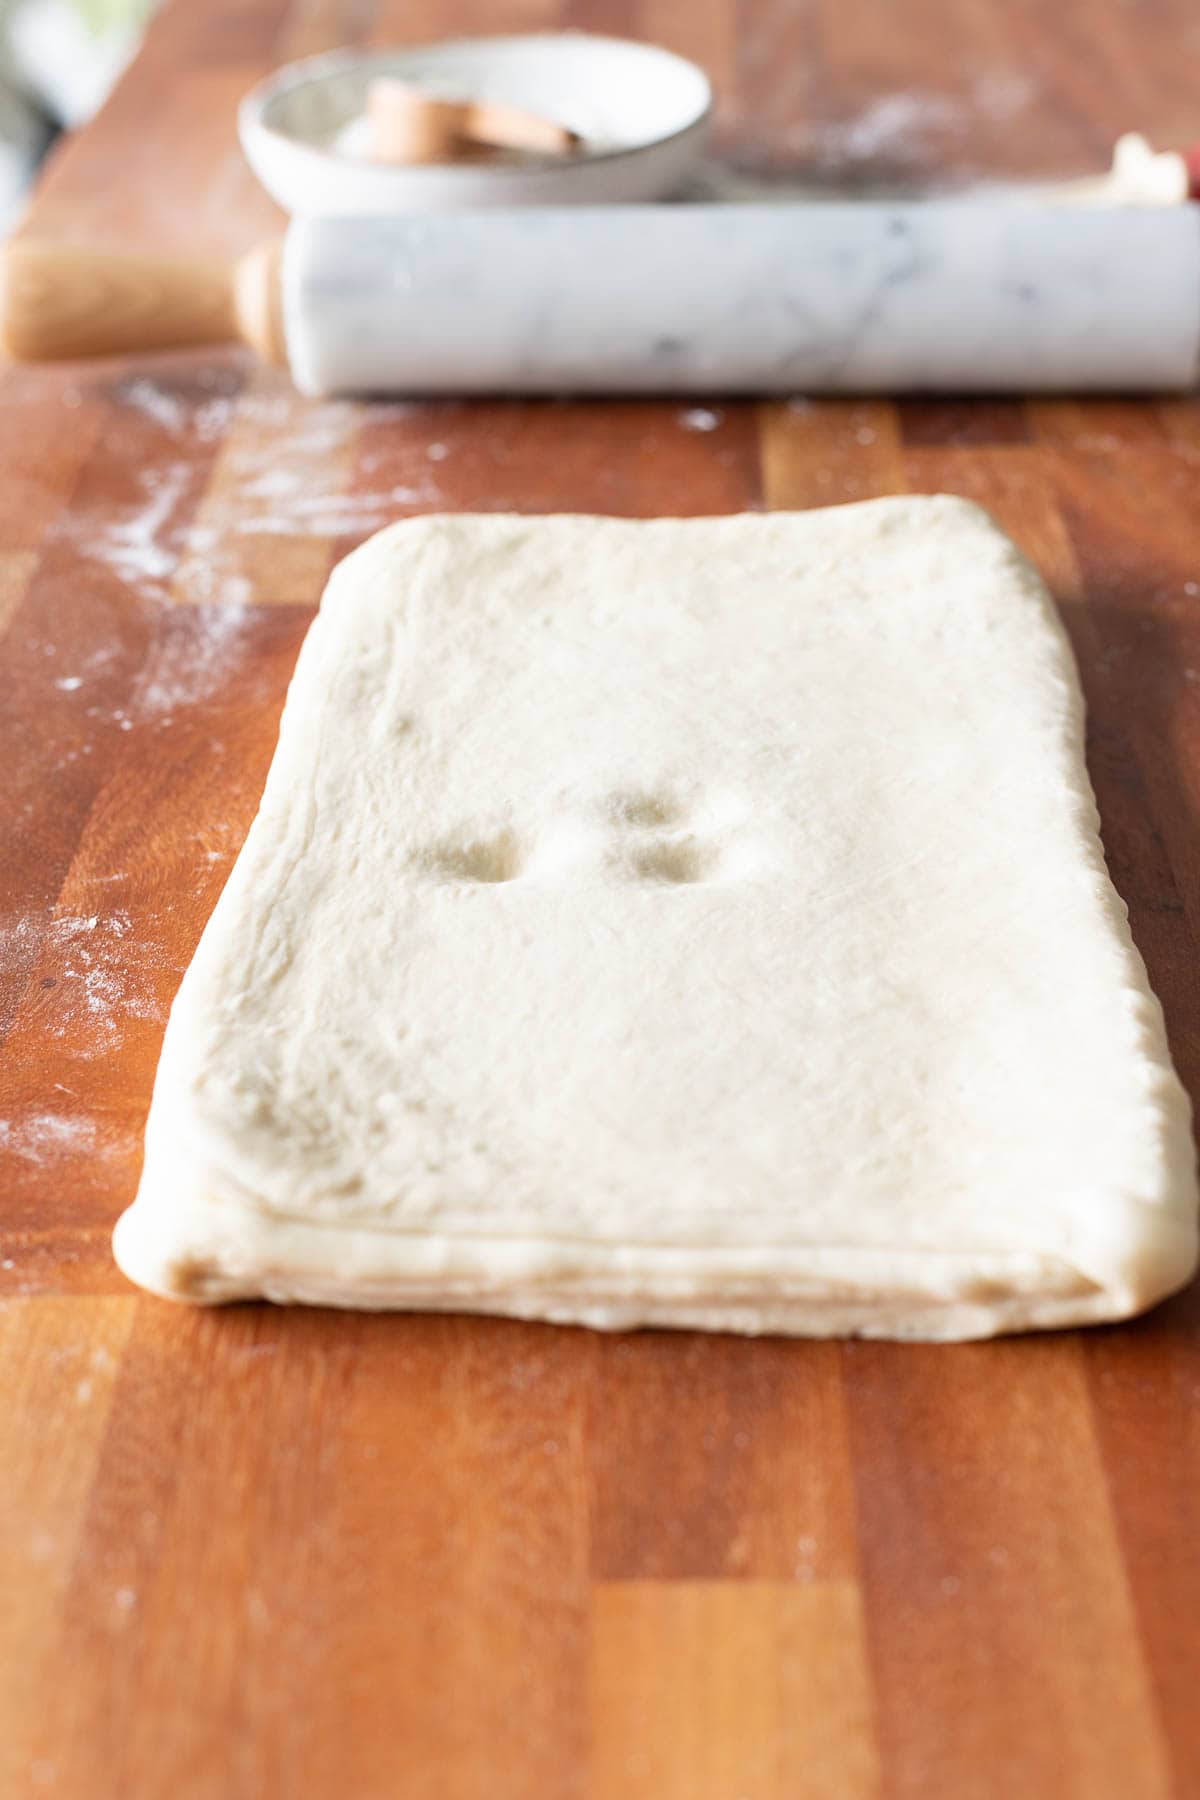
Now, this is a neat trick one of my teachers taught me. For each fold, press your finger into the dough to make an indention. This will help you remember how many folds you have done. You would be surprised how easy it is to forget how many times you have rolled it out, so don’t skip this step.
Remember when we initially folded the butter into the dough? Well, that one doesn’t count as one of the three folds, so don’t put an indention in the dough at that point. Now wrap in plastic wrap and place back in the fridge for 30 minutes.
Remove the dough from the fridge and take off the plastic wrap. Flour the work surface again and lightly flour the rolling pin and the surface of the dough. Roll out to 20-24 inches again the exact same way, also rolling width-wise a couple of inches.
The same rules apply to this turn. Watch for the butter breaking, tears in the dough, and oozing butter. Try rolling it out a bit, then flipping the dough over to check for tears, then rolling on the other side.
Fold the dough like a book again. Watch out for the edges popping out while rolling. This is hard to completely avoid, but keep the layers as aligned as possible. Use your hands to line the layers up. You can try lifting the layers to stretch them a tad, but be careful not to tear the dough.
Now to the second fold.
Below is an example of how to roll your dough out to prepare it to be folded.
Now add two indentions with your fingers to represent two folds. Wrap in plastic again and put back in the fridge for 30 minutes.
Ok, now we are on the third and final fold!! Roll out again in the direction of the book to 24 inches long and a couple of inches wider than it is. You might need to pound on the dough to help flatten it out before rolling it.
Because you have been manipulating the dough, the third turn can often result in some tears in the dough. Simply stop, wrap in plastic, put back in the fridge for about 15 minutes, and finish rolling out.
And before folding each layer, brush off excess flour on the surface with a pastry brush.
Put three indentions into the dough after rolling it out and folding into a book. Cover with plastic wrap and put in the fridge for 30 minutes.
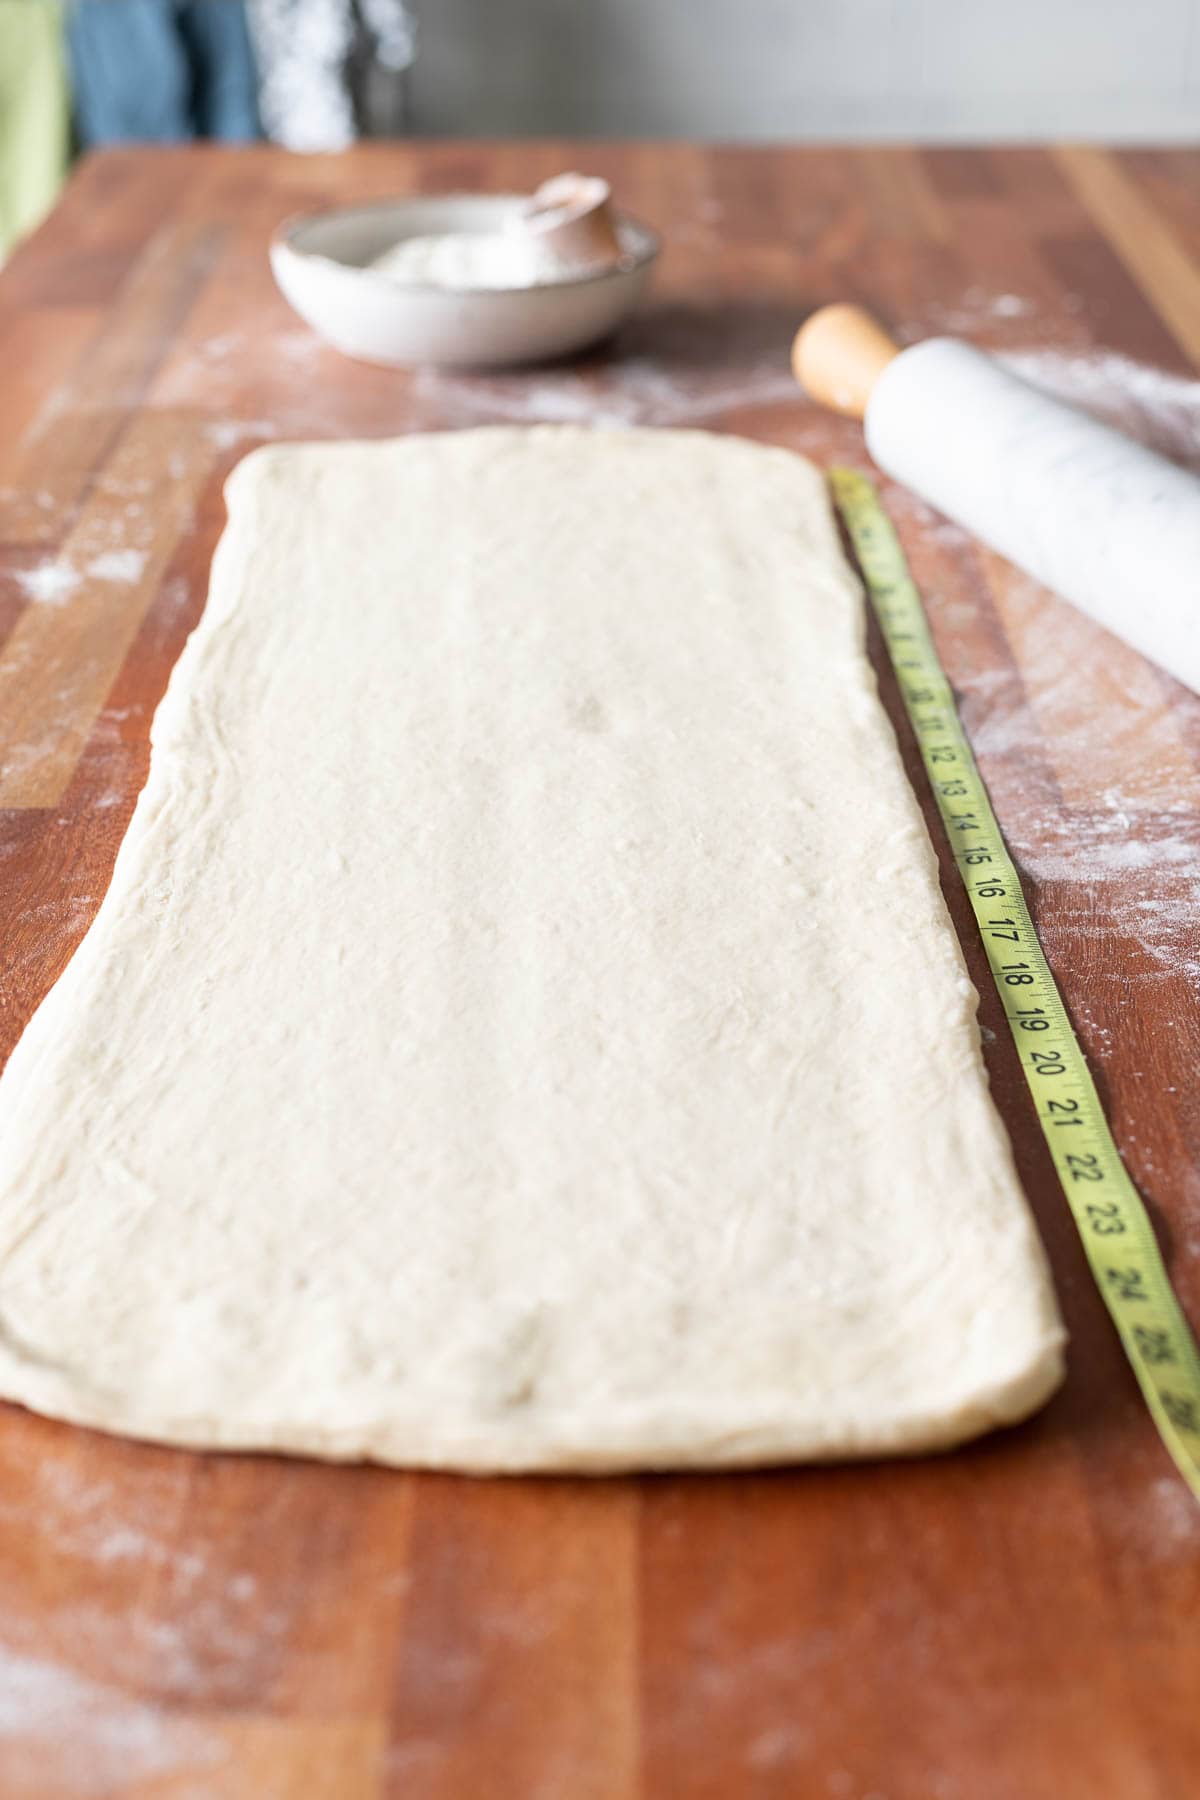
WHEW, are you tired of waiting yet? We are almost there!! Now flour your surface and roll out the dough to 25-27 inches long. If the dough is constantly shrinking back, the gluten needs to relax a bit.
Cover and place in the fridge for a few minutes to relax the dough. Roll out to 25-27 inches long to 8 1/2 inches wide.
Now here is a BIG question.
Do want to bake traditional croissants, chocolate croissants, or a mixture of both?
If the answer is both, then cut the dough in half so you have two pieces of dough 12-13 inches long and 8 1/2 inches wide. You will get more traditional croissants than chocolate croissants because they are skinnier and weigh less. Wrap one side of the dough in plastic wrap and put back in the fridge. If the other half of the dough is getting too warm, wrap it up and let cool too, otherwise, you are ready to cut into shapes.
Most often I just make one whole batch of traditional croissants and one batch of chocolate so I have plenty of both.
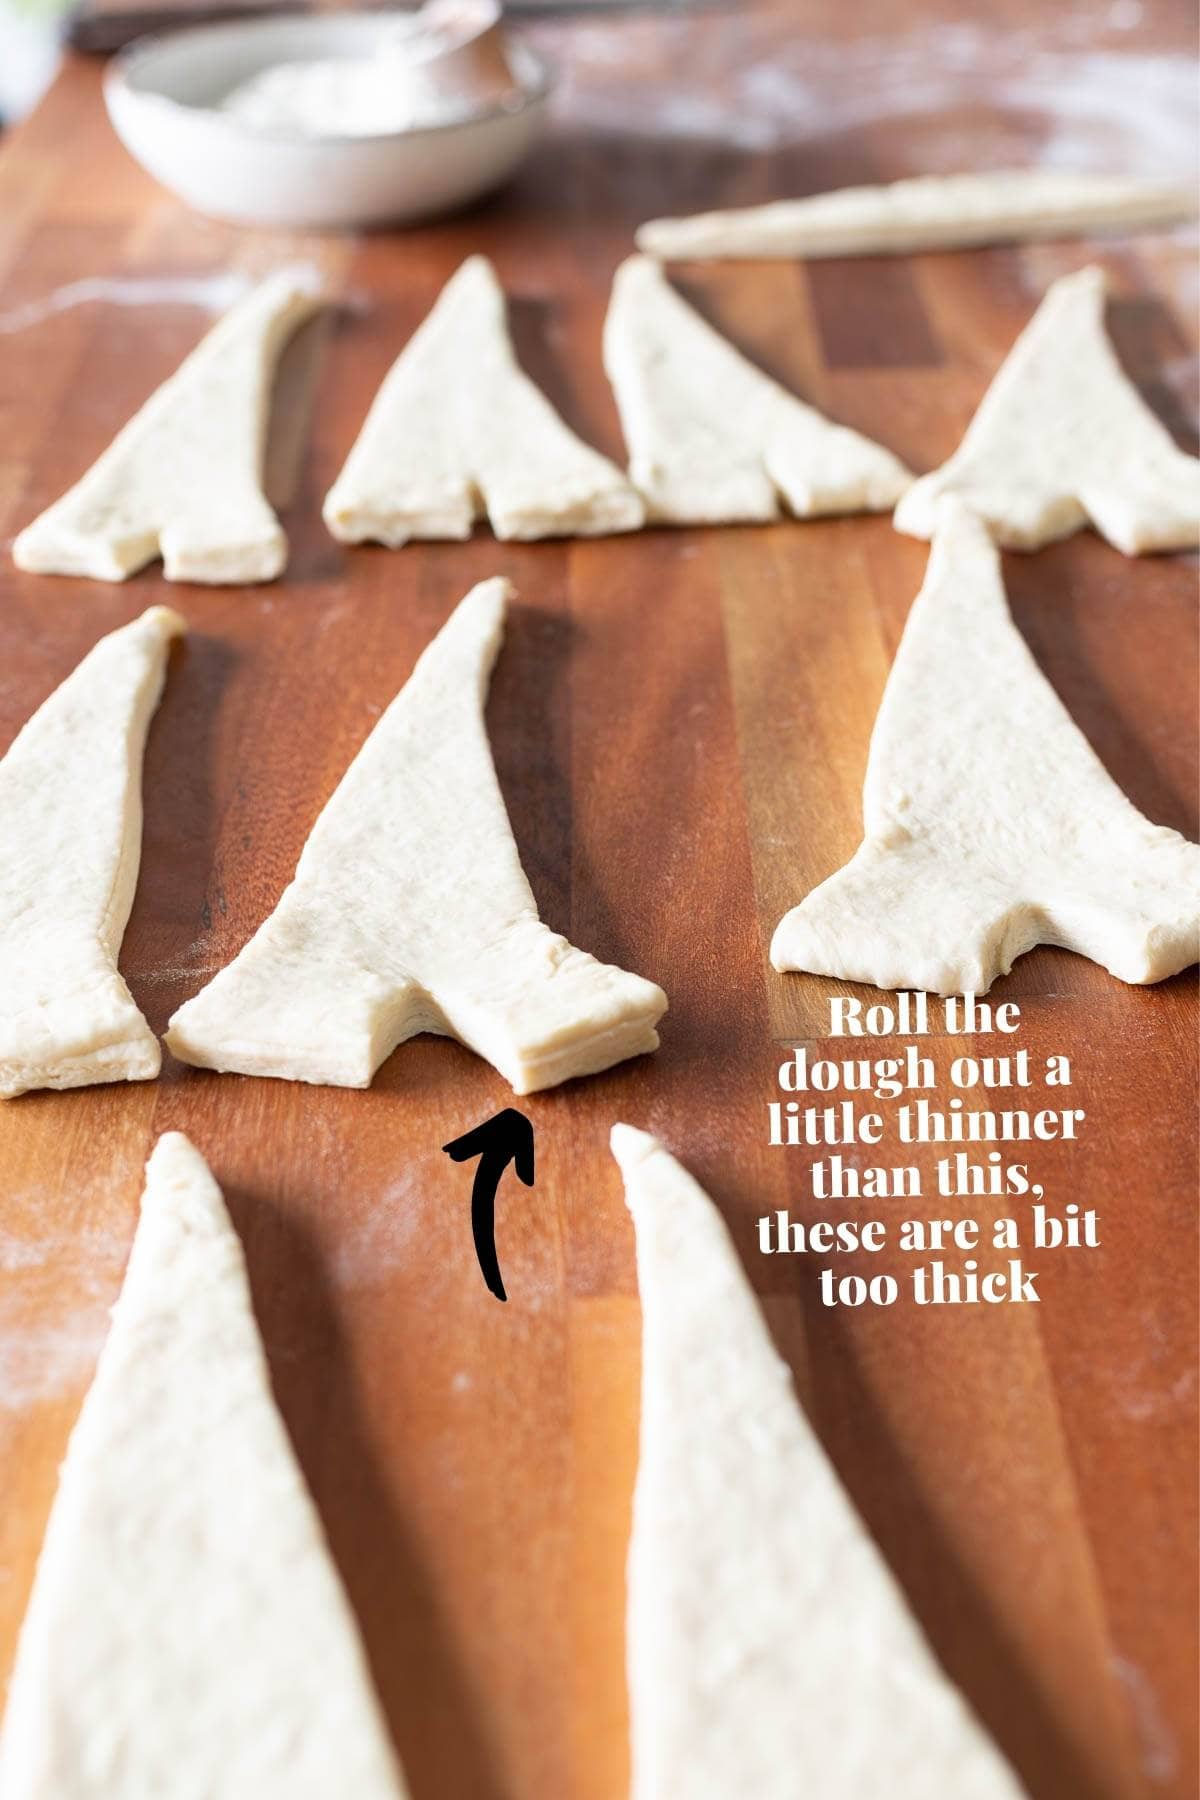
Trim the edges with a knife to make it as straight as possible. As you can see below, I used a ruler to mark where I need to cut the croissants. I cut them 3 inches wide and 8 inches high with a knife.
Make a slit in the center of the bottom of each croissant and stretch the top of the dough a bit to make longer. Roll the croissant into a crescent shape. Turn on the oven to 350 degrees because you will proof them on top of the stove and you want it to be warm.
I actually should have rolled out the dough a little thinner than this because they were a bit too thick.
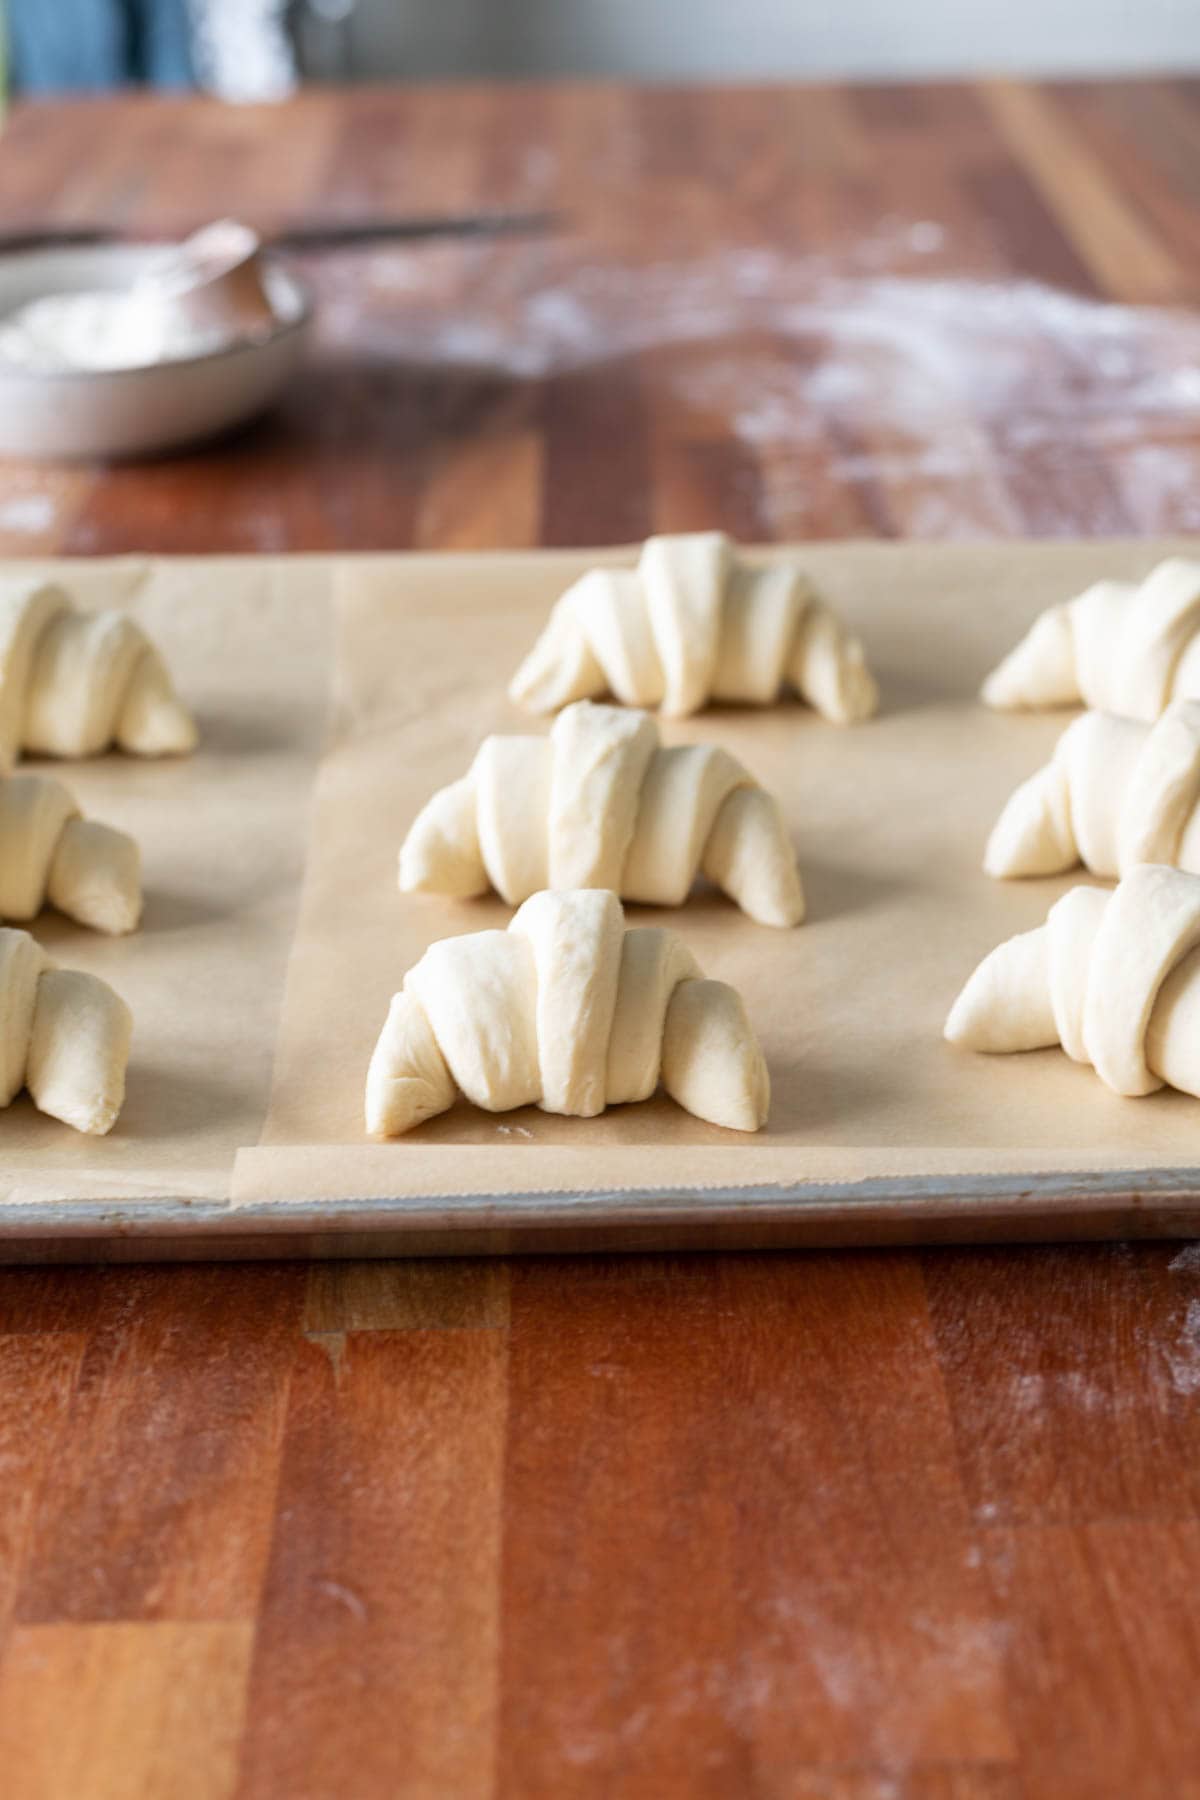
Place on a sheet pan lined with parchment paper about 2 inches apart. If you have extra pieces that are a little oddly shaped, don’t waste them!! Roll them into crescents too. They will still taste wonderful.
Please note: The sheet pan below is one I purchased from a restaurant supply store that is a bit larger than regular sheet pans, but it still fits on a standard oven rack. It’s awesome for baking because you can fit more croissants (or cookies!) on it.
For regular sheet pans, you can fit 6-7 croissants on one pan.
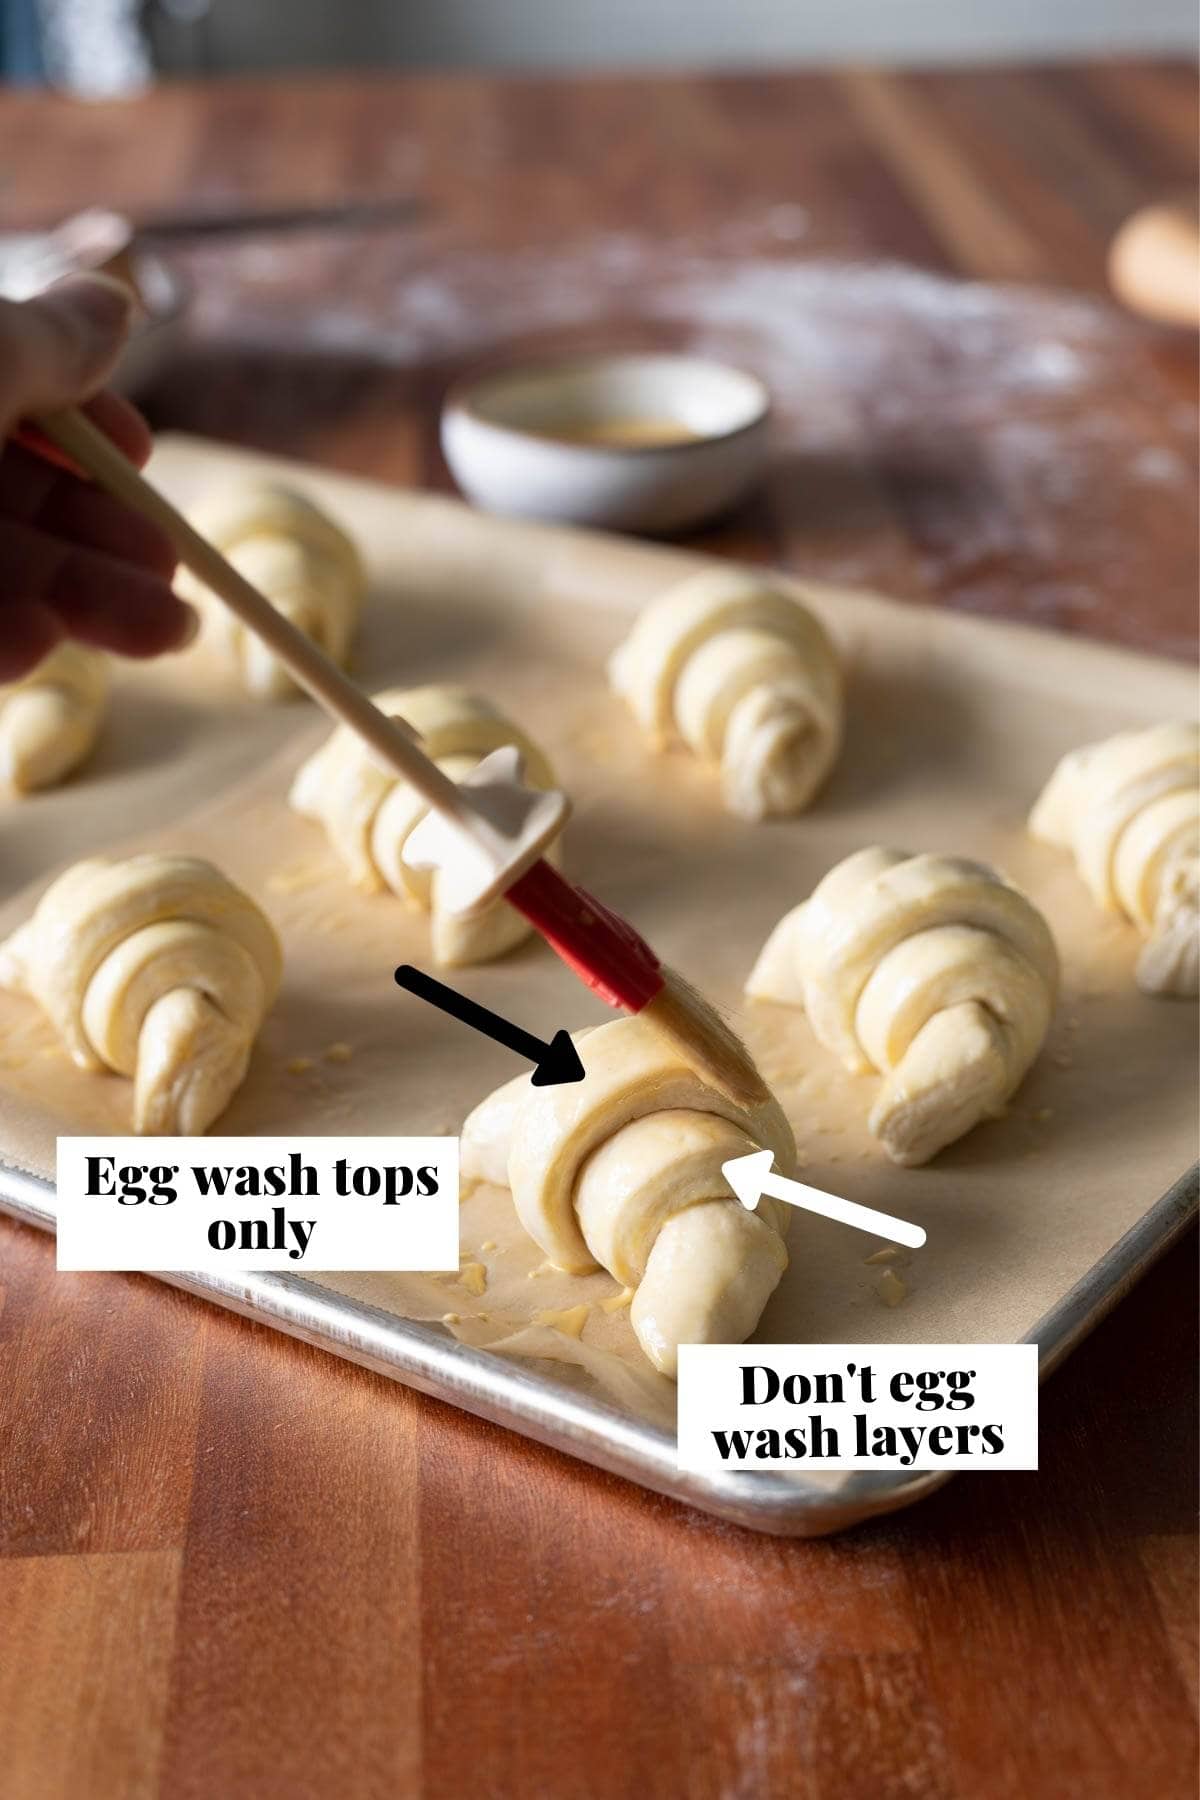
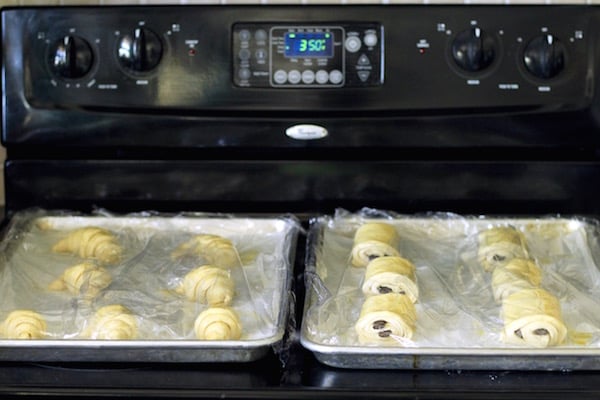
Egg wash only the surface of the croissants. Don’t egg wash the layers, this will keep them flaky. In the photo below, I didn’t properly egg wash the front of the croissants, so make sure the whole top is washed. Cover with plastic wrap and place on top of the stove to proof.
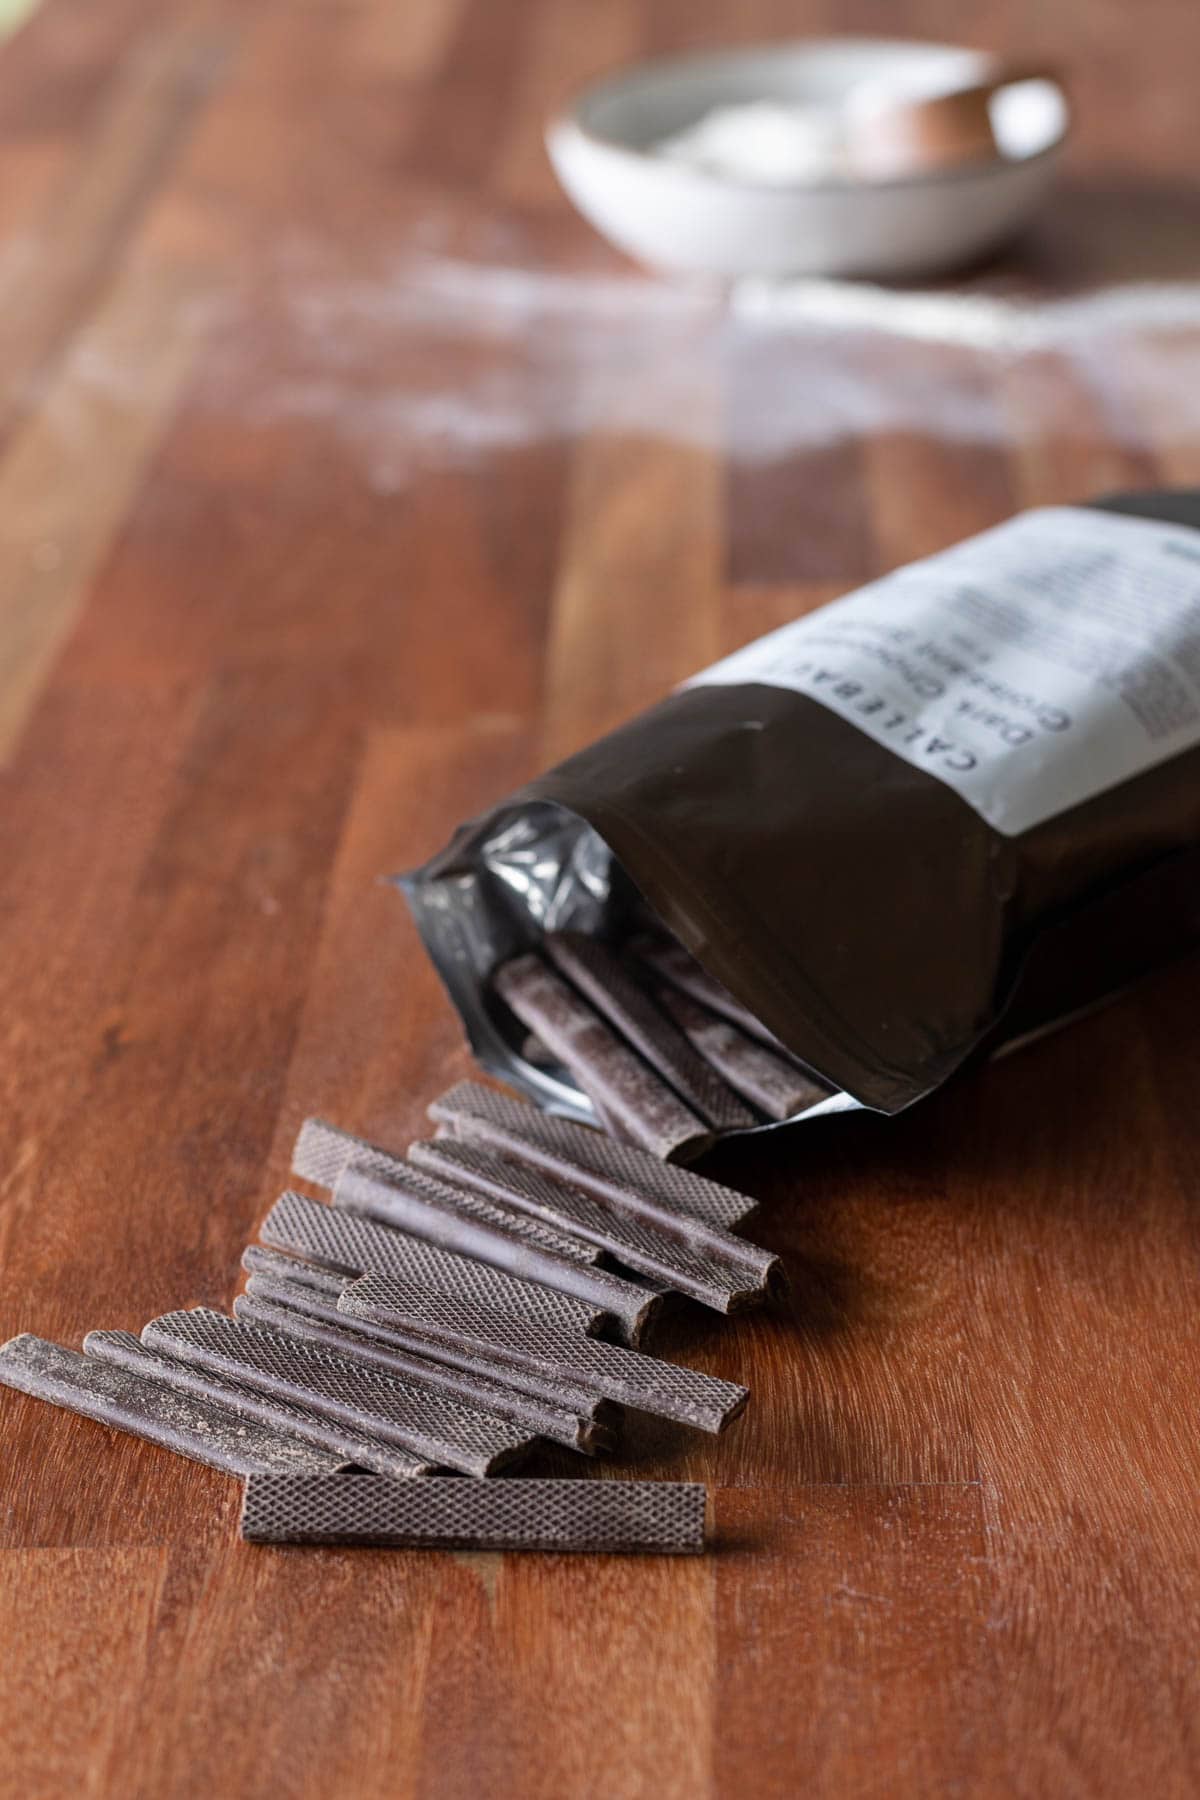
Now cut your chocolate croissants! Just look at those cute little chocolate batons (or pain au chocolat sticks). I have a giant box of them from when I used to bake croissants and sell them. You can find these large boxes (they are only $24.95) on Amazon here but if you are just making croissants occasionally, then grab some pain au chocolat sticks on King Arthur Flour’s website.
They sell 8 oz. packages of them, which is about 24-30 chocolate sticks. The nice thing about chocolate batons is they are the exact width you need and aren’t too thick, and are made of really high-quality chocolate. They are great little treats to snack on too! If you don’t have chocolate batons, you can buy 60-70% chocolate bars from the store and cut them into thin and wide pieces. They might break apart when cutting but just patch the pieces together as best as possible.
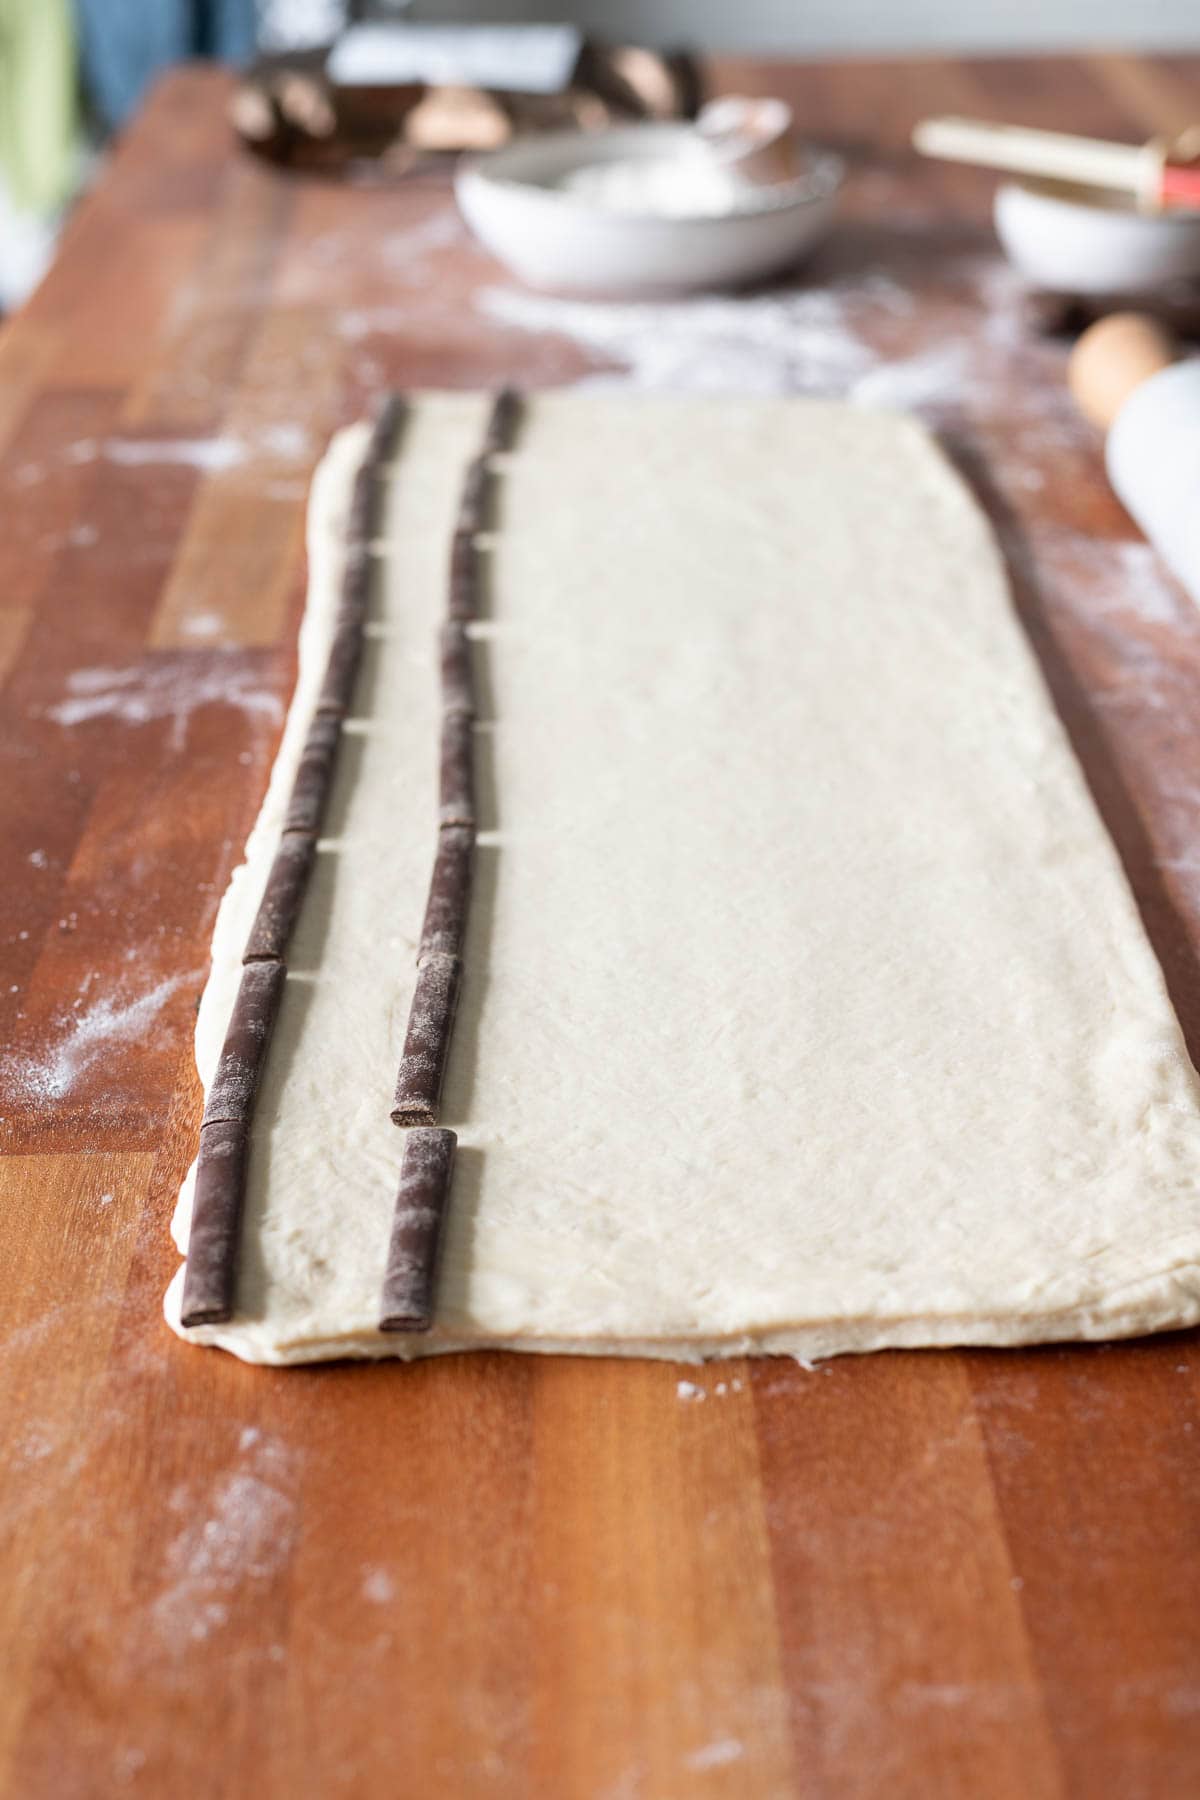
I use two pieces of chocolate per croissant. As you roll them, you will get the perfect chocolate to buttery/flaky dough ratio! Line the pieces up width-wise very close together. You actually want the chocolate to ooze out of the side of the chocolate, YUM! With a knife, cut them into individual slices, as shown below.
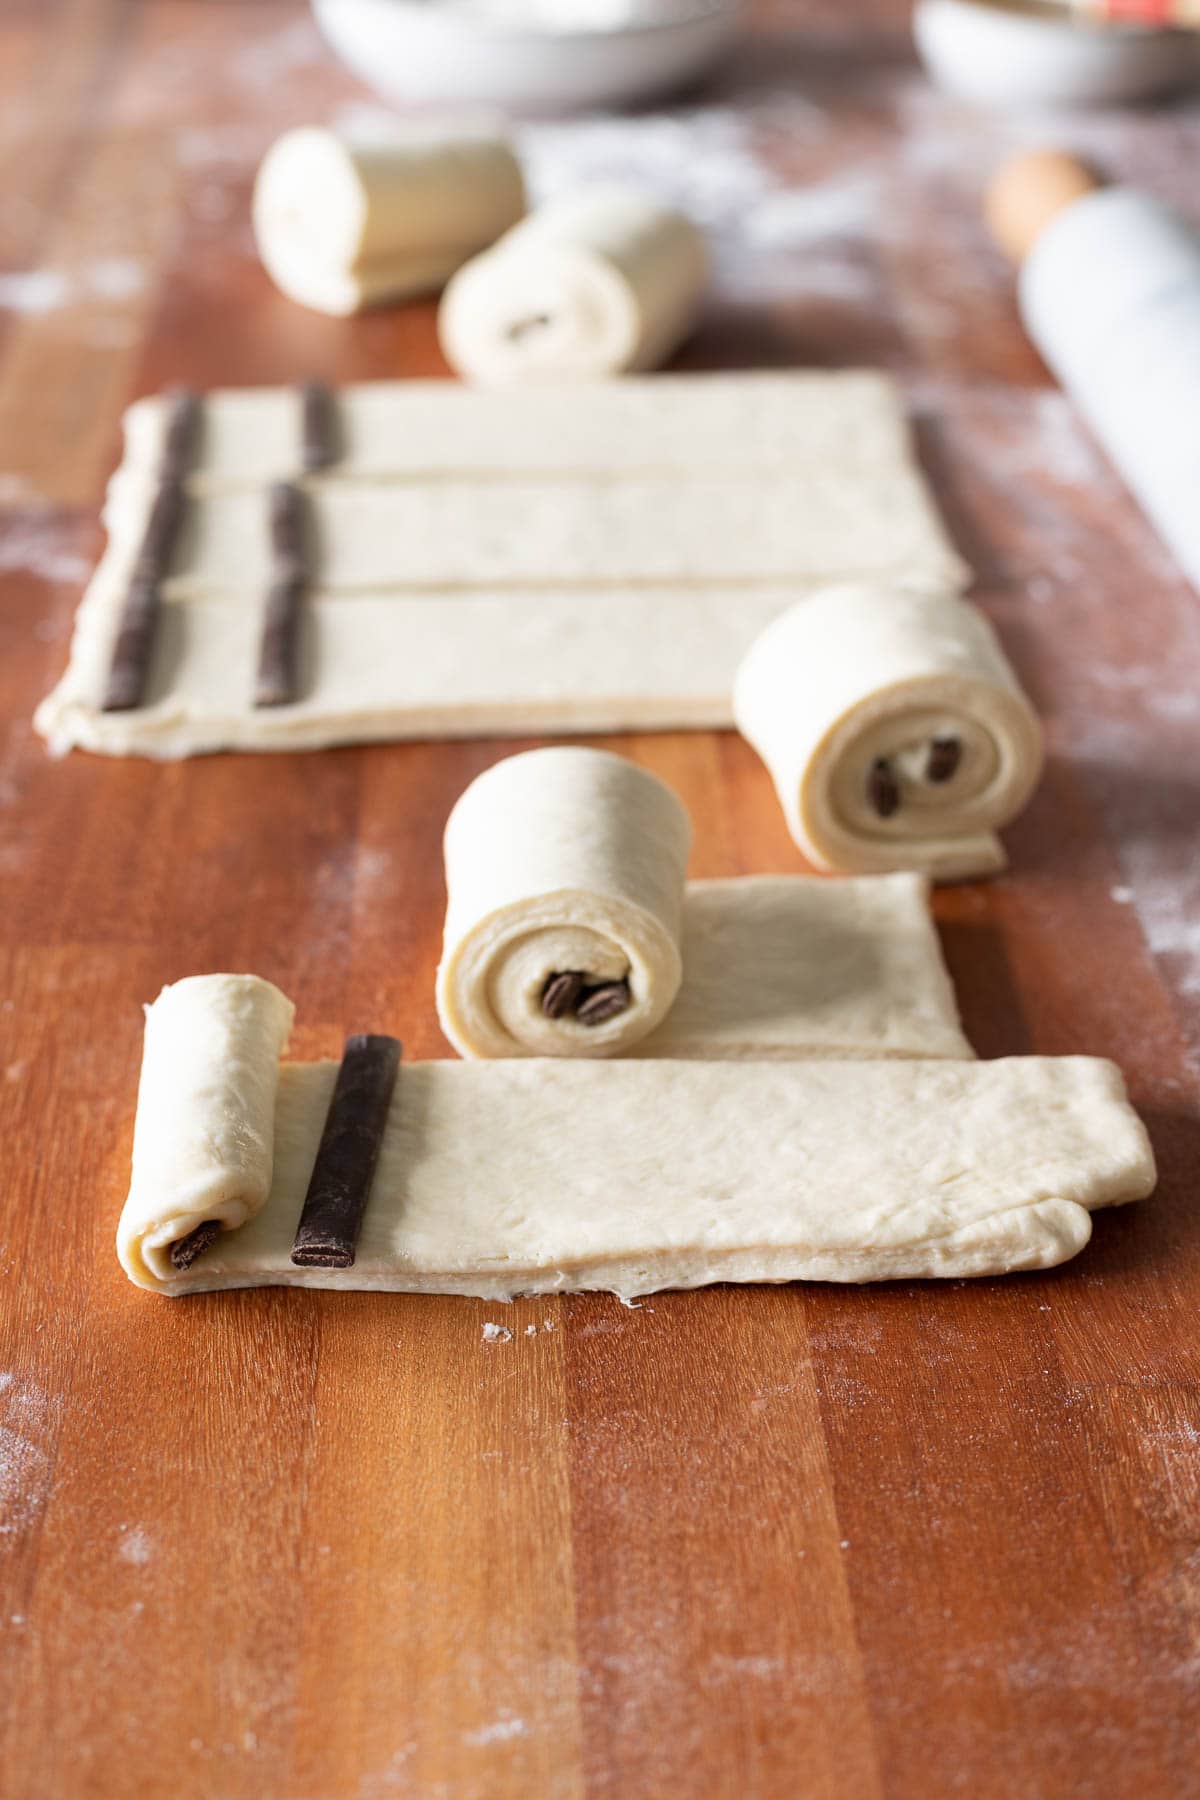
As you can see, I spaced the chocolate batons far enough apart to allow for one roll, then another roll on top. Roll up the rest of the croissant like a jelly roll to create so many beautiful layers!!
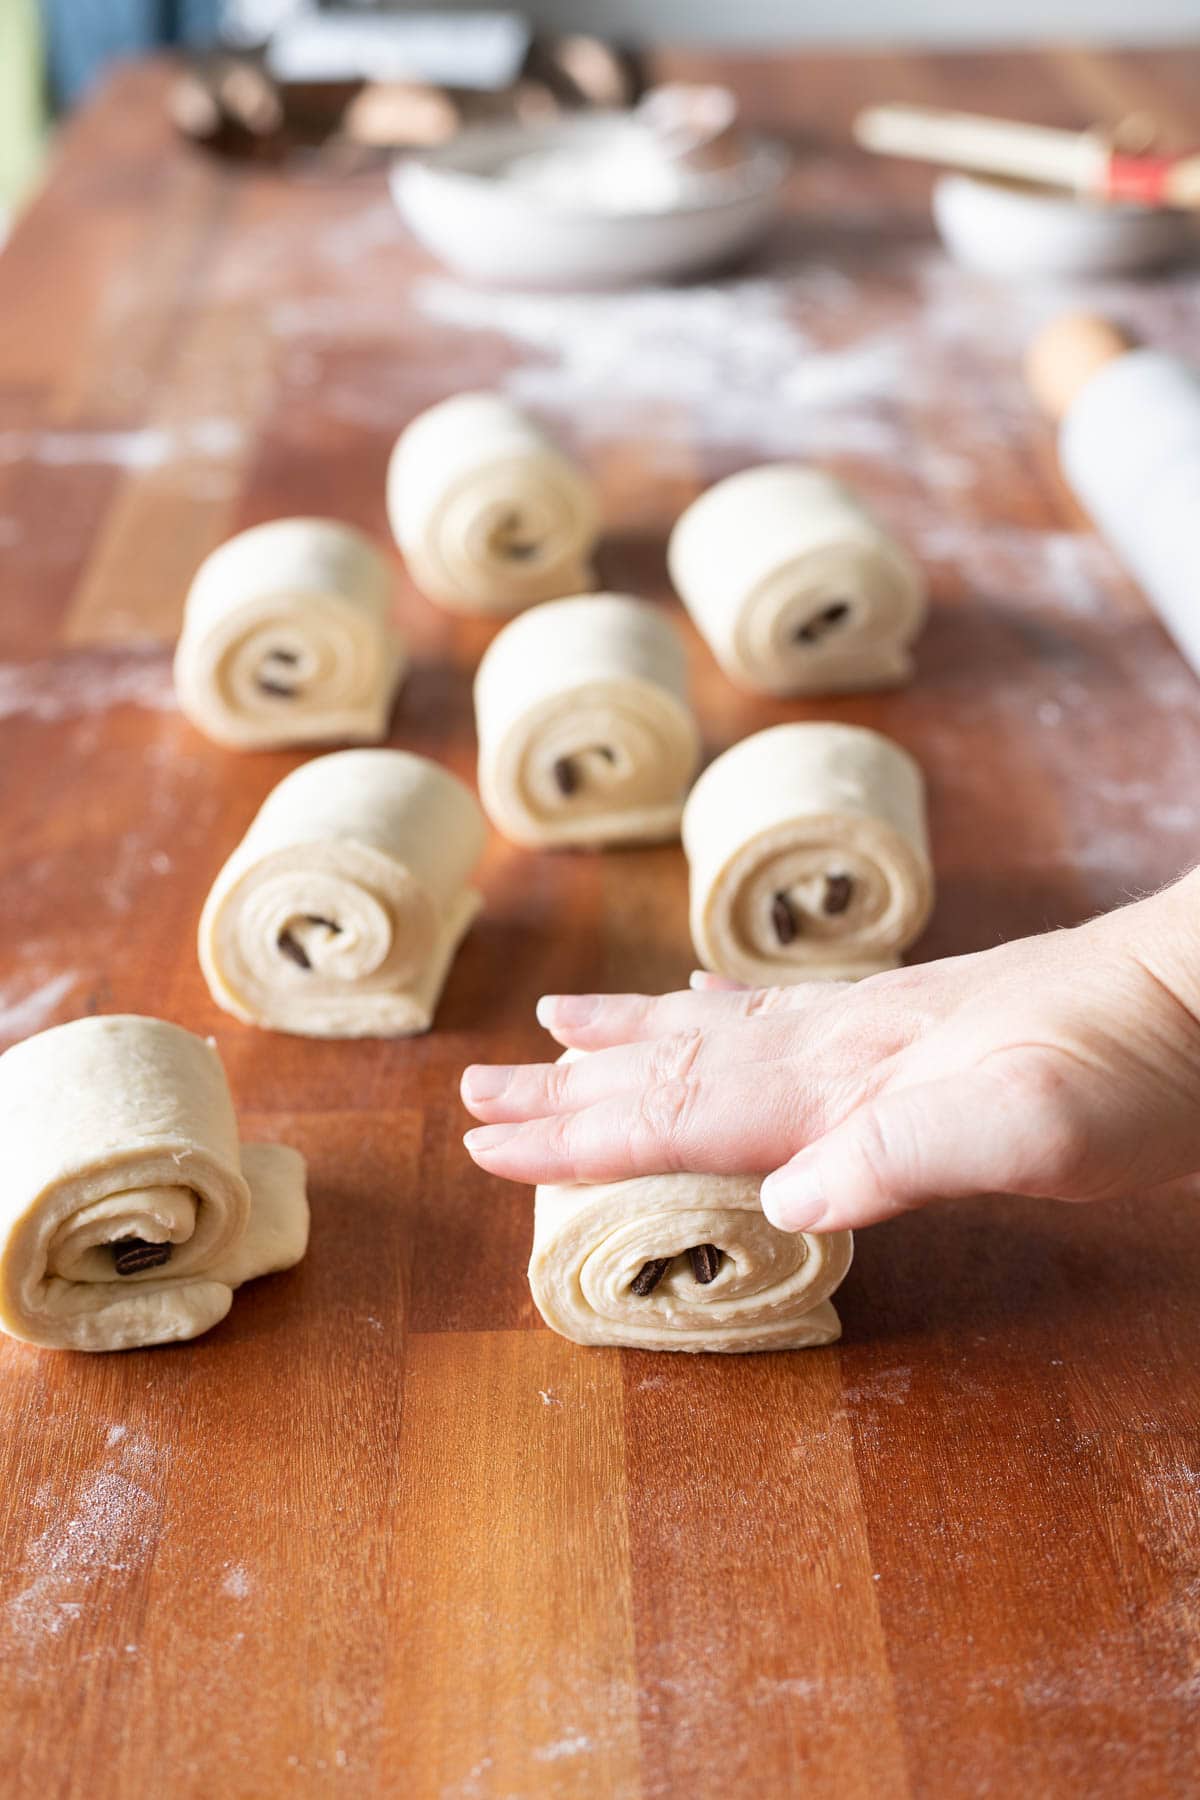
Place them on a parchment-lined baking sheet and press down firmly with your hand to help seal the croissants. Sometimes the croissants unroll a bit as they expand in the oven if they have been over proofed. Sealing them helps reduce this. If you over-proof them and they unroll in the oven, there is not much you can do. Just let them finish baking, they will still be flaky and OH-SO-GOOD.
Egg wash only the tops, cover with plastic wrap and place on top of the oven to proof. If you started rolling out traditional croissants first, they will get a head start on proofing and will be ready to bake first.
Before you begin proofing them, they croissants will need to be covered with plastic wrap and popped back in the fridge for 20-30 more minutes to ensure they chill again. I’ve found that this helps reduce the amount of butter that oozes out of the croissants while baking if they are chilled before baking.
As I stated earlier, turn on your oven when you are shaping your croissants so the oven is nice and warm. On top of the stove is the perfect place to proof them, and it should take about 45 minutes to 1 hour tops!
If you find that there is a hot spot on top of your stove where the heat is escaping, make sure to move the sheet pan away from it as it can over-proof the croissant where the heat is hitting it.
Your croissants are proofed sufficiently when you press the surface of the dough gently with your finger and it springs back.
THEY WILL NOT DOUBLE IN SIZE, but increase around 30%. They will rise even more in the oven.
BAKING CROISSANTS IN A HOME OVEN
The best way to bake croissants in a home oven is to place the racks at the second lowest position and second highest position. You start by baking them on the lowest rack for 10-15 minutes.
This will help the bottom of the croissants get some nice color and texture. Then place them on the top rack to finish baking. The great thing about this process is that once you transfer the pan from the bottom to the top rack, you can add the next sheet pan to the bottom rack to start baking. This method ensures that your next batch of croissants won’t over-proof.
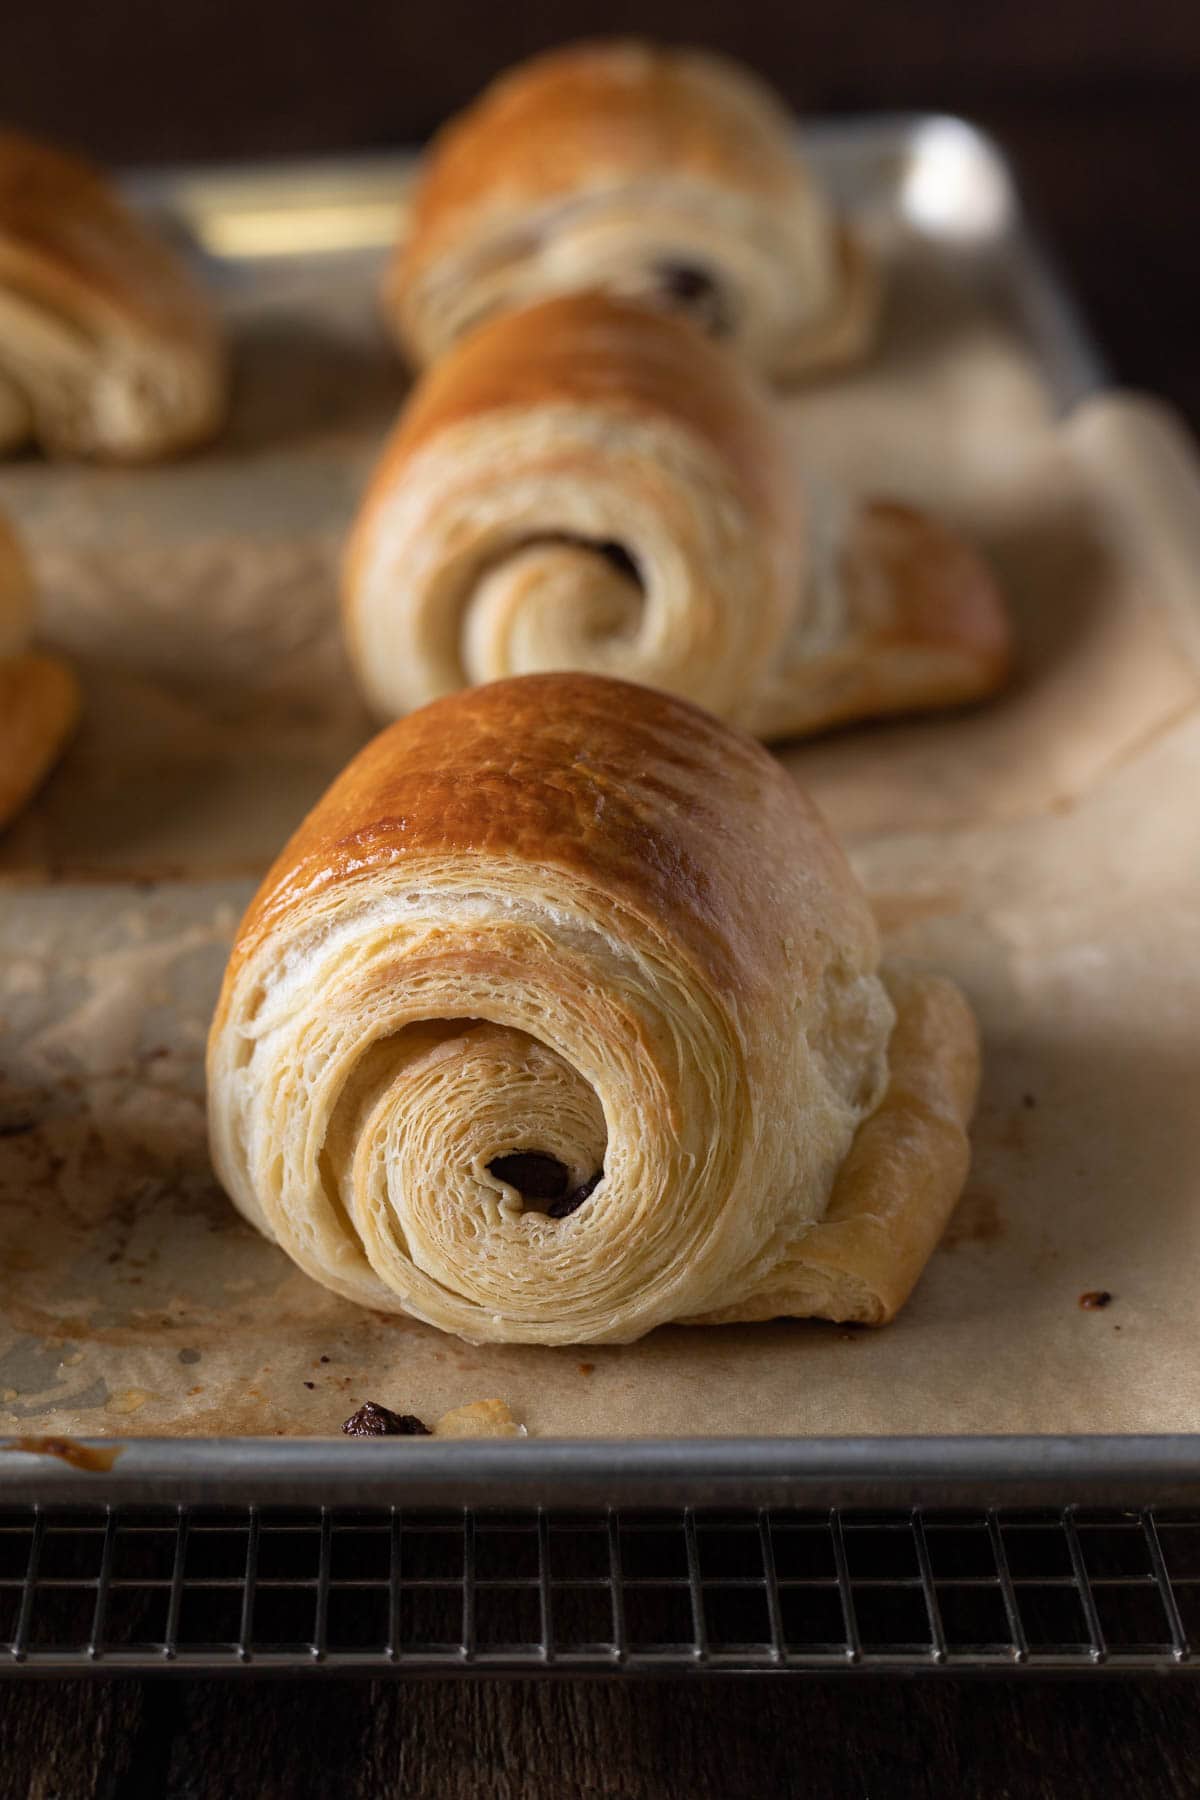
When the tops of the croissants get a DEEP GOLDEN color, they are fully baked. To ensure they are cooked in the center, you may want to sacrifice one of the oddly shaped croissants and cut into the middle. Just let them rest for a few minutes before checking as they will continue baking when you take them out of the oven.
If the center is underdone, put them back in the oven for 1-2 more minutes and inhale the croissant that you just cut into!!
Place them on a cooling rack, and once they have cooled enough to pick up, take them off the sheet pan and put directly on the rack. You want air circulation under the croissants to keep them from getting soggy on the bottom.
The chocolate croissants take a few more minutes to bake because they are bigger. You want a deep golden color on top otherwise they will be raw in the middle if you don’t let them get that color.
How to make croissants in advance, reheat, preserve, and store (important!)
To prepare croissants in advance, simply make the batch from start to finish. Once your croissants have cooled completely and you have eaten almost the entire batch yourself in one sitting (please don’t!), you can wrap them up really well individually in plastic wrap and place them in the freezer. They will keep for at least one month in the freezer.
DO NOT PUT THEM IN THE FRIDGE!
You can keep some on the counter in plastic wrap if they will be eaten in 24 hours or less. Once they have been wrapped in plastic wrap, they will lose their flaky texture.
But no worries! To get that flaky, crunchy texture back, simply pop them in a 350 degree oven for 3-5 minutes or until the top is flaky when you press on it.
SET A TIMER and stand guard because you don’t want to burn your croissants! DO NOT…. I repeat, DO NOT MICROWAVE CROISSANTS TO REHEAT.
You will ruin the flakiness of the texture. Sure they will be buttery and soft, but it completely defeats the purpose of spending all that time rolling out the dough and folding. A croissant is not a croissant if it isn’t flaky.
If you are reheating them from the freezer, let them thaw a bit on the counter for about 10 minutes. Then pop them in the oven 8-10 minutes to reheat and get flaky. Sometimes the center is still cold if you don’t let them thaw a little first.
Whew, ok I’m finished, I promise. I know this was a looooong post, but it’s so important to see what happens every step of the way, otherwise you might not bother to bake croissants. If you want to be a baking superstar in your family and community, then take the time to bake these croissants! I hope this post has inspired you to give them a shot. I promise, after ONE bite, you will know why you put forth the effort!
YES, YOU CAN DO THIS! ENROLL IN THE VIDEO COURSE HERE
Bon Appetit Ya’ll,
Leslie O.
Click here to Pin this recipe on Pinterest!
French Croissants | Chocolate Croissants (40 step-by-step photos)
Ingredients
- 2 cups plus 1 Tbsp. Bread Flour 10.6 oz. or 300 grams
- 2 cups plus 1 Tbsp. All Purpose Flour 10.6 oz or 300 grams
- 3/4 cup plus 2 tsp. Milk whole or 2% (6.55 oz. or 186 grams)
- 1/2 cup plus 3 Tbsp. Cold Water 5.55 oz. or 156 grams
- 2 tsp Salt 0.45 oz. or 13 grams
- 2 tsp Active Dry Yeast or Dry Instant Yeast (see note in instructions) (0.30 oz. or 8 grams)
- 2 tsp Honey 0.65 oz or 18 grams
- 4 Tbsp Cold Unsalted Butter to mix in the dough in the beginning, 2.10 oz. or 60 grams
Butter for the Butter Book
- 2 sticks plus 6 Tbsp. Butter 11.10 oz. or 310 grams
For the Egg Wash
- 1 whole egg
- 2 egg yolks
- 1 Tbsp heavy cream
- pinch of salt
For the Chocolate Croissants
- chocolate batons or dark chocolate bars cut into sticks
Instructions
Mixing the Dough
- If you are using active dry yeast, warm the milk and add the yeast to help activate it for a few minutes. When it's bubbly, it's ready to add to the dough. If you are using dry instant yeast, skip this step, keep the milk cold, and add the yeast straight in with the other ingredients.
- In a 5 qt. stand mixer, mix the flour and salt together (if using dry instant yeast, add it at this point). Add the honey to the milk and stir. Add the milk and honey mixture, the cold water and the small amount of butter.
- Mix on the lowest speed for about 3 minutes until the ingredients all come together. Turn off the mixer and place the dough on a floured surface. Have a small pile of flour to dip your hands in while kneading the dough.
- Knead the dough for a few minutes until it's nice and smooth. Don't dump flour on top of the dough while kneading, rather keep your hands floured as well as the surface under the dough. This will keep you from folding too much flour inside the dough. The butter might ooze out, but just keep kneading. If it starts sticking to the surface, use a scraper to scrape the dough up and add it back to the ball of dough.
- When it's smooth, place the dough back in the mixing bowl and cover with plastic wrap. Set a timer and let it ferment for 30 minutes at room temperature. Place it in the fridge overnight for 8-12 hours.
For the Butter Book or "Beurrage"
- While the dough is fermenting at room temperature, make the butter book. Let the butter warm a bit at room temperature. With a large sheet of plastic wrap, place the butter in the center of the plastic wrap. Overlap the parchment paper over the butter to cover. Fold in the edges to seal as well. You want it to measure to 7 1/2 x 10 1/2 inches.
- Take a rolling pin and gently pound out the butter to help it flatten out and spread. Gently roll it out so that it's smooth and fills in the entire 7 1/2 x 10 1/2 inch region, making sure it doesn't ooze out of the sides. If the parchment paper crack while rolling, simply cover it with plastic wrap before putting it in the fridge. Place it in the fridge overnight.
Folding the Butter into the Dough
- 8-12 hours later take the dough and the butter book out of the fridge. Place the dough bottom side up on a floured surface and pat it out with your fingers. Roll it out to shape of a rectangle. With the width of the rectangle facing you, place the butter book perpendicular to the dough (see photos for example). Fold the sides of the dough over the butter so that the dough ends meet perfectly in the middle without overlapping. If the dough isn't the right size, remove the butter, and roll out a bit more until it's the perfect fit.
- Squeeze the edges together to seal the dough. Press the ends of the dough on both sides with your fingers to seal as well (see photos for example). Cover with plastic wrap and place in the fridge for 15-30 minutes until nice and cold.
Three Folds For Flaky Layers
- Remove the dough from the fridge and remove the plastic wrap. Place on a well floured surface. Roll out in the direction of the lines of the book on top of the dough. Roll it out to about 24 inches long and a couple of inches wider. While you are rolling out the dough, occasionally run your hands underneath the dough to keep it from sticking. If the butter breaks, the dough is too cold. Stop rolling for a few minutes until it warms a bit. If the dough tears or butter oozes out, the dough is too warm. Immediately wrap the dough in plastic and place back in the fridge until it's nice and cold, about 15-20 minutes. When the dough is about 24 inches long, wipe off any excess flour, then fold one end toward the center, then the other end over the top of that. It will look like a book. Make sure the lines all line up perfectly. See photos for example. Put one indention with your finger on the top of the dough to show that you have completed one fold. Cover with plastic wrap and place in the fridge for 30 minutes.
- The dough needs to rest for 30 minutes in the fridge so that it's cold and the gluten gets a chance to relax.
- Remove from the fridge, take off the plastic wrap and place on a floured surface again. Roll out to about 24 inches long and a couple of inches wider. Watch for tears, the butter oozing, or breaking. Stop rolling if it's too cold and let warm a bit, or cover and place back in the fridge if too warm. Once it's rolled out, wipe off excess flour and fold again like a book. Put two indentions in the top of the dough to symbolize two folds, cover and place in the fridge for 30 more minutes.
- I don't recommend trying to speed up the process of rolling out the dough by placing it in the freezer in between folds. Yes, it will get nice and cold, but the gluten still needs to relax in between folds too, otherwise it will be tough to roll out and the dough will get overworked. If butter is oozing out but the gluten is relaxed, you can place it in the freezer for no more than 10 minutes. Any more and the butter might get too cold and will break when rolling! You will know if the gluten is not relaxed if if the dough continually springs back when you are rolling it out.
- Roll out for a third fold the exact same way as the previous two folds. The third fold can often be when you start to get tears or the butter oozes out because it's been manipulated a lot, so be patient and stop rolling if need be.
- Wrap again and place in the fridge for 30 minutes.
- While the dough is resting, make the egg wash by whisking together the whole egg, egg yolks, heavy cream, and salt. Cover and place in the fridge until ready to use. Line two sheet pans with parchment paper.
Shaping, Proofing, and Baking Croissants
- Remove the dough from the fridge and remove the plastic wrap. Place on a floured surface. Roll out to 25-27 inches long and a couple of inches wider than it is shaped, occasionally running your hands underneath the dough with flour to help lift the dough and keep from sticking. Again, watch for tears, and the butter oozing out. Turn the dough over and roll out on the other side as well.
- If you want to make half traditional croissants, and half chocolate croissants, take a ruler and cut down the center so you have 12-13 inches on each side. Otherwise I recommend making two separate batches.
- Cover one side with plastic wrap and place in the fridge while you are shaping the other side. Or if you are making one batch the same shape just have the plastic wrap handy in case it needs to be covered.
- With a knife, cut the croissants into triangles 3 inches wide at the bottom by 8 1/2 inches high. Every other croissant will be facing downward (see photos).
- In the middle of the base of the croissants, cut a small slit to allow for fanning out while shaping. Stretch each croissant with your hand and roll into a crescent shape and press down to seal. Place on a parchment-lined sheet pan and egg wash the surface of the croissants. Don't egg wash the layers. Cover with plastic wrap and proof on the stove top with the oven turned on to 350 degrees. This will help to warm the area while proofing. They should take 45 minutes to 1 hour tops.
- To shape the chocolate croissants, line the chocolate sticks up (almost touching) width-wise. You will use two sticks per croissant. Cut the croissants 3 1/2 inches wide by 8 inches high. Roll them like a jelly roll (see photos) and press down to seal. Place them on a parchment-lined sheet pan and egg wash only the surface (not the sides). Put them back in the fridge to chill one more time before baking for 20-30 minutes. This will help reduce too much butter oozing out of the croissants while baking.
- Once chilled cover with plastic wrap and proof on top of the stove for 45 minutes to 1 hour tops. The croissants are done proofing when you gently press the surface and it springs back. Whichever sheet pan started proofing first will be the first to bake.
- In a 350 degree oven, place the racks at the second position from the bottom and the second position from the top. Place the first pan of croissants on the bottom rack and bake for 10 minutes, this will help the bottoms of the croissants get some color. Move them to the top rack to finish baking for about 20-25 minutes or until they are a deep golden brown.
- If the second sheet pan is done proofing, you can place it on the bottom rack to start baking while the other pan bakes on top. Transfer them to the top rack after 10 minutes or when the top pan is baked.
- Place the sheet pans on a cooling rack. When the croissants have cooled a bit, take them off the sheet pan and put directly on the cooling rack.
Preserving the Croissants
- Wrap them individually in plastic wrap and place any croissants in the freezer that won't be eaten in 24 hours or less. DO NOT KEEP CROISSANTS IN THE FRIDGE, it will dry them out!
Reheating the Croissants
- DO NOT MICROWAVE CROISSANTS, you will ruin the flaky texture and they won't re-crisp. Rather, remove them from the freezer and thaw for about 10 minutes. Preheat the oven to 350 degrees. Bake for 5-8 minutes or until warm and crisp.









Bessie – this post is AWESOME! I’ve never even thought to make my own croissants but your post, photos and great instructions are inspiring. Thank you for all the effort in putting this together!!
Thank you so much Ahu!! It was a lot of fun taking pictures of buttery, flaky dough all day. Hope you get to try the recipe, you WON’T regret it!
This is phenomenal, Bessie. Inspired enough I might brave the croissant! With all the steps & pictures it seems foolproof!
Thank you Sarah. Definitely give these glorious croissants a try!
Hi Leslie, I would like to make croissants using your recipe, but I would like to fill them with white chocolate or pistachio cream, so when you bite into it you get a lot of nice creamy filling. Would you recommend to fill them after baking? Maybe with piping needle? I’m dreaming of croissants I ate when I was a kid, with runny creamy chocolate inside 😍
Hi Magdalena, thanks for the question. The fillings sound incredible! Using a piping needle should work great to fill the croissants after they have baked and completely cooled. You can also cut a sliver in the middle of the croissant width-wise (in the front of the croissant) and pipe some filling in there.
Traditionally, an almond croissant for instance would be made by baking the croissants, cooling completely, then cutting the croissant in half width-wise like a sandwich, filling them with almond pastry cream, putting the top of the croissant back on, and piping more almond cream on the top of the croissant, topping with sliced almonds, then baking again for a few minutes until the pastry cream set. OMG these are SO GOOD! Almond croissants can certainly be filled after baking and cooling, but not baked a second time too and they are wonderful.
As long as your filling is cooked and cooled, you can fill your croissants once the croissants are cooled and enjoy them like that. Oh the wonderful options for fillings!! I’ve been wanting to do a post with guides for ways to fill them. I think you’ve just inspired a new blog post!!
Thank you for such a quick reply! I will try to make them maybe next weekend 🥰 chocolate and pistachio flavour (now I have to decide should I make mascarpone and whipped cream filling or mix pistachio paste in white chocolate ganache 🤔). Can’t wait!
Also big thank you for a great guide! You explained the process so well!
Hi Leslie, I just finished baking your croissants and I have to say this is the best recipe I have followed in my life! The proportions for the dough are perfect, I didn’t have to add any more flour or liquids. The dough wasn’t sticky and it wasn’t hard, it was pure pleasure to work with! I just tried one croissant with my boyfriend and the taste is amazing! I’m just waiting for them to cool down so I can fill them ( I’ve decided to go for white chocolate and advocate ganache, pistachio and white chocolate ganache + whipped cream with pistachios , milk chocolate ganache ) I’ve added some crushed pistachios with butter and sugar on top of the dough triangle and rolled it so it can be fully pistachio flavoured Croissant! Thank you so much for making it so easy!
Oh wow this is so wonderful to hear!! I’m in love with the fillings combos your chose, they all sound absolutely divine!! Save me one, I’m coming over 🙂
They look delicious. Chocolate Croissants sounds like a treat, thanks a lot
Thanks Keith! Yes chocolate croissants, nuf said…mmmmmm.
love your croissant tutorial. so easy to follow and they look great.
Thank you Thalia!
Absolutely fantastic job! I have been wanting to make croissant’s for a long time and I will definitely be following this tutorial. Thank you so much for all of the hard work that you put into this post! 🙂
Making croissants can seem a little daunting. I hope you get to try these. Let me know if you have any questions about the process, I’d be happy to help!
Beyond amazing! Seriously, the flakiness of those croissants! I can’t wait to try these and pretend I’m in France! Thanks so much for sharing and inspiring!!!
Thank you for the kind words Becca! Yes I play pretend too when I eat these croissants.
This is such a beautiful recipe post!! Next time I run into someone whose wondering how to make the perfect croissant, I am sending them here!!
Thank you Andrea! I really appreciate readers spreading the word about these croissants. Have a great day!
Woooow!!!! This is by far the BEST post about croissants I have seen ever in my life! Very, very big thumbs up Bessie!
Awww shucks, thank you so much Lorena! Croissants are very photogenic for sure.
You might make some of us bakers!
Awesome Barbara! My intention with this post is to make baking croissants a reachable goal. You will feel like a rock star baker if you make these!
Oh my, I’m now hungry! I’ll have to look for a time when I have two days in which to try this recipe. Because that’s now a necessity! Thanks for the info and the wonderful detail.
You’re welcome Jennifer! After you make these croissants, I’m pretty positive they will be something you will make time for. Let me know how they turn out if you make them.
Thanks for this awesome post.Buttery flaky pastry and chocolate looks so decadent!
I want to give these croissants a try too.
Totally give these croissants a try!
I have been struggling now for weeks with my croissants. I came across your post and I believe the detail here is what I need to be successful. I am going to try again. This is the best set of instructions I have found so far.
Yes please keep trying Tonya!! They can be very tricky to make, and I have made every mistake possible, so that’s why I included so many photos. Otherwise, most people wouldn’t even attempt them. Let me know if you have any questions or need to troubleshoot. I would love to hear how they turn out if you make this recipe. The amount of yeast in the dough is best for making it by hand because they can over-proof.
Hi. I wanted to write back to you to let you know that the croissants I made using your recipe and instructions were the best I have ever made and I have no need for further research. I surprised myself but I know it is the detail you provided. I did use Vermont Cremert butter and I mixed half King Arthur bread flour wife half King Arthur all purpose flour.
FANTASTIC Tonya and a BIG THUMBS UP!!! I’m so happy to hear you tried this recipe and it worked for you. Yes it takes some practice making croissants, but you just need to know what to look for when making them. Vermont Creamery butter is excellent and the mix of the two flours sounds like an wonderful blend. You can give yourself a big pat on the back for making croissants like a pro! Thanks for letting me know how they turned out.
Hi! I’m planning on tackling this recipe for a Thanksgiving Day brunch/dinner in replace of a normal dinner roll. I have quite a large guest list, (around 3-4 batches), and I was wondering if this dough holds up in the fridge well if I make it a day or two in advance? Thank you for such a beautifully detailed post!
Oh awesome Naya! Sorry for the delayed response. I have been out of town for a few days and had no internet access! I wouldn’t recommend keeping the dough in the fridge because once you make the dough, it will continue to ferment. It will completely fall apart once you bake it if you try to keep it in the fridge for too long. Once you start the process, you really should complete it without delay. Also I don’t recommend baking them and keeping them in the fridge either to preserve them, as it will dry them out. The only way I recommend making them in advance is to complete the entire process, bake them, let them cool to room temperature, and wrap each croissant individually in plastic wrap. Place them in the FREEZER only. This will preserve them, perfectly. When you are ready to serve them, take them out of the freezer and let thaw for a couple of hours.
Just before serving, reheat them in a 350 degree oven until they are crisp, about 5-8 minutes. Try not to cover them once they are out of the oven as they will get soggy and lose their crisp texture. I will also say that these will be QUITE filling as dinner rolls, so you could actually make them a bit smaller instead. I would recommend that when you are going to roll them out to shape them into croissants, roll the dough out to only 5-6 inches in width, then roll them out length-wise about 26-30 inches. This way you will get more croissants out of one batch, and they will be smaller. Another option would be to serve even the traditional croissants for dessert, and serve with jams or chocolate hazelnut spreads (just a thought).
I can’t wait to hear how they turn out, and please don’t hesitate to let me know if you have any more questions before baking! Also, my croissant course on Skillshare is really helpful to watch if you are interested, in that you can really see the texture of the dough and how it rolls out. Thanks so much and check in anytime with questions 🙂
Thank you! This actually would work better for the occasion and I love the dessert idea. It sounds divine!
Hi Bessie. It’s Tonya. I decided to make the croissants again and this time o had some trouble. I ran across the Skillshare video and utilized it. I am worried that I may have over worked the dough this time using my stand mixer. Even on the first rollout the dough was very very difficult to roll out. I refrigerated many times per instructions but noticed that my dough was much puffier than yours and much more difficult to roll out. I think they will be ok as I am just getting them into the oven but wanted to know what you think I did wrong.
Have you ever baked a chocolate hazlenut spread into the croissants? Someone has requested these and I’m not sure if starting with a spread will just be a mess in the end.
I’m sure it would work, but as you said, it will be a bit messier. Because the chocolate hazelnut spread is already melted, the croissants might not rise as easily in the center. The chocolate batons (chocolate croissant sticks) have the perfect melting point for croissants.
What you could actually do instead is bake croissants with their traditional crescent shape all the way through. Let them cool completely, and cut them in half lengthwise (like you were making a sandwich out of them). Fill the interior of one side with the chocolate hazelnut spread, then top it with the other half. Bake them at 350 for a few minutes until the chocolate spread is melted and lovely. Then serve!
To ensure this works, bake one croissant using this technique to see how they turn out. You’ll just have the horrible job of taste-testing this luscious croissant, HA!
This type of technique is used for croissants with different fillings like almond croissants with almond cream filling inside. Let me know if you try them this way!
Of course, you can always just have the chocolate hazelnut spread on the side to serve with the croissants. Best of luck!
Thanks for the tip! I’m baking them this weekend and I will let you know how they turn out. I like the idea of baking them all the same way anyway, makes this at least one step simpler!
Hi Bessie. I made these croissants again and had some trouble. This time I utilized the Skillshare video and I tried to duplicate the dough consistency of yours prior to fermentation. I kneaded it by hand for about 4 minutes after mixing in my Kitchenaid. I found that even before the first fold the dough was very hard to roll out. It got worse as I worked with it. I was able to complete the croissants and I think they will be fine but I definitely saw my dough was nothing like yours. What do you think I did wrong? It seems I may have overworked it but surprised that even after additional multiple testing periods in refrigerator it didn’t improve.
Thank you for the response and letting me know about your experience! Ok, so this is the tricky thing about bread and pastries that is hard explain in a recipe without confusing the reader. Although baking is about “precise” measurements, sometimes the water content needs to be adjusted based on the temperature, humidity, etc. I know where I live it is dry as a bone outside with very low humidity, and we desperately need rain. This can affect your dough in that your flour might have the tendency to absorb more liquid, requiring just a bit more liquid to the final dough. Typically in the colder months you might need to add a touch more liquid to get the consistency you want. This is something that you can only really know once you are working with the dough.
Chances are, if you mixed it for 2-3 minutes in your stand mixer and kneaded by hand for 4 minutes, you didn’t overwork the dough. Because there is some butter in the dough, it will be stickier and the gluten develops at a slower rate the more fat that is in the dough. What brand of flour did you use, may I ask? King Arthur Flour is extremely accurate with the percentage of protein they have in each of their flours, because the amount of protein affects baking so much. I can’t really speak to other companies being as accurate with their protein content in bread flour. Also the dough might have been a pit “puffier” because your house or your fridge might have been a little warmer.
Opening and closing the fridge when making croissants can really raise the temperature, causing fermentation to happen faster. Also, the final proofing time sometimes needs to be adjusted depending on how fast they are proofing. How did the final croissants turn out? I used to have problems with my croissants unraveling in the oven, because my process went a bit slower and they would easily over proof because I put them in the oven a little late. Thanks for the update!
I think the count is wrong on number of layers. When placing the book you end up with 3 layers. The first fold doubles that to 6. The second fold again doubles that to 12. Finally the third fold doubles to 24. Ifim wrong please tell me how you came to 163.
Great question Sam! Actually, once the croissants bake, the heat separates the layers and that’s how you get 163 layers.
With the beurrage encased in dough, you have 2 layers of dough. Each time you fold the dough, you multiply that by 3. So, after 3 folds, you have 2×27=54 layers. Then you roll the croissant into another 3 layers for 54×3=162 layers of flaky dough.
Wow! This is indeed a work with passion and labor of love. I never really have the patience for bread making but you gave me an inspiration to try it and learn to love it eventually. Thank you for this beautiful post.
Thank you Sam for the kind comment! Yes, making bread and croissants can actually be a wonderful process. Croissants are a really fun project that are totally worth every second. Working with the dough is therapeutic. I hope you dive in!
Hi Bessie!
Thank you for the great and clear instructions!
My chocolate croissants turned out beautiful and flakey and golden…. BUT a lot of butter melted out when I was proofing them on the oven and even moreso when cooking in the oven. Maybe the top of my oven runs too hot for proofing? I think I also maybe underproofed them because I panicked and put them into the oven when I saw the butter running out when they were proofing. The chocolate I used also melted out considerably! I think this may have been from using too large chunks of chocolate or meltier chocolate (I used some organic dark (85%) chocolate bars from my grocery store, cut into strips).
Any advice appreciated! 🙂 Next time I will look for sticks/batons and not proof on my hot oven and see how it goes.
Thank you for sharing your experience Chelsea, this is great insight! The butter melting out while proofing is a common problem and something that happened to me a lot in the beginning. I thought that it was proofing at too hot a temperature, but professional bakeries who use a proofing box set the temperature around 80 degrees Fahrenheit with humidity for proofing croissants. The butter melting out actually has more to do with the temperature your dough was at the time you shaped it. When you are first starting out, it might take you a bit longer to roll it out and shape until you get the hang of the sizes. If the dough has warmed up from you rolling and manipulating it, the butter has already softened quite a bit and can ooze out while proofing, and even more while baking.
Now, it’s totally normal for a little bit of butter to ooze out while baking, as I’ve never made a batch that didn’t at least somewhat. To prevent the butter from oozing out while proofing, try keeping the temperature of your house around 68 degrees (or at least your kitchen) while you are doing all three of your folds. If it’s cold out, open a window close by where you are rolling it keep the room cool. When you get to rolling it out to shape, keep checking the surface and make sure it’s cool to the touch. If it’s warmer than that, stop, place on a sheet pan, cover and pop it in the fridge for 10-15 minutes to chill. If you have gotten to the point of actually cutting the croissants and you haven’t rolled them up and they have warmed up, you can also chill the flat pieces (covered with plastic wrap on a sheet pan) for about 15-20 minutes too. Once they are shaped, if your kitchen is still cold, but they are on top of the stove with the oven turned on, they might take a little bit longer to proof, but that’s ok.
As for the chocolate, yes the chocolate batons work so much better, but the strips of a chocolate bar at least do the job. If you use a bar, it’s going to melt a bit more than the baton because it’s not as thick. Best of luck on your next croissant-making session, and thank you for sharing your experience. This will be very helpful for others reading this!
thanks for this very detailed accurate recipe. For many years I had the experience of so many different methods of preparation. always something was going wrong.
The joy of working and the end result certainly worth the effort! would love to share photos taken with u and show u its an effort worth taking.
Thank you Sigalit for sharing your experience. I agree, the joy is definitely as much in the process as it is in the result! I need to figure out a way to share the photos of everyone who has made these croissants. I’ll see if I can put something together and I’ll get back to you.
Thank you!
Hello,
I have just made these and am loving them. Previously I’ve made less time intensive varieties of croissants but as they did not allow the gluten to relax I ended up with chewier, denser pastries than this recipe yielded. Thank you for taking the time to put so much helpful detail in one place!
This is SO wonderful to hear Carly! Yes it’s true, the extra time for long fermentation makes a WORLD of difference with croissants. There are some recipes that try to rush the process, but perfection in a croissant takes love and patience. Thank you for sharing your experience here and feel free to tag me on Instagram or Facebook if you have an account and share photos. On IG I’m bessie.bakes, on Facebook you can tag @Bessiebakes!
My family took a trip to France in June and have been dreaming of those wonderful croissants since we got back. I decided to make your recipe yesterday. It seemed daunting at first but wasn’t bad after I read through it a couple of times before I started. It made my day when my teens eyes lit up when they bit into them saying they tasted just as good as the ones in France! I thought they were a little salty. Do you think they would be good with unsalted butter? Thank you so much for your detailed instructions and pics. I never imagined I would be able to make authentic french croissants.
OH MY GOODNESS, this is the highest compliment ever!! And yes, it IS possible to enjoy REAL French croissants at home, so I’m so glad to hear you made them at home (and with love) yourself. Kuddos to you for making your family so happy! That’s an excellent point about the butter. It should be unsalted butter, so thank you for asking, as I will add that the notes for the recipe. I hope you have a wonderful day, you sure made mine!
This is the best presentation of a recipe I have ever read 😀 So awesome.
I just have a question that I hope you can help with.
So I live in Denmark, and almost everything we make in a oven is done with the air turned on inside the oven. Hope this makes sense to you, since I don’t know what it’s called in English.
Do you bake yours with this air on, or is it of? And do you know how it will affect the croissants when this air is on, since I don’t have a specific function without the air, like you have in your ovens. 🙂 Some recipes says that the oven should be on lower, I think) temperature to make up for the difference.
Hope it makes sense, and that you can help me.
Hello Pernille! Thank you for the kind comment and your question makes perfect sense. In the states it’s called a convection oven and many home ovens have this feature, however some models are not consistent in how the convection fan blows inside the oven, so I don’t like to recommend using it. In your case, it’s probably fine, as ideally you want to bake croissants in a convection oven as this helps the croissant to rise and bakes it nicely.
However, I’m not exactly sure how much you would need to reduce the heat by, as your oven may bake differently than mine. The conversion for 350 degrees fahrenheit to celsius is about 176 degrees. You may want to drop the temperature by 5-10 degrees, but I can’t guarantee the temperature difference. If you notice that your croissants are baked on the outside but still raw in the center, you can reduce the oven to about 121 degrees celsius so they bake much more slowly for a few more minutes so they set on the inside.
When you pull them out of the oven, let them sit for at least 10-15 minutes as they will continue to bake in the center before you check them. I hope this helps and please let me know how your croissants turn out if you make them!
Thanks for the quick reply 🙂
That sound like a really good plan, and perfect with the solution, in case they are raw on the inside when I take them out.
I have read your recipe again and have two other questions that I hope you have time to answer :).
1. When you buy butte for this recipe, is it with or without salt? Many recipes differs in this area, and butter without salt is not that used here :). If you bake without salt, have you then ever tried to make them with butter with salt in it?
2. You place the croissants on the stove, above the oven for 45 to 1 hour before putting them into the oven. My oven is built in and therefore this is not possible for me 🙁 But I’m not sure if it is enough to just place them at room temperature (about 21 degrees)? Or maybe you have another solution here?
Again thank you so much for this recipe 🙂
Definitely use butter without salt as this will make your croissants too salty. Using salt in the dough is extremely important as it not only flavors the dough, but helps to control fermentation too. If it was only present in the butter, the dough would ferment out of control and your croissants would collapse in the oven most likely. This is true for all bread and pastries. So salt has a few different purposes in bread and pastries!
As for your oven being a wall unit, don’t worry about it. If you can, while the croissants are proofing try turning up the heat in your home by a few degrees or use a small space heater in the kitchen to warm the area. However, while you are rolling out the dough and doing the folds, you want your kitchen cold, so only adjust the heat during the final proof. If you can’t adjust the temperature you can place the croissants next to a sunny window, or you can turn on your oven and crack the door open a bit to warm your kitchen.
If all else fails, it will just take a little longer to proof your croissants, so don’t worry.
okay, yeah don’t want the croissants to be to salty, not after all that work.
So I’m gonna start my hunt for butter without salt, hasn’t been easy so far to find some, but somebody must have it 🙂
Good advice about opening the oven :). I also thought that maybe more time might help, I at least know what sign I should look after 🙂
I weighed out all my ingredients and had a pretty dry dough. It was so hard to roll out the next day I added some water and kneaded it in. In the end, my croissants were very dense. It looks like this recipe uses almost twice as much flour as other recipes for comparable liquid and yeast ratios. Is 600 grams (total combined) correct?
P.S. I read your comment incorrectly, and edited my first response to better answer your question.
I’m so sorry to hear that the dough didn’t turn out well for you! Yes, the recipe is correct. It’s an authentic recipe from France. 600 grams total of flour and 342 grams of milk and water total. With the small amount of butter added to the dough, it should be soft and the butter will ooze out somewhat while kneading until the dough comes together and is kneaded sufficiently. I just made croissants for Christmas so I know the recipe is correct.
It’s so cold and dry outside (at least where I live) that it could have been why the dough turned out dry. When this happens, flour absorbs more liquid, requiring some extra liquid. Did you knead it by hand completely or in a mixer? With the extra liquid you added, it may have required a bit more kneading by hand to bring the dough together. If you knead it completely in a stand mixer, the dough has a tendency to be tougher because those machines overwork the dough. That’s why I recommend starting it in the mixer, but finishing by hand. Not saying this was the case for you, but thought this might be a potential issue.
The problem came about by trying to add liquid to the dough after it had already fermented. If you ever need to add extra liquid to the dough, you should always add it while you are bringing it together, not after it’s fermented because the gluten structure has already formed and it will mess up the structure of the dough. The dough should have been soft and the 4 Tbsp. of butter should have been incorporated into the dough without it oozing out. Because this was your first time making the dough, I’m sure it was hard to know exactly what the dough should look and feel like once it’s been mixed.
Last question. Was the butter in the dough oozing out at all while you were kneading it? This should have happened and would have hydrated the dough. Once the butter is incorporated, the gluten can start to form.
When I can get around to it, I’ll create a downloadable document that is for troubleshooting croissants, so if you run into any problems, you may be able to fix them.
Thank you for giving feedback and I hope you’ll give croissants another shot someday! I must have tried making them 15-20 times before I finally felt comfortable. I know how frustrating it can be to spend money on ingredients and take all that time to make croissant dough, and they not turn out right. I hope this didn’t ruin your holiday. If you are up to responding, I’ll do my best to see if I can help figure out what went wrong.
Sincerely,
Leslie
My butter was def not oozing out while kneading. Although I should admit that I only bought enough unsalted butter for the book and used salted butter in the dough and skipped the added salt. In the end, I could have used more salt for flavor. Would this affect the dough texture though?
I mixed in my stand mixer on low for a couple minutes just to get it started, then by hand. Even at this point, it was hard to knead but it hadn’t rested yet so I thought nothing of it. I should have watched a video to see how soft the dough should have been because I did that later and saw it’s very soft, very sticky. Mine was very firm and dry like pasta dough before needs to be for cutting. I’ll definitely try again, I’ve already promised my failed batches to friends and family. I was just so shocked because I have never met a recipe I couldn’t master right away. Humbling indeed…!
Yes, croissants are VERY humbling! It sounds like it just needed a touch more liquid added while kneading the dough. The best thing to do next time is to mix it in the mixer until it starts to come together, but the butter will be still coming out a bit in the mixer. Then knead by hand for several minutes. It might have been that it needed more kneading time by hand too.
Salt is very important to any bread or pastry dough. The problem with salted butter is that the ratio of salt isn’t the same in the butter as it would have been in the dough. The recipe is really precise and if you change something, it will dramatically affect the dough. Salt not only helps add flavor, but it also controls fermentation. Without enough salt, the dough can ferment out of control.
If you want, let me know in advance next time you make them so you can send me a photo of how the dough turns out before it starts to ferment.
Thank you so much for the great instructions. I only had one real problem…I think I either over proofed or under proofed. I got a little nervous and decided to put them in the over because they sprung back and were getting quit puffy and the saran wrap was pulling on the dough. Anyway, they came out with beautiful flaky layers but several of them split on the top and they were huge…but still delicious. Also, I have one more question. When I cut my dough to shape it I only got 4 chocolate ones from one 12 inch side. Did I do something wrong. From beginning to end the dough rolled perfectly and the consistency was beautiful. I rolled it to a 24 by 81/2 and used the chocolate batons which are 3 inches each. Did you roll your dough longer once you cut it in half? Anyway, I appreciate the recipe, photos and detailed explanations. Thanks in advance for your response and any help!!
This is so great to hear!! It sounds like you did a wonderful job. I’ve definitely had croissants split at the top when baked. It may have over proofed by 10-15 minutes. The proofing time can be tricky because you really have to go by the look and not the time. It’s better that they over proof just slightly than under because at least they are light and airy that way.
As far as getting only 4 chocolate croissants out of half of the dough, what likely happened is that the dough sprung back after you cut it, making the dough a bit shorter. This has definitely happened to me too because the gluten has been worked a lot by the shaping process, so if it springs back, it just means the gluten isn’t quite relaxed and needs to rest in the fridge a bit so you can roll it out one or two more inches and make it “hold” that length. It must have been a bit of a disappointment getting two less croissants than expected!!
If you haven’t signed up for the video course, the next time you make them it would definitely help watching the videos to make your next batch even better!! Croissant mastery is always a work in progress…a delightful process 🙂
Thank you so much for this amazing recipe! This was my first attempt and by no means did they turn out perfect, but they are still delicious. I definitely over proofed them (all of the butter leaked out) and my dough was not cold enough before I shaped them. I am really happy with how they turned out, all things considered, and I look forward to trying them again when I have the time. Thanks again for making this recipe feel accessible!!
Thank you so much for sharing your experience!! The butter leaking out has definitely happened to me several times before, but the next time you make them, you might be able to shape them even faster which should keep your dough cold. You can also keep the dough in the fridge for 15-20 minutes longer before you roll it out to shape them to make sure the dough is cold.
You can also keep the temperature in your house to around 68 degrees F while you’re doing the folds and rolling it out to shape them.
Made ur recipe today and let me tell you.. they came out great! The entire family devoured the first batch within minutes! If anyone is perturbed by the time spent making these, don’t be! It’s not hard at all, it’s mostly waiting and the recipe itself is pretty easy. Totally worth it!
Thank you so much for sharing your experience!! Yes, we get to reap delicious rewards when we are patient with croissants. Happy New Year and may many croissants be in your future 🙂
I made these a couple weeks ago and they were sooooo good! I’ve been struggling to make a good croissant and this was so helpful! Have you made almond croissants with this dough? Any tips if you have?
Oh that’s so wonderful to hear Christa! I’m glad this tutorial helped you make authentic croissants. I don’t have an almond croissant tutorial yet, but I’ve had several requests for one so I’ll be working on a new post in the next month.
For almond croissants, there are a couple of ways you can prepare them. The first way is to make them is to make an almond pastry cream, bake them fully (without the cream), cool, then fill, then rebake until the filling gets a bit of color on it. Or the easier way is to bake and completely cool your croissants, then pipe them in the center and serve.
These tips may not be as helpful as step-by-step instructions with photos so I’ll be working on that post as soon as I can! What other fillings would you like to learn how to make?
The recipe looks great! I want to give it a try, but I don’t have a stand mixer… Maybe this is a silly question, but would there be any change to the process if I were to knead it by hand?
It’s not a silly question at all! I would recommend mixing the ingredients in a large bowl with a wooden spoon, making sure the milk is cold. I say use a wooden spoon at first because if you mix with your hands you will have a large amount of dough stuck to your fingers, and you want that dough in the bowl. Resist the urge to keep adding flour if it’s wet at first, as it will come together the more you knead it.
It will definitely take more time to knead this way, but if you can be patient with the process, it will be worth it. Stir the dough together with the wooden spoon until it becomes hard to stir, then switch to your hands. Start kneading in the bowl for a few minutes and fold the edges toward the center over and over again. Periodically scrape the dough off of your hands with a bench scraper. You will definitely want to have a plastic or metal bench scraper for kneading the dough.
Once the dough starts to become more of a ball, you can then switch to kneading on your counter. Don’t add flour under the dough on your counter, but rather dip your hands in flour off to the side periodically if it’s too sticky. Folding too much excess flour inside the dough will throw off the moisture and change the crumb texture.
The butter will ooze out of the dough before the gluten has formed, but just keep kneading.
I would highly recommend purchasing the croissant video course (it’s only $12), especially for the kneading portion because I do more than half of it by hand anyway. This way you can see what the dough looks like in the different stages. Plus it’s invaluable to see it in video form for the rolling, shaping, proofing, and baking portion. The videos are separated by the different stages of making croissants, so you aren’t having to watch one long boring video. You can easily go back and re-watch a certain section while you’re making them too so you can follow along and really be successful making them.
Let me know if you have any other questions!
Hey, i also don’t have a mixer and I always kneed the dough by hand! This recipe is perfect, so it’s super easy to work with the dough by hand 🙂
Oh fantastic! Thank you for sharing your experience about kneading the dough by hand. Have a great day!
Hi! I wanted to try this recipe last night but then i got a bit confused, why is it that you have 2x 300g of flour in the recipe(1 bread and 1 all purpose). Is the recipe 600g of flour or just exactly what it says? Thanks!
Yes, the two flours (AP and bread flour) are combined at 300 grams each for a total of 600 grams to provide the right amount of gluten to create a structure in the dough that’s not too light and not too dense. All-purpose has less protein than bread flour. The protein content in bread flour is a tad high for light and airy croissants but it will help with the structure. So combining the two flours will give you just the balance for a nice structure.
Following the techniques for folding and laminating the butter in the dough will result in a great texture too! I would highly recommend purchasing the video course as it helps to see each step in video form. You can also watch it while you’re making the croissants to ensure your technique is right on. Let me know how they turn out!!
If I were to use only all purpose flour, would the recipe still turn out? Due to the shortage of flour, it’s tricky! Thanks so much
Yes I totally understand! I think ti will be just fine to use only all purpose flour. Please let me know how they turn out when you make them. Thank you!
Amazing! This was my first time making croissants and they came out great! The directions and pictures made the recipe very easy to follow and understand. I will use this as my go to recipe. My son says they taste just like the ones we had in Paris! So buttery and flakey.
Ahhh this is such a wonderful review, that means SO much! I’m so glad to hear you had success with the recipe and that you’ll be able to come back to this recipe again and again.
I made these yesterday and while I made a few rookie mistakes along the way they came out pretty good. The pictures and detailed step by step was intensely helpful. I’ll start by saying I have never made anything pastry before. Not even our dough…. The thing I can’t resolve is while these cooked nicely they kind of shrank up. I can’t decide if I proofed them too much or too little. A lot of butter melted out, which make me think it was too much (too warm). Or maybe too little so not enough time to relax the gluten? I wish I could leave a picture. They still tasted great and made a nice flake. Just not looking like yours or typical. Any insight?
Hello Dawn, thank you for letting me know how your croissants turned out! As for the issues with the butter melting out, I’ve had this happen many times over years and what I find is that it has more to do with the dough being too warm when you rolled it out and shaped it. By the time you get to the final rolling and shaping, the dough has been worked with and needs a little extra time in the fridge to chill before rolling and shaping. This may mean 30 minutes or a little longer if you’re fridge has warmed up by opening and closing it often throughout the process.
The faster you roll it out, the cooler the dough and butter will stay during shaping. I find if the dough gets too warm while rolling it out, it starts to soften too much and can ooze out of the dough. This also increases how much butter oozes out when you bake it. I know it sounds like fermenting at a warm temperature would cause this, but I find if the dough is sufficiently chilled by the time it’s shaped, less butter runs out while baking.
I always have a little butter ooze out while baking, but not too much. The best way to keep it chilled during the final rolling and shaping is to roll it out and feel if it’s still cool. If the dough is starting to tear or get warm, stop, cover with plastic wrap on a sheet pan and place back in fridge for 15-20 minutes. Or if it starts to warm up by the time you’ve cut them, place the unshaped triangles back on a sheet pan, cover with plastic wrap, and place in fridge for 15-20 minutes to chill before rolling them into crescent shapes.
Best of luck on making these again!
Hi, I have used this recipe and your method several times, each time with excellent results! Thank you for posting. I have a few questions that I get caught up on each time. The size of the finished dough is 24×8.5. You split in half to make half chocolate and half regular, so you have 2 pieces at 12 x 8.5. If you are cutting the chocolate croissants at 3.5 inches, the math gives you just over 3 croissants. Should I be rolling the dough out again to make the 12″ piece a 24″ piece, such that in the end I am cutting based on 2 24″ pieces? I probably missed it somewhere in the instructions, but some clarity here would be helpful.
I’m glad you’ve made them so many times! You are correct in that if you cut the down the middle from 24 inches long you won’t get that many chocolate croissants. Because traditional croissants are shaped like the Eiffel Tower (a tall V) you’re able to cut more of them in the same amount of space. You can slice the dough down the middle and roll the dough out just a little bit more, but not more than 16 inches because it may be too thin. Just make sure the dough isn’t springing back so that the gluten is relaxed. If it’s springing back, cover the dough and place in the fridge for 15 minutes.
Hi! I’m excited to make these and Wondering if it would work to do all the steps through the 3 times folding and then refrigerate over night and in the morning roll out and shape and bake? Would the dough need to sit at room temp before rolling so not too cold?
Hello Kari, great question! So when I first started making croissants I followed a croissant recipe this way 3-4 times but every time I would run into the same problems the next morning while rolling it out. I found it difficult to roll out when then entire piece of dough had fermented in the fridge with the butter inside it. Without fail, the butter would be super cold and the dough would warm up quickly while rolling it out, but the butter would break because it was too cold. Even when I tried putting it on the counter to warm up, I would still have the same problem. The dough would warm faster than the butter.
Also it was harder to roll out in general. This is because the fermentation will allow the gluten to develop and cause the dough to become more elastic, so rolling the dough before that develops will cause issues. If you are wanting to make the croissants in advance so you don’t have to get up super early the morning of, I prefer making them from start to finish, cooling them completely, then wrapping in plastic wrap. They will stay fresh for 24 hours at room temp wrapped in plastic. I’m actually making my croissant dough tomorrow evening, then will finish them Christmas Eve morning, then I’ll reheat them in the oven on Christmas morning. They crisp up perfectly this way.
If you want to make them further in advance, simply freeze them after you bake. Just cool, and wrap them, then freeze. Thaw overnight at room temp, then reheat in the oven in the morning. Either of these options will make the croissants taste really really fresh and you won’t be sacrificing that perfect hot-out-of-the-oven freshness!
I hope it goes well and feel free to ask any questions if you have any!
Made this recipe , your instructions are super helpful and so detailed , best step by step instructions I’ve had to follow .
The process is long but so worth it and gratifying at the end .
The recipe is a keeper , mine didn’t turn out as pretty as yours , they came out maybe a little too big . And my chocolate croissants ended up looking like danishes 😬 cause I didn’t flatten them enough so they rolled over and cooked like a danish . But still came out tasting great . For a first timer , I’m quite proud . It’s all thanks to your pictures and instructions .
That’s wonderful to hear Nellie! Thank you for sharing your experience.
I am happy to have found this tutorial and hope to try it soon however I’m looking to make chocolate dough, not filled with chocolate. Can you advise on what I should add and if there anything I would need to adjust if adding cocoa powder? Thank you!
Hell Robin! I’ve never tried to make croissants with cocoa powder but I imagine you would want to replace a bit of the flour with the cocoa powder. Since I assume you won’t need much cocoa powder, I don’t think subbing some of the flour for cocoa would cause any issues. Best of luck!
What a wonderfully informative post, I can’t wait to try. When using your stand mixer to make the dough are you using the dough hook or paddle attachment?
Thank you! I use the dough hook for the mixer. Best of luck, I hope they turn out well!
I have attempted to make puff pastry in the past, but it has never really worked. After I came across this recipe with all of the wonderful comments and reveiws, I thought I would try again. I am happy to report that my chocolate croissants turned out perfect thanks to the great detail and photos provided with your recipe! My friends and family very much enjoyed them. Would definitely recommend this recipe to anyone looking to make delicious croissants.
Oh wow thank you so much for your feedback! I’m so glad to hear the croissants were a success. Thank you for sharing!
Hi, thanks so much for posting the recipe. I’ve made them three times and they are mostly coming out pretty good. I found some Strauss butter with 85% fat content that made a little difference.
The only problem I’m having is they seem to be getting overdone on the bottom. The last batch I only had on the bottom rack for a few minutes before moving to the top rack and the bottom layers are getting crusty instead of flaky. I wondered if you have any words of wisdom. I can follow a recipe pretty well but I’m not that good at trouble shooting. 🙂
Thanks for your help!
Thank you for the question! It sounds like your oven might run a little hot. You could bake them at a slightly lower temperature (around 325 degrees), it will just take a little longer and you can bake them on the middle rack only. Because it would be baking only in the middle rack, you can only bake one tray at a time. Since one batch makes two sheet pans worth of croissants, you would want to make sure that the second batch you bake doesn’t get over-proofed since it will be proofing for an extra 30 minutes or more while the first batch is baking.
So I would keep the second batch covered in the fridge for 30 minutes longer to slow down the proofing while the first batch is starting to proof. You can have them already shaped and apply the first egg wash, then cover, then pop in the fridge. Then you can take it out after the extra cooling time and proof at room temp so that’s it’s ready when the first batch comes out of the oven. Hope that helps! Let me know if you have any other questions. Happy baking!
Thank you!
Hi there! Wanting to give these a try, but I have a set of double ovens separate from my stove, so how would I go about proofing them? Also, sadly, I do not have a stand mixer. Would this recipe be okay all by hand, or I should really have a stand mixer for the beginning? Thank you!
Hi there! I would just proof them in the warmest spot in your kitchen, or if it’s a sunny day you can place the tray next to a sunny window (keeping them covered of course). Depending on how warm certain areas of your kitchen or house are, just keep an eye on them. And yes, you can definitely make the dough by hand, it just gets a little messy at first. I would highly recommend signing up for my Skillshare croissant-making video course as I show kneading the dough by hand. This way you can see what the texture will look like while you’re kneading it.
At first you’ll need to mix all the ingredients together in large bowl until they are mixed enough so that you can knead the dough by hand on the counter. Then you’ll want to have a bench scraper handy to scrape up the butter that will stick to the counter while kneading. You can scrape and fold back into the dough. By hand will take 7-10 minutes longer since the butter causes the dough to take longer for a gluten structure to develop. I don’t recommend adding extra flour to your work surface since this might cause your dough to dry out. Just use the bench scraper to scrape up the dough from the counter as you’re working. And you can knead until the butter is absorbed into the dough and it’s soft. The video will show the exact texture you’re looking for. Hope that helps!
Here is the link to my Skillshare croissant video course if you want to join:
https://skl.sh/2lyDVZr
I’ve always wanted to try my hand at making croissants, but just never stopped long enough to actually do it. Then I saw your post and short video. That’s it, I’m gonna do it! Just pulled them out of the oven … oh my gosh! They are heaven! Not quite France heaven, but for me, close enough! Thank you so much for the VERY detailed post and instructions!
Oh my goodness, I’m so glad you gave them a chance! It takes a few times to work out the temperature of the dough, rolling it out and keeping it soft, proofing, etc. I hope you enjoy them! Please feel free to ask any questions about the process.
Hello Bessie!
I have finally tried your recipe, after two weeks of reading and studying it thoroughly, and it has worked WONDERS! This was my first time ever trying to make proper croissants, and I swear I was jumping wih joy like a little kid when I rolled my first successfull croissant, and then again when I took them out the oven and took my first bite 😀
This is not a recipe, this is a guide to making actual edible gold!
I really did my best to follow all your steps to the T, be very precise with measurements, and I’m happy and surprised to say that I didn’t have any issues with the dough tearing up or butter oozing out, but I was so damn careful and it paid off, just like you said 🙂
This page is going permanently to my bookmarks, and I’m going to make your croissants as often as I can 🙂
Now it’s just the matter of finding the best butter to get that perfect flavour, and I can’t wait to see how my next batch turns out 🙂
from the current batch, only happy memories are left – they’re all gone 😀
THANK YOU a ton for your incredible step-by-step recipe!
Much love, take care <3
WOW, this comment means SO MUCH Ana! Thank you for taking the time to make the recipe and letting me know how it turned out. You made my day!
You are AMAZING and KIND! Thank you for the recipe. I appreciate much! I will try your Authentic French Croissant Recipe soon.
Do you know if I can prep these and freeze the uncooked croissant before baking them? Or is better to bake them and then pull them out of the freezer to reheat? I made these a few years ago, and they were absolutely delicious, I had to hunt down the recipe again. Thank you!